Do you have a question about the Reolink Keen Ranger PT and is the answer not in the manual?
Instructions for activating your SIM card before inserting it into the camera.
Step-by-step guide for inserting the SIM card into the camera.
Process for connecting the camera to the cellular network and verifying the connection.
Common problems and solutions for SIM card recognition and network connectivity.
Guide to configuring the camera's initial settings using the Reolink mobile application.
Instructions for securely mounting the camera unit onto a wall surface.
Guide for attaching the camera to a tree or pole using the provided loop strap.
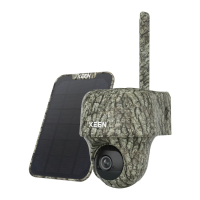
The Keen Ranger PT is a sophisticated trail camera designed for hunters and wildlife observers, offering high performance and a range of advanced features. This pan-tilt trail camera provides a 360-degree view, allowing users to cover more areas than traditional cameras. Its angle can be manually adjusted via a dedicated app, enabling precise control over the viewing area.
The camera's primary function is to capture footage and images of wildlife, making it an ideal tool for monitoring animal activity. It is equipped with a speaker, 940nm IR LEDs for night vision, a status LED, a built-in PIR sensor for motion detection, a built-in microphone, a lens, and a daylight sensor. These components work together to provide comprehensive surveillance capabilities.
For connectivity, the Keen Ranger PT includes an antenna, a Micro USB port, a power switch, a reset hole, a Nano SIM card slot, and a Micro SD card slot. The device relies on a SIM card for mobile carrier network connectivity, supporting WCDMA and FDD LTE. Users must activate their SIM card on a smartphone or with their network carrier before inserting it into the camera. It's important to note that some SIM cards may have a PIN code that needs to be disabled first using a smartphone. The camera does not support IoT or M2M SIM cards when inserted into a smartphone.
To install the SIM card, the camera lens must be rotated, and the rubber cover removed. The SIM card is then inserted into its slot, ensuring the gold contacts face down and the trimmed corner is pushed inside the camera. The SD card slot is located below the SIM card slot, and when inserting an SD card, the gold contacts should face up. After insertion, the rubber cover must be firmly pressed back for waterproof performance.
Once the SIM card is in place, the camera can be turned on using the power switch. A red LED will illuminate solidly for a few seconds before turning off. Subsequently, a blue LED will flash for a few seconds and then go solid, accompanied by a voice prompt "Network connection succeeded," indicating successful network connection.
The status light provides important feedback on the camera's operational status. If the camera connects to the network successfully, the status LED will not light up during idle mode. A solid red LED that then flashes indicates that the camera cannot recognize the SIM card or that the SIM card has a PIN code. If the red LED is solid and then flashes slowly about once every second, it means the camera cannot register with the mobile carrier network. A red LED that flashes quickly about three times in one second signifies a data call failure or a requirement to input the APN. If the red LED is solid, then a blue LED starts to flash and goes off completely, it indicates a network connection failure. Finally, if the red LED is solid, then a blue LED starts to flash and goes solid, it means the network connection has succeeded.
Troubleshooting steps are provided for common issues. If the "SIM card cannot be recognized" voice prompt is heard, users should check if the SIM card is facing the reverse direction or if it is fully inserted. If the "The SIM card is locked with a PIN. Please disable it" prompt appears, the SIM card needs to be put into a mobile phone to disable the PIN. If the camera is "Not registered on network," users should verify if their SIM card is activated, check the signal strength, and ensure they are using the correct camera version. For "Network connection failed," the camera will enter standby mode and attempt to reconnect later. If "Data call failed" is prompted, users should confirm their cellular data plan is available or import the correct APN settings.
Setting up the camera on the Reolink App involves several steps. First, users tap the "+" icon in the top right corner to add the camera. Next, they scan the QR code on the back of the camera or manually enter the 16-digit UID number. After that, they create a login password and name their camera. The app then prompts users to select a scene (indoor or outdoor) for installation. Finally, users read a note and tap "Finish" to complete the camera's initialization.
For installation, the camera offers flexibility for different environments. For outdoor use, it is recommended to install the camera upside down to ensure better waterproof performance and optimize the PIR motion sensor's efficiency. The ideal installation height is 2-3 meters (7-10 ft) above the ground to maximize the detection range of the PIR motion sensor. For better motion detection, the camera should be installed angularly.
The physical installation process involves several steps. First, the cover is placed on the camera, ensuring the hole aligns with the antenna post and charging port. Then, the top of the cover is opened, and the camera is secured with a hexagonal screw. Finally, the antenna is installed onto the camera.
For mounting, the camera can be attached to a wall using the provided mounting hole template and security mount. Drywall anchors are included if needed. Alternatively, the camera can be installed with a loop strap by threading the strap through the bracket and fastening it to a tree.
Maintenance features include the status light indicators for quick diagnostics of connectivity issues. The camera is designed to be battery-powered, and to conserve battery life, it is not intended for 24/7 continuous recording. It wakes up only when motion events are triggered or when accessed via the client or app. Proper installation, especially regarding the PIR motion sensor, helps reduce false alarms and save battery power. The camera should avoid frequently moving objects, strong light, strong signal interference, heat sources, and mirrors to ensure optimal performance and battery efficiency.
| Type | IP security camera |
|---|---|
| Day/night mode | Yes |
| Placement supported | Outdoor |
| Connectivity technology | Wireless |
| Built-in HDD | No |
| Compatible memory cards | MicroSD (TransFlash) |
| Maximum memory card size | 128 GB |
| Pan range | 0 - 355 ° |
| Tilt angle range | 0 - 140 ° |
| Total megapixels | 4 MP |
| Maximum resolution | 2560 x 1440 pixels |
| Video formats supported | H.265 |
| DC output current | 2 A |
| DC output voltage | 5 |
| Power source type | Battery, Solar |
| Wi-Fi | - |
| 4G standard | LTE-FDD |
| 3G standards | WCDMA |
| Mobile network generation | 4G |
| LED type | IR |
| Infra-red wavelength | 940 nm |
| Night vision distance | 10 m |
| Number of illumination LEDs | 12 |
| Audio system | 2-way |
| Number of cameras | 1 |
| Sensor type | CMOS |
| Optical sensor size | 1/3 \ |
| Digital zoom | 16 x |
| Alert notification type | E-mail, Push notification |
| Operating temperature (T-T) | -10 - 55 °C |
| Form factor | Dome |
| Mounting type | Wall/Pole |
| Product color | Camouflage |
| International Protection (IP) code | IP64 |
| Width | 98 mm |
|---|---|
| Height | 112 mm |
| Weight | 485 g |