EasyManua.ls Logo

Retrospec LENOX - User Manual

Retrospec LENOX
5 pages
Print Icon
To Next Page IconTo Next Page
Loading...
MAIN PARTS: HARDWARE:
A: 2 x 1 ¼” length x 8mm hex head bolts with 2 lock washers
(to secure Hitch Tongue to Main Support Hub)
B: 1 x 2” length x 6mm hex head Flush-Mount Bolt (for 2” Adapter)
C: 1 x 3 ½” half-thread Anti-Rattle Hitch Bolt with lock washer + Hairpin Cotter Pin
D: 1 x 2-Hole Anti-Rattle Threaded Plug (for Hitch Tongue to Main Support Hub)
E: 1 x 1-Hole Anti-Rattle Threaded Plug (for Hitch Bolt into Vehicle Receiver)
F: 1 x 6mm hex wrench
G: 1 x 8mm hex wrench
A: 1 x Main Support Hub with 1 – Main Center Mast (vertical) factory installed
(with 3 Push Pins – leash-attached)
B: 2 x Wheel Tray Support Beams (horizontal)
C: 4 x Wheel Trays with 4 rubber straps
D: 1 x Hitch Tongue 1 ¼”
E: 2 x Ratcheting Lock-Down Hooks (1- long, 1-short)
F: 1 x 2” Receiver Adapter
LENOX TRAY HITCH RACK
ASSEMBLY INSTRUCTIONS
WARNING & CAUTION
Improperly installed rack or bikes can fall onto roadway
potentially causing a serious accident resulting in bodily
injury. Do not use rack on any vehicle where the rack cannot
be properly and safely installed. Max weight: 2 bike rack =
80lbs / 36kgs. Do not exceed.
Only install rack on vehicles with a 1 ¼” (Class II) or 2” (Class III) receiver hitches.
Never use on trailers, RV’s, hitch adapters, or front of vehicle.
Bikes must be secured to the rack using the trays, supplied tie-downs and additional straps if
necessary (not supplied).
Check regularly during use that all bicycles remain secured and all bolts and pins are tight
and secured.
Bicycle tires should not be placed directly in front of an exhaust pipe. Tires can melt.
Not safe for Tandem Bikes, Recumbent Bikes, Motorized Bikes, or other non-standard bikes.
Do not block tail-lights or other car lights with bikes.
Drive carefully. Drive slowly over bumps. Do not Drive off-road.
Be aware that the rear of the vehicle is much longer when the rack is installed and needs
additional clearance when moving in reverse.
Do not use the rack if any parts are missing. Contact Retrospec for replacement parts.
Bikes should never extend beyond side of vehicle.
Stow carry arms or remove rack when not in use.
Never mount the rack on the front of a vehicle. Mounting the rack on the front of a vehicle can
obstruct the headlights, directional lamps, and your forward visibility creating an unsafe
driving condition.
This rack is only intended to be installed on a vehicle with a receiver hitch that is attached to
the vehicle’s frame.
STEP 1: UNPACKING CONTENTS
1 – Unpack the contents of your bike carrier and lay the parts out on a flat surface (Fig. 1).
ASSEMBLY INSTRUCTIONS * PLEASE READ INSTRUCTIONS ENTIRELY BEFORE BEGINNING ASSEMBLY *
Fig. 1
A B C D E F
A
D
B
E
C
F G
Question and Answer IconNeed help?

Do you have a question about the Retrospec LENOX and is the answer not in the manual?

Summary

Warning and Caution

Unpacking Instructions and Parts

Main Parts Identification

Lists the primary components of the tray rack system.

Hardware Identification

Lists all fasteners and small parts needed for assembly.

Step 1: Assembly Instructions

Step 2: Hitch Tongue to Main Support Hub

Step 3: Wheel Support Beams

Step 4: Receiver Adapter

1¼ Receiver Attachment

Instructions for attaching the rack to a 1¼ inch hitch receiver.

2 Receiver Attachment

Instructions for attaching the rack to a 2 inch hitch receiver.

Step 5: Rack on Vehicle

Step 6: Ratcheting Lock-Down Hooks

Step 7: Bikes on Rack

Limited Warranty

Terms and Conditions

Details the warranty coverage, limitations, and transferability.

Items Not Covered by Warranty

Lists exclusions from the product's warranty coverage.

Overview

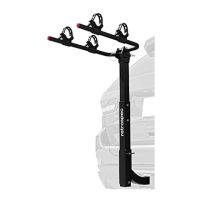
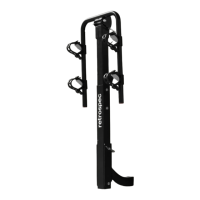
This document provides assembly instructions and warranty information for the Retrospec Lenox Tray Hitch Rack, a device designed to transport bicycles on the rear of a vehicle.

Function Description

The Retrospec Lenox Tray Hitch Rack is a bicycle carrier that attaches to a vehicle's receiver hitch. Its primary function is to securely transport up to two bicycles. The rack features a tray-style design, where bicycles are placed on horizontal beams and secured by wheel trays, rubber straps, and ratcheting lock-down hooks that clamp onto the bike frames. This design aims to provide stable transport while minimizing contact between bikes and the vehicle.

Important Technical Specifications

  • Compatibility: Designed for vehicles with 1 1/4" (Class II) or 2" (Class III) receiver hitches.
  • Capacity: Max weight: 2 bike rack = 80 lbs / 36 kgs. Do not exceed this limit.
  • Bike Types: Not safe for Tandem Bikes, Recumbent Bikes, Motorized Bikes, or other non-standard bikes.
  • Mounting: Attaches to the vehicle's frame via a receiver hitch. Not for use on trailers, RVs, hitch adapters, or the front of a vehicle.
  • Materials: Includes hex head bolts, lock washers, anti-rattle threaded plugs, and a hairpin cotter pin for secure assembly and attachment.

Usage Features

Assembly:

  1. Unpacking: Lay out all main parts and hardware on a flat surface.
    • Main Parts: Main Support Hub (with 3 Push Pins), Wheel Tray Support Beams (2), Wheel Trays (4 with rubber straps), Hitch Tongue (1 1/4"), Ratcheting Lock-Down Hooks (2, one long, one short), 2" Receiver Adapter.
    • Hardware: Hex head bolts (8mm), lock washers, Flush-Mount Bolt (6mm), half-thread Anti-Rattle Hitch Bolt (19mm), 2-Hole Anti-Rattle Threaded Plug, 1-Hole Anti-Rattle Threaded Plug, 6mm hex wrench, 8mm hex wrench.
  2. Hitch Tongue to Main Support Hub:
    • Insert the 2-Hole Anti-Rattle Threaded Plug into the Hitch Tongue.
    • Align and insert the Hitch Tongue (with plug) into the Main Support Hub.
    • Secure with two 1 1/4" x 8mm hex head mounting bolts and lock washers from the bottom of the rack base, tightening firmly with the 8mm hex wrench.
  3. Wheel Support Beams:
    • Slide the two Wheel Tray Support Beams into the horizontal square slots on the Main Support Hub and secure them with Push Pins.
    • Slide the Wheel Trays onto the beams, alternating left and right to allow for adjustment based on bike wheelbases.
  4. Receiver Adapter (if needed):
    • For 1 1/4" Receiver: The rack is factory-ready. Insert the 1-Hole Anti-Rattle Threaded Plug into the large hole at the end of the Hitch Tongue.
    • For 2" Receiver: Align and install the 2" length x 6mm hex head Flush-Mount Bolt through the 2" Adapter Sleeve into the smaller/second hole from the end of the Hitch Tongue. Tighten firmly. Then, insert the 1-Hole Anti-Rattle Threaded Plug into the large hole at the end of the Hitch Tongue.
  5. Rack on Vehicle:
    • With the 1-Hole Anti-Rattle Threaded Plug installed, slide the Hitch Tongue into the vehicle's hitch receiver.
    • Insert the 3 1/2" half-thread Anti-Rattle Hitch Bolt (19mm) with a lock washer into the receiver and tongue, tightening securely.
    • Insert the Hairpin Cotter Pin through the hole on the other side of the hitch bolt.
  6. Ratcheting Lock-Down Hooks: These hooks ratchet down the vertical Center Mast to secure bike frames. One arm is longer to accommodate different frame sizes. To raise or remove the arms, press the button(s) on the side of the arm bracket.
  7. Bikes on Rack:
    • Adjust wheel tray locations to match bike wheelbases.
    • Tighten thumb knobs on each wheel tray to prevent movement.
    • Load bikes with handlebars facing opposite directions to avoid interference.
    • Lower Ratcheting Lock-Down Hooks onto bike frames, pressing firmly until secure.
    • Secure each bike wheel to the tray using the provided rubber straps.

Safety Precautions:

  • Only install on Class II or III receiver hitches.
  • Never use on trailers, RVs, hitch adapters, or the front of a vehicle.
  • Bikes must be secured with trays, supplied tie-downs, and additional straps (if necessary).
  • Regularly check that all bicycles are secured and all bolts/pins are tight.
  • Avoid placing bicycle tires directly in front of an exhaust pipe to prevent melting.
  • Do not block tail-lights or other car lights.
  • Drive carefully and slowly over bumps; avoid off-road driving.
  • Be aware that the vehicle is longer with the rack installed, requiring additional clearance in reverse.
  • Do not use if any parts are missing.
  • Bikes should never extend beyond the side of the vehicle.
  • Stow carry arms or remove the rack when not in use.
  • Mounting the rack on the front of a vehicle can obstruct headlights, directional lamps, and forward visibility, creating unsafe driving conditions.

Maintenance Features

Regular Checks:

  • Check regularly during use that all bicycles remain secured and all bolts and pins are tight and secured. This is crucial for safety and preventing damage.

Warranty Information:

  • Limited Lifetime Warranty: Retrospec grants the original purchaser a non-transferable limited lifetime warranty against defects in materials and workmanship for the useful life cycle of the product.
  • Warranty Conditions:
    • Applies to the original retail purchaser and is non-transferable.
    • Original proof of purchase is required for warranty claims.
    • Product must be returned to Retrospec for inspection; owner is responsible for shipping costs.
    • Retrospec determines eligibility for repair or replacement.
    • If the exact product is unavailable, a substitute of equal or better value may be offered.
  • Items Not Covered by Warranty:
    • Damage due to improper assembly.
    • Damage from mounting on trailers, RVs, or bumper hitch adapters.
    • Normal wear and tear.
    • Damage due to lack of maintenance.
    • Damage from installation of non-original parts.
    • Damage from loading non-standard bicycles, items exceeding weight capacity, or items not intended for the carrier.
    • Damage or failure due to improper use, accidents, neglect, or failure to follow instructions.
    • Paint and finish of the carrier.
    • Damage to bicycles or automobiles.
    • Damage or injury from the rack or bicycles falling from the car.

This warranty is expressly in lieu of all other warranties. Implied warranties of merchantability or fitness for a particular purpose are limited to the duration of this express warranty. The warranty is void if the product is modified. Retrospec is not responsible for direct, incidental, or consequential damages, including personal injury, property damage, or economic losses.

Retrospec LENOX Specifications

General IconGeneral
BrandRetrospec
ModelLENOX
CategoryAutomobile Accessories
LanguageEnglish

Related product manuals