EasyManua.ls Logo

RIDGID DP1500 - User Manual

RIDGID DP1500
32 pages
Print Icon
To Next Page IconTo Next Page
Loading...
2:1(5·60$18$/
$VVHPEO\
2SHUDWLRQ
5HSDLU3DUWV
)RU<RXU6DIHW\
5HDGDOOLQVWUXFWLRQVFDUHIXOO\
48(67,21625&200(176"
&$//5,'*,'
Part No. SP6158 Printed in U.S.A.
'3
,1&+)/22502'(/
'5,//35(66

Table of Contents

Questions and Answers

  • K
    Keith MeyerAug 15, 2025
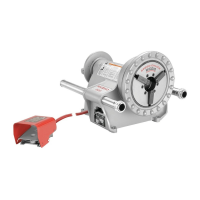
    Why is my RIDGID DP1500 Power Tool drill bit burning?
    • C
      Christopher BurkeAug 15, 2025
      Your RIDGID Power Tool drill bit may be burning due to several reasons. It could be the incorrect speed, so you should change the speed. The chips may not be coming out of the hole, so retract the drill bit frequently to clear the chips. The drill bit could be dull, so resharpen it. You might be feeding too slow, so feed fast enough to allow the drill bit to cut. Finally, the drill bit may not be lubricated, so lubricate it.
  • A
    Anne RichardsonAug 17, 2025
    How to fix a noisy RIDGID DP1500 Power Tool?
    • H
      hmillerAug 18, 2025
      A noisy RIDGID Power Tool can be caused by several issues. The belt tension may be incorrect, so adjust the tension. The spindle may be dry, so lubricate it. The spindle pulley might be loose, so check the tightness of the retaining nut on the pulley and tighten if necessary. Lastly, the motor pulley could be loose, so tighten the set screws in the pulleys.
  • M
    Megan ColemanAug 21, 2025
    What to do if RIDGID Power Tool drill bit binds in the workpiece?
    • J
      John NortonAug 21, 2025
      If your RIDGID Power Tool drill bit binds in the workpiece, it could be due to the workpiece pinching the drill bit or excessive feed pressure, so support or clamp the workpiece. It may also be caused by improper belt tension, so adjust the tension.
  • D
    Debra LopezAug 25, 2025
    Why does my RIDGID Power Tool have excessive drill bit runout or wobble?
    • S
      Sheila SandersAug 26, 2025
      Excessive drill bit runout or wobble in your RIDGID Power Tool can be caused by several factors. The drill bit may be bent, so use a straight drill bit. The spindle bearings might be worn, so replace the bearings. The drill bit may not be properly installed in the chuck, so install the drill bit properly. The chuck may not be properly installed, so install the chuck properly.
  • M
    Michelle BennettAug 28, 2025
    Why is my RIDGID Power Tool drill bit leading off and the hole is not round?
    • R
      Richard SummersAug 28, 2025
      If your RIDGID Power Tool drill bit leads off and the hole is not round, it could be due to hard grain in the wood or unequal lengths of cutting lips and/or angles, so resharpen the drill bit correctly. Alternatively, the drill bit may be bent, so replace it.
  • E
    Eric RobertsAug 31, 2025
    What to do if the workpiece is torn loose from my hand using a RIDGID Power Tool?
    • T
      timothyhowardSep 1, 2025
      If the workpiece is torn loose from your hand when using the RIDGID Power Tool, it is likely not supported or clamped properly, so support or clamp the workpiece.
  • J
    James BushSep 4, 2025
    How to prevent wood splinters on the underside when using a RIDGID DP1500 Power Tool?
    • A
      Alexander RamosSep 4, 2025
      To prevent wood splinters on the underside when using a RIDGID Power Tool, use “backup material” under the workpiece.
  • T
    Timothy McguireSep 6, 2025
    How to adjust the quill return speed on a RIDGID Power Tool?
    • A
      Andrea WrightSep 7, 2025
      If the quill returns too slow or too fast on your RIDGID Power Tool, the spring likely has improper tension, so adjust the spring tension.
  • B
    boydericSep 10, 2025
    Why won't the chuck stay attached to the spindle on my RIDGID Power Tool?
    • A
      Andrea SimonSep 10, 2025
      If the chuck will not stay attached to the spindle on your RIDGID Power Tool, it may be because there is dirt, grease, or oil on the tapered inside surface of the chuck or on the spindle's tapered surface. Clean the tapered surface of the chuck and spindle with a household detergent to remove all dirt, grease, and oil.

Summary

Safety Instructions

Safety Signal Words

Defines DANGER, WARNING, CAUTION safety terms.

Before Using The Drill Press

Steps to take before operating the drill press for safety.

When Installing Or Moving The Drill Press

Guidelines for safely installing or moving the drill press.

Before Each Use

Essential checks and inspections to perform before each use.

Use Only Accessories Designed For This Drill Press

Importance of using manufacturer-approved accessories.

Kickback

Explanation and prevention of kickback during operation.

Plan Ahead To Protect Your Eyes, Hands, Face and Ears

Protective measures for personal safety during operation.

Dress for safety

Specific clothing and attire recommendations for safe use.

Reduce the Risk of Accidental Starting

Steps to prevent unintentional start-up of the drill press.

Keep Children Away

Measures to ensure children are kept at a safe distance.

Before Leaving The Drill Press

Actions to take before leaving the drill press unattended.

Safety Instructions for Basic Drill Press Operation

Comprehensive safety guidelines for operating the drill press.

Specifications and Electrical Requirements

Glossary of Terms

Definitions of common terms used in the manual.

Motor Specifications and Electrical Requirements

Details on the tool's power source and motor characteristics.

Motor Safety Protection

Measures to protect the motor from damage and ensure safety.

Wire Sizes

Recommendations for appropriate extension cord wire gauges.

Unpacking and Setup

Tools Needed

List of tools required for assembly and setup.

Unpacking

Instructions and warnings for safely unpacking the drill press.

Loose Parts in Box and Bag

Detailed list and illustration of all loose parts found in packaging.

Location and Function of Controls

Belt Tension Lock Handles

Handles that secure belt tension.

Belt Tension Handle

Handle used to adjust belt tension.

Head Lock Set Screws

Screws used to lock the head to the column.

Feed Handle

Handles for moving the chuck up or down.

Table Crank

Crank for elevating the table.

Chuck Key

Tool for tightening and loosening the drill chuck.

Chuck

Component that holds the drill bit or accessory.

Depth Scale

Scale for adjusting drill depth.

Drill On-Off Switch

The main switch for starting and stopping the drill.

Light On-Off Switch

Switch to control the drill press light.

Depth Scale Lock

Mechanism to lock the depth scale setting.

Spring Cap

Component for adjusting quill spring tension.

Table Lock

Lock to secure the table's rotation.

Table Bevel Lock

Lock for securing the table's tilt angle.

Bevel Scale

Scale indicating the table's tilt angle.

Support Lock Handle

Handle to lock the table support to the column.

Assembly Procedures

Assembly of Base;Column

Step-by-step instructions for assembling the base and column.

Installing The Table

Procedure for attaching the drill press table.

Installing the Head

Steps for mounting the drill press head assembly.

Pulley Alignment and Speed Adjustment

How to align pulleys and adjust belt speed.

Tensioning Belt

Instructions for properly tensioning the drive belt.

Installing Feed Handles

How to attach the feed handles to the drill press.

Installing the Chuck;Arbor Assembly

Procedure for mounting the chuck and arbor.

Installing Light Bulb

Instructions for installing a light bulb into the drill press.

Adjusting the Table Square To Head

How to align the table perpendicular to the drill press head.

Bevel Scale

How to use the scale for setting table tilt angles.

Operation Guide

Getting To Know Your Drill Press

Overview of drill press components and their functions.

Spindle Speed in R.P.M.

Chart and explanation for selecting spindle speeds.

Drilling to a Specific Depth

Steps for drilling blind holes to a set depth.

Locking Chuck at Desired Depth

How to lock the chuck at a specific depth.

Removing Chuck and Arbor

Step-by-step guide to safely remove the chuck and arbor.

Re-installing the chuck and arbor

Procedure for correctly reinstalling the chuck and arbor.

Basic Drill Press Operation

Fundamental procedures for operating the drill press.

Installing Drills

How to properly insert and secure drill bits into the chuck.

Positioning Table and Workpiece

Correct placement of the table and workpiece for drilling.

Tilting Table

How to tilt the table for angled drilling operations.

Hole Location

Methods for marking precise hole locations.

Adjustments

Procedures for making adjustments to the drill press components.

Quill Return Spring

How to adjust the tension of the quill return spring.

Maintenance and Troubleshooting

Maintenance

General care and cleaning procedures for the drill press.

Lubrication

Recommended lubrication points and procedures.

Wiring Diagram

Electrical schematic for the drill press components.

Troubleshooting

Common problems and their solutions for the drill press.

Repair Parts

Parts List for RIDGID 15 Drill Press (Figure 1)

Comprehensive list of replaceable parts with key numbers for Figure 1.

Parts List for RIDGID 15 Drill Press (Figure 2)

Detailed diagram and list of parts for Figure 2.

Parts List for RIDGID 15 Drill Press (Figure 2 Continued)

Continuation of the parts list with part numbers and descriptions.

Parts List for RIDGID 15 Drill Press (Figure 3)

Parts list for Figure 3, detailing components.

Parts List for RIDGID 15 Drill Press (Figure 4)

Parts list for Figure 4, including hardware and tools.

Warranty Information

Lifetime Warranty On RIDGID Tools

Details of the manufacturer's lifetime warranty policy.

RIDGID DP1500 Specifications

General IconGeneral
BrandRIDGID
ModelDP1500
CategoryPower Tool
LanguageEnglish

Related product manuals