15
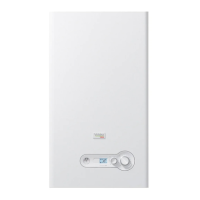
INSTALLATION
connection
Fig. 21
Power supply connection
L N
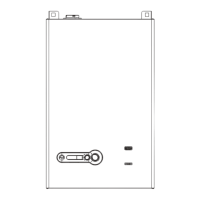
Fig. 22
120VAC Power Supply connection
If an external electrical power source is used, the installed boil-
er must be electrically bonded to ground in accordance with the
requirements of the authority having jurisdiction. In the absence
of such requirements, the installation shall conform to National
Electrical Code (NEC), ANSI/NFPA 70 and/or the Canadian Electrical
Code (CEC) Part I, CSA C22.1 Electrical Code.
2.13 Field control wiring
Each unit is fully wired from the factory with an internal operat-
ing control system. No eld control wiring is required for normal
operation.
However, the control system used with all Array boilers does allow
for some additional control and monitoring features. Wiring con-
nections for these features are made on the Input / Output (I/O)
terminal strips located behind the removable cover on the inner
side of the front door of the unit, as shown in Fig. 23.
NOTE: Any electrical load connected to the terminal strip (external
pumps, air damper, alarm) must be powered through a relay, not
included in the boiler, to be provided and wired by the installer.
101 102 104 105 106 107 108 109 110 111 112 113 114 115103
ALARM
PUMP DHW /
3-WAY DHW
3-WAY CH
MAIN PUMP /
PUMP CH
Air Damper
1 2 3 4 5 6 7 8 9 10 11 12 13 14 15 16 17 18 19 20
LINK
DAMPER
Door
Sensor
Sensor
RX TX GND
GND
Sensor
Thermostat
+
Fig. 23
I/O Terminal Strips
All eld wiring is installed from the rear of the panel by routing the wires
through one of the openings provided on the sides of the cover panel.
Opening for
wires
Fig. 24
Opening on the Cover Panel
2.13.1 Room Thermostat Connection (Enable/Disable)
The Room Thermostat (Enable/Disable) terminals (dry contacts)
come pre-wired closed (jumped) from the factory. For connecting a
room thermostat, the jumper must be removed and the thermostat
wires must be connected to terminals 11 and 12, as shown in Fig. 23.
2.13.2 Air Damper
The Air Damper output comes disabled from the factory. For con-
necting an air damper, the Programmable Output 3 must be set to
10 and the damper wires must be connected to terminals 3 and 4,
as shown in Fig. 23.
The Air Damper is connected to output J3-6 which is a Triac con-
trolled output.
This output need a minimum load of approx. 10VA to work cor-
rectly and the max load must be limited to 50VA at mains voltage.
Connection of an external relay to this output to be able to switch
a higher load is only possible when an additional resistor or load
is added to make sure the minimum load requirements are met.