8
INSTALLATION
INSTALLATION
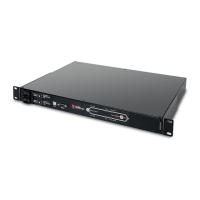
Figure 8 shows how to install the ATS module in a 19-inch bay (with a depth of 600mm), using the four screws supplied, at the
desired height in the cabinet uprights.
The module is not as wide as the bay and therefore does not obstruct the flow of air.
Fig. 8: ATS module in a rack cabinet mounting.
If the temperature inside the bay will rise above 40 °C, ventilation is required.
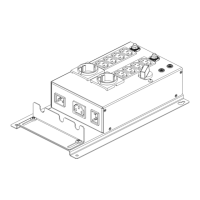
CONNECTIONS
For connecting the ATS, plug “INPUT A” and “INPUT B” to the mains or to the UPS depending using the SCHUCKO-IEC or
IEC-IEC 16A cables supplied.
Plug the user load to the output 10A (“OUTPUT 1 and 2”) or 16A (“OUTPUT 3”) sockets depending on user’s requirements.
Put the input switch in “ON” position. The output will then be supplied by the source set as preferred (Default: “INPUT A”).
CONFIGURING THE ATS
It is possibile to set the input preferred to supply the output by pushing the button “select input”.
The following table shows the configurations available.