EasyManua.ls Logo

Rightline Gear 100B90 User Manual

Rightline Gear 100B90
2 pages
To Next Page IconTo Next Page
Page #1 background imageLoading...
Page #1 background image
1-Clean the back of your vehicle, unscrew your license
plate, and place it inside the Car Back Carrier’s interior
license plate sleeve (Fig 7).
2-Load the Car Back Carrier on the ground. The load
capacity of the carrier is 100 lbs.
Assemble The Bottom Pole Frame
The correct attachment of this product is critical and
beyond the control of Rightline Gear. The safe use
and long life of this product depends entirely on
your good judgment and following these directions.
Fig 1
Fig 2
1-Run (2) of the poles through the pole guides into the
sewn pole pockets (Fig 2).
3-Run the remaining (2)
poles through the hook-&-
loop pole pockets, through
the pole guides and into
the pole junctions (Fig 4).
4-Make sure all of the pole frame segments are rmly
locked together (Fig 5).
5-Close the hook-&-loop pole pockets (Fig 6).
Sewn
Pole
Pockets
Hook-
&-Loop
Pole
Pockets
Pole Guides
Pole Guides
Cross Pole
Assembly
Fig 5
Fig 6
Fig 7
Pack The Carrier
Car Back Carrier Set Up Guide 100B90
www.rightlinegear.com/setup.html
Set Up
Video:
SAFETY NOTES:
Emergency access to the the vehicle’s rear hatch door
will be extremely limited while using the Car Back
Carrier.
The vehicle’s automatic rear window, rear windshield
wiper, and back up camera may not be operable
while using the Car Back Carrier.
Keep the Car Back Carrier and its straps away from
the vehicle’s hot exhaust system.
Don’t exceed the load rating of your vehicle’s attach-
ment points. The side straps can be routed around ve-
hicle rear fairings if necessary.
Cross
Pole
Assembly
2-Slide the cross pole assembly onto the (2) pole ends of
(Fig 3).
Fig 8
2-Pull the (2) strap ends tightly to tension the strap, close
the door over the strap, and let the (2) strap ends hang
down (Fig 9).
3-After attaching the Car Back Carrier to the vehicle (see
Attach The Car Back Carrier-...”), adjust the belt strap to
the correct length/tension by sliding the tri-glide. Buckle
the belt strap around the middle of the Carrier (Fig 10).
Attach The Belt Strap
Fig 9
Tri-glide
Buckle
Fig 10
1-Run the belt strap around the inside of the vehicle’s
rear hatch door (Fig 9). Make sure the strap is not
twisted.
Fig 3
Fig 4
3-Close the Carrier by bringing the (2) zipper pulls
together (Fig 8).
4-Fold the zipper ap down to secure the hook-&-loop
closures (Fig 8). Make sure the hook-&-loop closures on the
zipper ap completely overlap those on the carrier. If it is
difcult to secure the closures, the carrier is over packed.
NOTE: THE BELT STRAP IS OPTIONAL IF YOU ATTACH
THE BOTTOM STRAPS TO YOUR VEHICLE (SEE “ATTACH
THE BOTTOM STRAPS”).
Pole
Guides
Sewn
Pole
Pockets
Hook-
&-Loop
Pole
Pockets
Pole
Guides
Pole
Junctions
Pole
Junctions
Zipper Flap
Hook-
&-Loop
Closures
Question and Answer IconNeed help?

Do you have a question about the Rightline Gear 100B90 and is the answer not in the manual?

Rightline Gear 100B90 Specifications

General IconGeneral
Product TypeSUV Tent
Product NameRightline Gear SUV Tent
CategoryAutomobile Accessories
Mounting TypeVehicle Mounted
Floorless DesignYes
CapacitySleeps 4 adults
Water ResistanceWater-resistant
Attachment MethodStraps and Buckles
Dimensions94.5 x 94.5 x 78.7 inches
CompatibilitySUVs, minivans, crossovers, wagons, or pick-up trucks with cap
SetupEasy setup
VentilationMesh Windows

Summary

Safety Information

Assemble The Bottom Pole Frame

Run Poles Through Sewn Pockets

Insert two poles through the pole guides and into the sewn pole pockets.

Attach Cross Pole Assembly

Slide the cross pole assembly onto the two pole ends.

Insert Remaining Poles

Insert remaining poles through hook-&-loop pockets and guides into junctions.

Pack The Carrier

Prepare Vehicle and License Plate

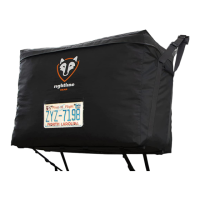
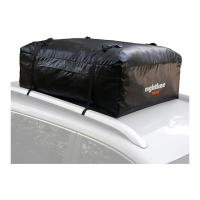
Clean vehicle, remove license plate, and place it inside the carrier sleeve.

Load Carrier and Secure Closures

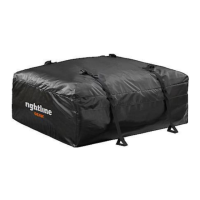
Load carrier (100 lbs max), close zippers, and secure the zipper flap overlap.

Attaching the Belt Strap

Route Belt Strap Around Hatch

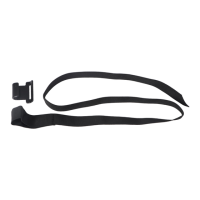
Run the belt strap around the inside of the vehicle's rear hatch door, ensuring it is not twisted.

Tension and Secure Belt Strap

Tension strap ends, close door over strap, and adjust tension with the tri-glide.

Attach Carrier With Roof Rack

Prepare Long Side Straps

Unthread strap end, add male buckle and rear car clip, then rethread through buckle, pad, and tri-glide.

Route Long Side Straps

Loop long side straps around rear cross bar or side rails, routing from inside to outside.

Attach Bottom Straps

Route Bottom Straps Through Guides

Run bottom straps through carrier guides and around attachment points.

Secure and Tie Off Bottom Straps

Thread strap ends through buckles, tighten evenly, and tie off ends to prevent flapping.

Re-Attach Rear Car Clips

Prepare Side Strap for Clip

Extend side strap, unthread end from tri-glide, and remove male buckle.

Attach Rear Car Clip and Buckle

Add Rear Car Clip and male buckle onto the strap, ensuring correct routing.

Complete Side Strap Attachment

Run strap back through buckle, clip, pad, and tri-glide; repeat for second strap.

Attach Carrier Without Roof Rack

Position Rear Car Clips

Place Rear Car Clips in the gap between the vehicle's rear hatch door and roof.

Attach and Adjust Side Straps

Buckle long side straps to short side straps, adjust length by sliding tri-glide.

Secure Loose Strap Ends

Move tri-glides to the end of loose strap ends to prevent flapping in the wind.

Adjust The Side Straps

Connect Long and Short Side Straps

Buckle the (2) long side straps to the (2) short side straps, ensuring pads face downward.

Set Carrier Level

Adjust long side straps for correct length by sliding the tri-glide.

Prevent Strap Flapping

Move each strap's tri-glide to the end of its loose end to prevent flapping.

Related product manuals