EasyManua.ls Logo

Rightline Gear 100R20 User Manual

Rightline Gear 100R20
2 pages
To Next Page IconTo Next Page
Page #1 background imageLoading...
Page #1 background image
2-Unzip the carrier and place it on top of the vehicle with
its non-zippered end facing front.
3-Load your gear within the shape of the carrier (Fig 1).
Place sharp edged items in the middle and softer items
around them.
WARNING: DAMAGE MAY OCCUR TO THE CARRIER
IF EXCESS MATERIAL FLAPS IN THE WIND.
TO ELIMINATE EXCESS MATERIAL, PACK THE CARRI-
ER FULL. IF UNABLE TO PACK FULL, FILL THE FRONT
CORNERS OF THE CARRIER AND PULL THE EXCESS
MATERIAL DOWN OVER THE SIDES. HOLD THE EX-
CESS MATERIAL SECURELY IN PLACE WITH THE CAR-
RIER’S STRAPS.
4-Close the zipper as you ll the carrier from the front to
the rear.
1-Remove the Car Clips from the (4) attachment straps (Fig
3); the Car Clips will not be used.
3-Attach each strap by wrapping it around the rack,
threading its end through its loop, and pulling tight (Fig 5).
4-Thread the straps up through slot A and down through
slot B of the buckles (Fig 6) and tighten the straps evenly.
Pack The Carrier
Attach The Carrier - WITH A Roof Rack
The correct attachment of this product is critical and
beyond the control of Rightline Gear. The safe use
and long life of this product depends entirely on
your good judgment and following these directions.
Fig 1
Fig 2
2-Decide if you will be attaching the straps to the roof
rack side rails or cross bars. If side rails, the straps will
connect to the side buckles (Fig 4). If cross bars, the straps
will connect to the front and rear buckles (Fig 4).
Range Car Top Carriers 100R20, 100R50
1-Clean the vehicle’s roof of all dirt and debris.
NOTE: REQUIRES SPACE UNDER THE ROOF RACK
SIDE RAILS OR CROSS BARS FOR THE CARRIER’S
ATTACHMENT STRAPS TO PASS THROUGH.
Fig 6
5-Tie off the strap ends so they don’t ap in the wind (Fig
7). Make sure to re-tighten the straps after a few miles
and check them regularly throughout the trip.
Fig 7
Hook-&-Loop Closures
Hook-&
-Loop
Closures
Protective Flap
Front
Fig 3
Fig 5
A
B
5-Fold the protective ap down to secure the hook-&-loop
closures (Fig 1 and Fig 2). Make sure the hook-&-loop clo-
sures on the zipper ap completely overlap those on the
carrier. If it is difcult to secure the closures, the carrier is
over packed.
Fig 4
Side
Buckles
Rear
Buckles
Front
Buckles
Front
Side Rail
Side Rail
Cross
Bar
Cross
Bar
NOTE: IF A STRAP MAKES NOISE WHILE DRIVING,
LOOSEN THE STRAP, RE-POSITION IT SLIGHTLY,
AND RE-TIGHTEN IT.
Question and Answer IconNeed help?

Do you have a question about the Rightline Gear 100R20 and is the answer not in the manual?

Rightline Gear 100R20 Specifications

General IconGeneral
BrandRightline Gear
Model100R20
CategoryAutomobile Accessories
LanguageEnglish

Summary

Attach The Carrier - WITH A Roof Rack

Remove Car Clips

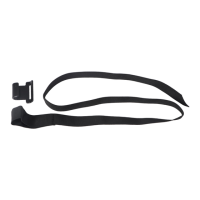
Remove the car clips from the attachment straps; they will not be used.

Select Attachment Points

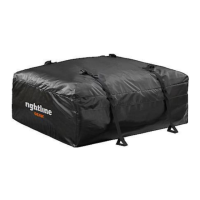
Decide whether to attach straps to side rails or cross bars for connection.

Secure Straps to Rack

Wrap straps around the rack, thread through their loop, and pull tight.

Tighten Straps

Thread straps through buckle slots A and B, then tighten evenly.

Tie Off Strap Ends

Tie off strap ends to prevent flapping and re-tighten after a few miles.

Pack The Carrier

Prepare Vehicle Roof

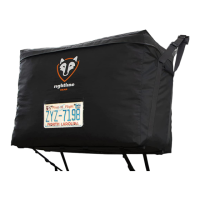
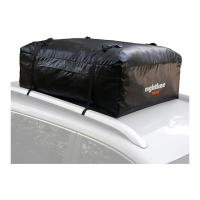
Clean the vehicle's roof of all dirt and debris before placing the carrier.

Position Carrier

Unzip the carrier and place it on the vehicle with the non-zippered end facing front.

Load Gear Securely

Load gear, placing sharp items in the middle and softer items around them.

Close Zipper and Flap

Close the zipper, fold down the protective flap, and secure hook-&-loop closures.

Attach The Carrier - WITHOUT A Roof Rack

Start with Car Clips

Begin with the car clips attached to the four attachment straps.

Position Side Buckles

Line up side buckles with vehicle doors for attachment to weather molding.

Orient Straps

Hold straps with car clips facing towards the vehicle for threading.

Hook Clips to Door Frame

Open vehicle doors and hook car clips under the door frame weather molding.

Tighten Straps and Close Doors

Tighten straps evenly, then shut vehicle doors over the clips and straps.

Tie Off Strap Ends

Tie off strap ends to prevent flapping and re-tighten straps after a few miles.

Re-Connect Car Clips

Loop Strap Through Clip

Run a strap's loop through the backside of a car clip.

Thread Strap End

Thread the strap's end through its loop.

Tighten Strap

Pull the strap's end to tighten the strap around the car clip.

Repeat for Other Straps

Repeat steps 1-3 for the remaining three straps.

Related product manuals