MODEL GX-2009 CONDENSED USER GUIDE
Note : Regarding detail, refer to instruction manual.
1.Check that the battery level is sufficient.
2.Check that the dust filter is free of dust.
1.Power-on
Press the POWER/MODE button until the buzzer blips.
After the LCD switched as follows, the gas monitor
enters the detection mode.
All lights ON→Date and time→Battery voltage→
Detection range→Alarm setpoint value→
Detection mode
2.Air calibration
Keep the AIR button pressed until “Adj – Release ”
on the LCD. After adjustment, it automatically
returns to the detection mode.
3.Seeing information
Every time the POWER/MODE button is pressed, the following pieces of information are
displayed on the display in turn.
Measured gas concentration display → PEAK value display → STEL value display
(CO/H2S only) → TWA value display(CO/H2S only) → Full scale display →
Return to measured gas concentration display
4.Resetting of alarm
When the gas concentration is lower than the first alarm set point (for oxygen, higher than the
first alarm set point), a gas alarm can be reset by pressing the POWER/ MODE or AIR button.
5.Power-off
Keep the POWER/MODE button pressed for four seconds.
6.Charging batteries
(1) Connect the plug of the AC adapter to the supplied charger.
→ (2) Connect the AC adapter to the electric outlet.
→ (3) Turn off the power and set GX-2009 on the charger.
→ (4) The charge LED lights up red when it starts charging.
→ (5) The charge LED goes off when the charging is completed.
→ (6) Remove the AC adapter from the electric outlet.
WARNING : Do not charge the batteries in
a hazardous area.
Daily maintenance
PT0E-1000
How to use
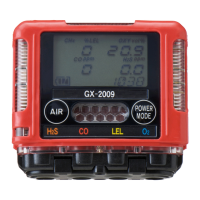
LCD
POWER /MODE
button
AIR button
Part Name
Buzzer sound
Alarm lamp
Battery Charge
(BC-2009)
Charger LED
GX-2009
AC adapte
Battery Charge
(BC-2009)