Turning the unit on
Important
Before turning on the power, make sure that all cords and tubes are cor-
rectly connected.
Allow at least one minute between turning the power on and turning it off
again, and after turning it off before turning it on again.
Hold down the “POWER” button for at least one second to turn on the power.
Shows the startup screen. The display in the center of the startup screen changes
through “Initializing”
“Starting up” as status changes.
Turning the unit off
To turn off the unit, hold down the “POWER” button for at least one second.
The Shutdown screen appears and the power is turned off.
Note
If no operation is performed for 30 minutes while the unit is not carrying out
measurement, an alarm beep is heard and power will automatically be shut off.
However, this does not apply while the unit is connected to a computer, or while
“Multi” is selected (see page 53 of the instruction manual).
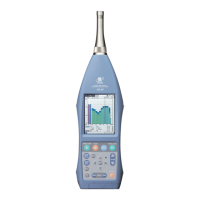
Screen display
Besides measurement values, the Measurement screen also shows information about
the operation status of the unit. The illustration below is for explanation purposes
only, showing all available indications.
The display mode is for all particle sizes.
For details, please refer to the chapter of “Settings” of the instruction manual.
Menu bar
Pressing the “MENU” button in the button area of the measurement screen brings up
the menu bar. Using the buttons on the menu bar, you can bring up other screens or
execute functions. Pressing the “MENU” button again turns the menu bar off.
Current time
Battery status
Power
connection
Password function
USB connector status
SD memory card
Popup icon
Data area
Button area
Status area
“LIST” button
Changes to the Folder Selection screen (see page 85 of the instruction manual).
“CONFIG” button
Changes to the Measurement Parameter Con guration screen (see page 34 of the
instruction manual).
“SYSTEM” button
Changes to the System Con guration screen (see page 48 of the instruction manual).
“PRINT” button
Prints the displayed measurement data by the connected printer (see page 92 of
the instruction manual).
For details, please refer to the chapter of “Settings” of the instruction manual.
Information bar
Press “INFO” button on the Measurement screen. The information bar is displayed.
Menu bar
“Label” button
Changes to the Label Selection screen. Assigning different label names according
to measurement location and measurement date/time will make data management
easier (see page 31 of the instruction manual).
For details, please refer to the chapter of “Settings” of the instruction manual.
Information bar
Measurement Parameter Con guration screen
Use the Measurement Parameter Con guration screen to set, measurement mode,
measurement time, volume, number of measurement for average, period for measure-
ment interval, alarm and other parameters.
Press the “CONFIG” button on the Menu bar. The Measurement Parameter Con gu-
ration screen is displayed.
For details, please refer to the chapter of “Settings” of the instruction manual.
Measurement parameter setting procedure
1. On the measurement parameter con guration screen, enter or select the value for
the respective item.
To input a value:
Press the parameter section of the item to set. A numeric input screen appears.
Enter the value and press the “ENT” button (see page 40 of the instruction
manual).
To select a value:
Each time the parameter section of the selected item is touched, the value is
switched. The value of items for which a “
” button appears to the right of
the parameter section can be set by selecting the value (see page 44 of the
instruction manual).
2. Repeat step 1 to set all necessary items.
3. Once setup is complete, press the “BACK” button.
4. Display returns to the Measurement screen.
List of parameter settings
Setting items Settings
Measurement mode Volume, Time (default)
Volume 0.283L (default), 1L, 2.83L, 10L, 28.3L
Time
00:00:00 (manual: default),
00:00:01 (1 sec) to 02:00:00 (2 hours)
Average 1 (no average calculation: default), 2 to 99
Period Time
00:00:00 (no periodic measurement: default),
00:00:01 (1 sec) to 24:00:00 (24 hours)
Alarm/Audio Alarm, Audio (default)
Alarm
Alarm Size 0.3 (default), 0.5, 1.0, 2.0, 5.0
Alarm Level 0 (alarm is off: default), 1 to 99999999
Audio
Audio Size 0.3 (default), 0.5, 1.0, 2.0, 5.0
Audio Level 0 (alarm is off: default), 1 to 99999999
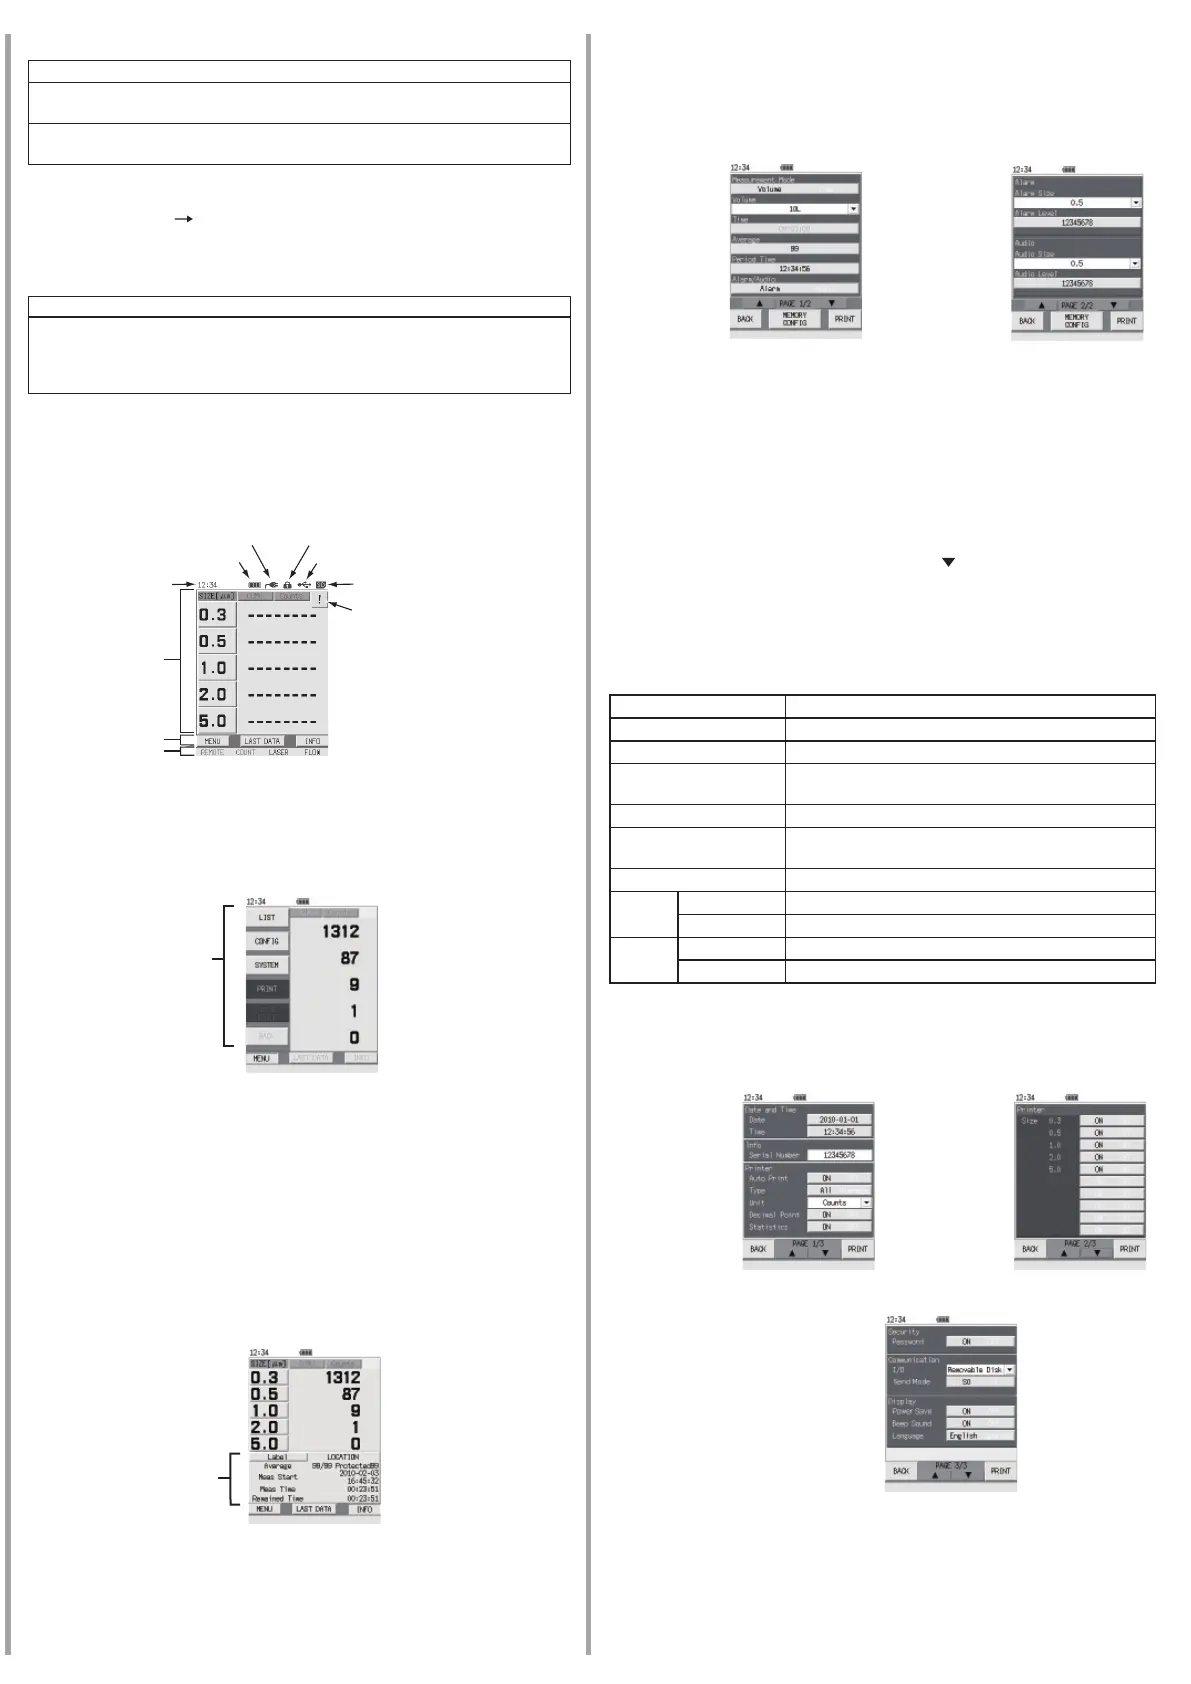
System Con guration screen
Use the System Con guration screen to set systems, such as current date and time,
printer setting and password setting.
Press “SYSTEM” button on the Menu bar. The System Con guration screen is dis-
played.
Measurement
Parameter
Con guration
screen 1/2
Measurement
Parameter
Con guration
screen 2/2
For details, please refer to the chapter of “Settings” of the instruction manual.
System
Configuration
screen 1/3
System
Configuration
screen 2/3
System
Configuration
screen 3/3

 Loading...