List of parameter settings
Setting items Settings
Date and Time
Date yyyy-mm-dd (year-month-day)
Time hh:mm:ss (hours:minutes:seconds)
Info Serial Number Fixed (impossible to change)
Printer
Auto Print ON, OFF (default)
Type All (default), Average
Unit Counts (default), /L, /28.3L, /1000L
Decimal Point ON (default), OFF
Statistics ON, OFF (default)
Size ON (default [all size are ON]), OFF
Security Password ON, OFF (default)
Communication
I/O Removable Disk (default), Serial, Multi
Send Mode S0 (default), S1
Display
Power Save ON (default), OFF
Beep Sound ON (default), OFF
Language Japanese (default), English
Example of system setup
• To set the date and time to 12:34:56 on April 1st 2011
1. Press “Menu” button on the Measurement screen. The menu bar is displayed.
2. Press “SYSTEM” button on the menu bar. The System Con guration screen 1/3
is displayed.
3. Press the parameter part of [Date]. The Date Entry screen is displayed.
4. Press “YEAR” button. The [YEAR] item is displayed in red.
5. Press “CLR” button to delete the current value, and use the numeric keypad to
input the year (e.g. 2011). Press “CLR” button to cancel the entered value.
6. In the same way as steps 4 to 5, select [MONTH] and [DATE] and enter their
values (e.g. 04 and 01).
7. Once entry is complete, press “ENT” button. Input is not con rmed until “ENT”
button is pressed.
8. Press “BACK” button. Display returns to the System Con guration screen.
9. Press the parameter part of [Time]. The Time Entry screen is displayed.
10. Press “HOUR” button. The [HOUR] item is displayed in red.
11. Press “CLR” button to delete the current value, and use the numeric keypad to
input the hour (e.g. 12). Press “CLR” button to cancel the entered value.
12. In the same way as steps 10 to 11, select [MINUTE] and [SECOND] and enter
their values (e.g. 34 and 56).
13. Once entry is complete, press “ENT” button. Input is not con rmed until “ENT”
button is pressed.
14. Press “BACK” button. Display returns to the System Con guration screen.
15. Press “BACK” button on the System Con guration screen. Display returns to the
Measurement screen.
Installing the USB driver
By connecting the KC-52 to a computer with the supplied USB cable (A to mini B)
and using a dedicated communication/control program, the KC-52 can be controlled
remotely from the computer and measurement data can be sent to computer in real
time. Moreover, it is also possible to make computer recognize the KC-52 as a remov-
able disk. To enable use of these functions, you must rst download driver software
from the RION Co., LTD. web site and install this driver on the computer to be used
with the KC-52. The driver will create a virtual COM port on the computer.
Important
If the USB driver was installed and communication between the computer
and the KC-52 was established, performing the device removal steps on
the computer will prevent the computer from recognizing the KC-52, even
if the [I/O] settings of the KC-52 are subsequently changed (see page 53
of the instruction manual). In such a case, disconnect the USB cable and
then connect it again.
For details, please refer to the chapter of “Settings” of the instruction manual.
Measurement example
(Measurement mode: Volume, Volume: 2.83L, Average: 3)
1. Hold down the “POWER” button for at least one second to turn on the power.
2. Install the unit in the measurement location.
3. Press “Menu” button on the Measurement screen. The menu bar is displayed.
4. Press “CONFIG” button on the menu bar. The Measurement Parameter Con gu-
ration screen 1/2 is displayed.
5. Press the parameter part of the [Measurement Mode], and select [Volume].
6. Press the “
” button on the parameter part right edge of [Volume]. The Measure-
ment Volume Select screen is displayed.
7. Select the measurement volume (e.g. 2.83L). [Volume] is set to 2.83L and the
Measurement Parameter Con guration screen is displayed.
8. Press the parameter part of [Average]. The Numerical Entry screen is displayed.
9. Press “CLR” button to delete the current value, and use the numeric keypad to
enter the number of measurements for average values (e.g. 3).
10. Once entry is complete, press “ENT” button.
11. Press “BACK” button. Returns to the Measurement Parameter Con guration
screen.
12. Press “BACK” button on the Measurement Parameter Con guration screen. Dis-
play returns to the Measurement screen.
13. Press the “START” button to begin the measurement. Measurement proceeds au-
tomatically, according to the set measurement parameters.The measured particle
count appears on the touch panel in real time.
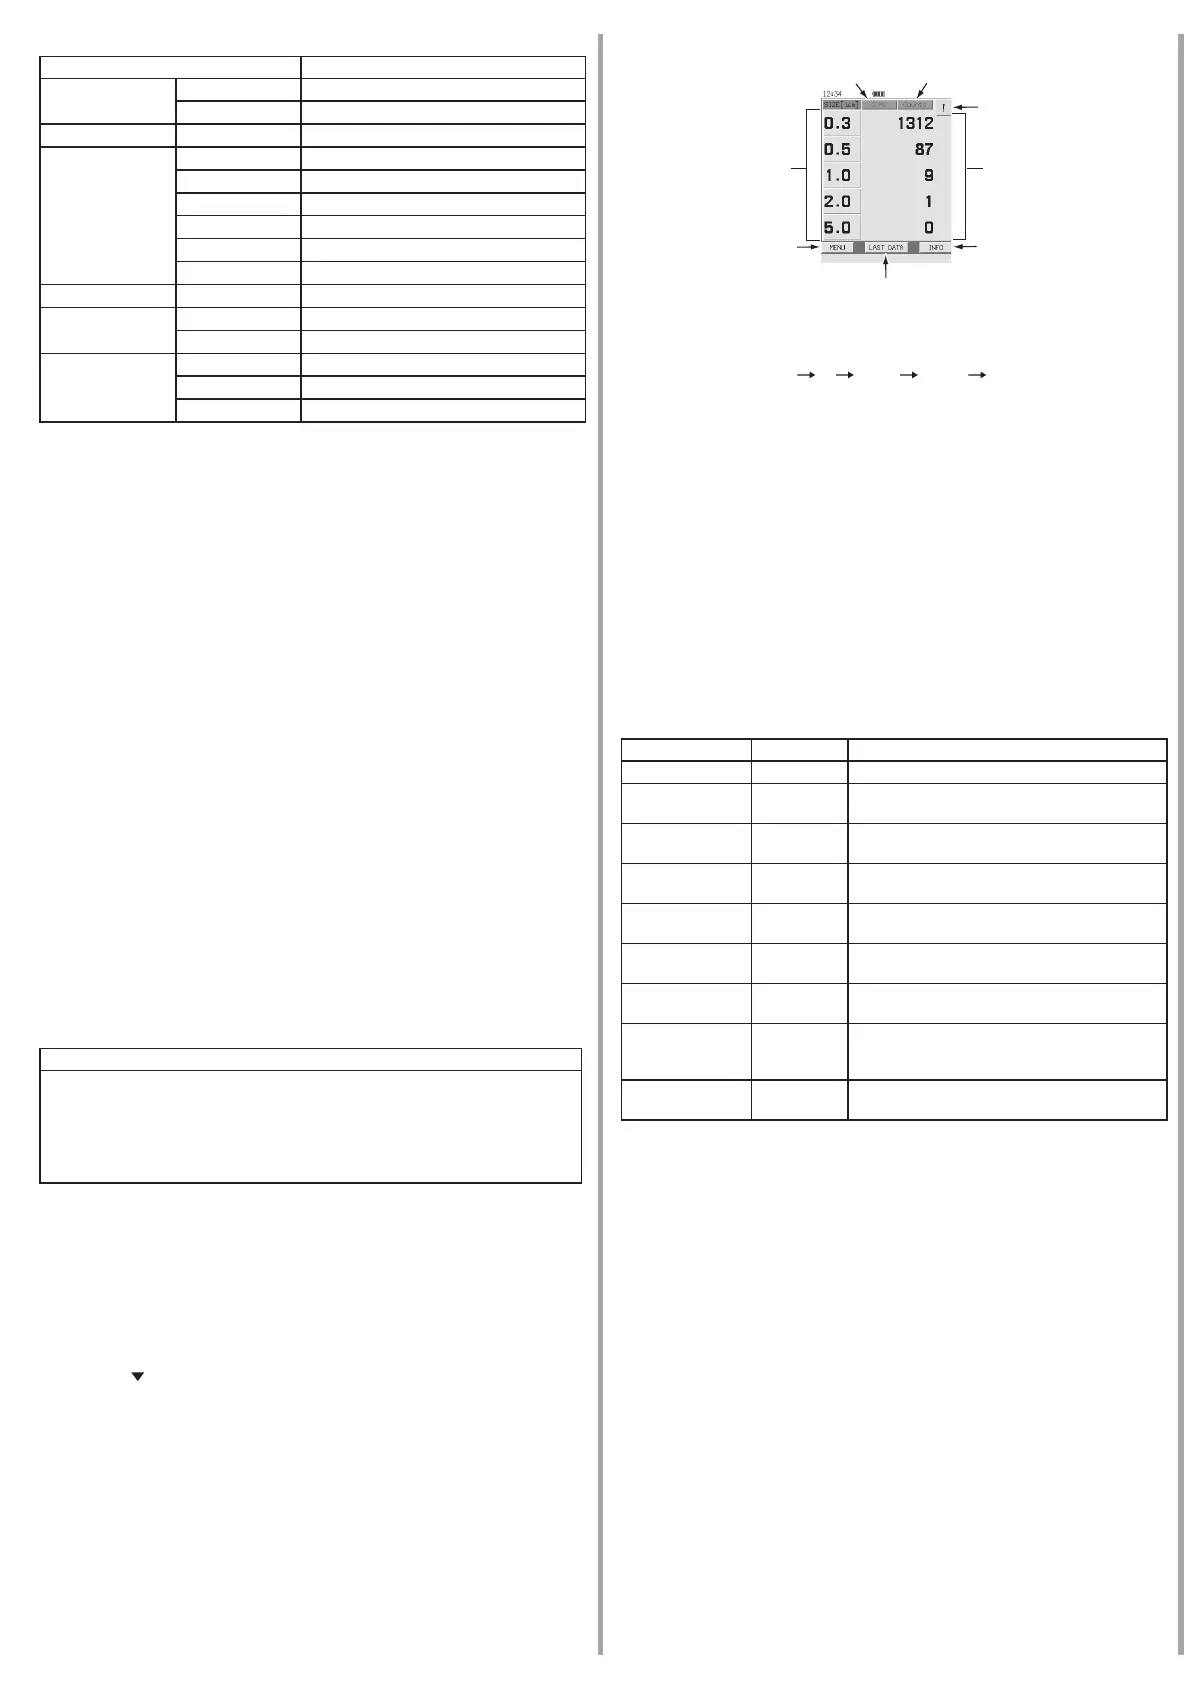
Measurement screen
Popup icon
“Particle size”
button
“MENU” button
“LAST DATA” button
“INFO” button
Particle count
indication
“Number concentration
conversion” button
“CUMU/DIFF” button
“Number concentration conversion” button
Each press of this button cycles through the number concentrations (particle
count per sample volume) indication as follows:
Counts (no conversion)
/L /28.3L /1000L Counts (no conversion)
The value is also shown during measurement. If “/L”, “/28.3L”, or “/1000L” is
selected, the running average is calculated six times per second. Display is con-
verted every second.
“CUMU/DIFF” button
Each press of this button toggles between cumulative count (CUMU) and dif-
ferential count (DIFF) (during all-size display).
The cumulative count includes all particles in or above the particle size range.
The differential count shows the count between the particle size ranges.
For details, please refer to the chapter of “Measurement” of the instruction manual.
Stopping the measurement
When the “STOP” button is pressed during automatic measurement, the STOP selec-
tor screen appears. If [ABORT] is selected, the measurement stops. If [CANCEL] is
selected, the measurement continues.
Relation between error messages and error classes
The relation between error messages about errors that occurred during measurement
and error classes is listed below.
[Information] error classes except for the “LOW BATT.” message are only shown in
the measurement data le and printout.
Message Class Occurrence condition
BOOT ERROR Protected A problem has occurred during startup.
PUMP FAIL Protected
There is a problem with pump operation or tem-
perature.
STOPED MEAS. Protected
An internal problem has occurred during mea-
surement.
LASER FAIL Warning
The light source output has fallen below the
rated level.
FLOW ERROR Warning
Flow rate is more than ±5% outside of speci-
ed range.
LOW BATT. Information
The amount of charge of a built-in battery has
decreased.
LASER LIFE Information
The light source is nearing the end of its service
life.
HIGH CONCE. Information
Particle number concentration in sample air has
exceeded the maximum particle number con-
centration. (140,000,000 particles/m
3
)
FLOW ALERT Information
Flow rate is within −3% to -5% or +3% to +5%
of speci ed range.
For response with errors, please refer to “Troubleshooting” on page 149 of the in-
struction manual.
Storing and displaying data
Measurement results and the corresponding measurement parameter settings are
stored automatically in the internal memory for about 5000 measurements.
Displaying stored past data
To display stored past data, perform the following steps on the Measurement screen.
1. Press the “Menu” button on the Measurement screen.
The Menu bar is displayed.
2. Press “LIST” button on the Menu bar.
The Folder Selection screen is displayed. The Folder Selection screen displays a
list of dates on which measurements were taken.
If the date of the le you want to display does not appear, press “<<” button or
“>>” button to display the screen containing the date of the target data. Press
“BACK” button to return to the Measurement screen.
3. Select the measurement date for the data to be displayed.
The File Selection screen is displayed. The File Selection screen displays a list of
measurement data les.
If the data le you want to display does not appear, press “<<” button or “>>” but-
ton to display the screen containing the date of the target data le. Press “BACK”
button to return to the Measurement Folder Selection screen.
4. Select the data le to display.
The Past Data Display screen saved in the le is displayed.
When pressing the “START” button, display returns to the Measurement screen
and measurement is started.
When pressing the “STOP” button, display returns to the Measurement screen.
When pressing the “BACK” button on the menu bar, display returns to the File
Selection screen.

 Loading...