6 Commissioning
EN
28 Rittal roof-mounted Blue e+ cooling unit/VX25 Blue e+ integration solution
Micro-USB interface
A micro-USB interface is located on the front, to the right
of the display. A tablet or laptop may be connected here
for easy configuration of the unit.
Connect a tablet or laptop with installed RiDiag III soft-
ware to the micro-USB interface.
No other USB devices will be detected on this connec-
tion.
RS 485 interface
An RS 485 interface is located at the bottom of the cool-
ing unit. The IoT interface (3124.300) for linking the cool-
ing unit to the customer’s own monitoring, energy man-
agement and/or superordinate systems may be con-
nected here.
Connect the the IoT interface (accessory) to the
RS 485 interface (X3).
6 Commissioning
Observe the aforementioned waiting period of at least
30 minutes before commissioning the unit after as-
sembly.
Next, switch on the voltage supply to the cooling unit.
The Rittal logo will initially appear on the display, fol-
lowed a short time later by the start screen.
You can now make your individual settings on the unit,
e.g. set the temperature or assign the network identi-
fier, etc. (refer to chapter 7 "Operation").
7 Operation
7.1 General
The cooling unit is equipped with a touch function dis-
play for making basic settings and displaying error mes-
sages. This is an industrial-grade touch display which is
pressure-sensitive and may therefore be operated with
gloves.
As well as operating directly on the cooling unit itself,
there is also a smartphone app available. This offers al-
most the same functions as the actual display, and ad-
ditionally provides extended explanations of error mes-
sages, as well as the option of contacting the Rittal Ser-
vice team directly.
7.2 Layout of the display
The display is divided into a top section on a dark back-
ground, and a bottom section with the menu bar. This
layout is always identical, but the content of the two sec-
tions will vary according to the menu selected.
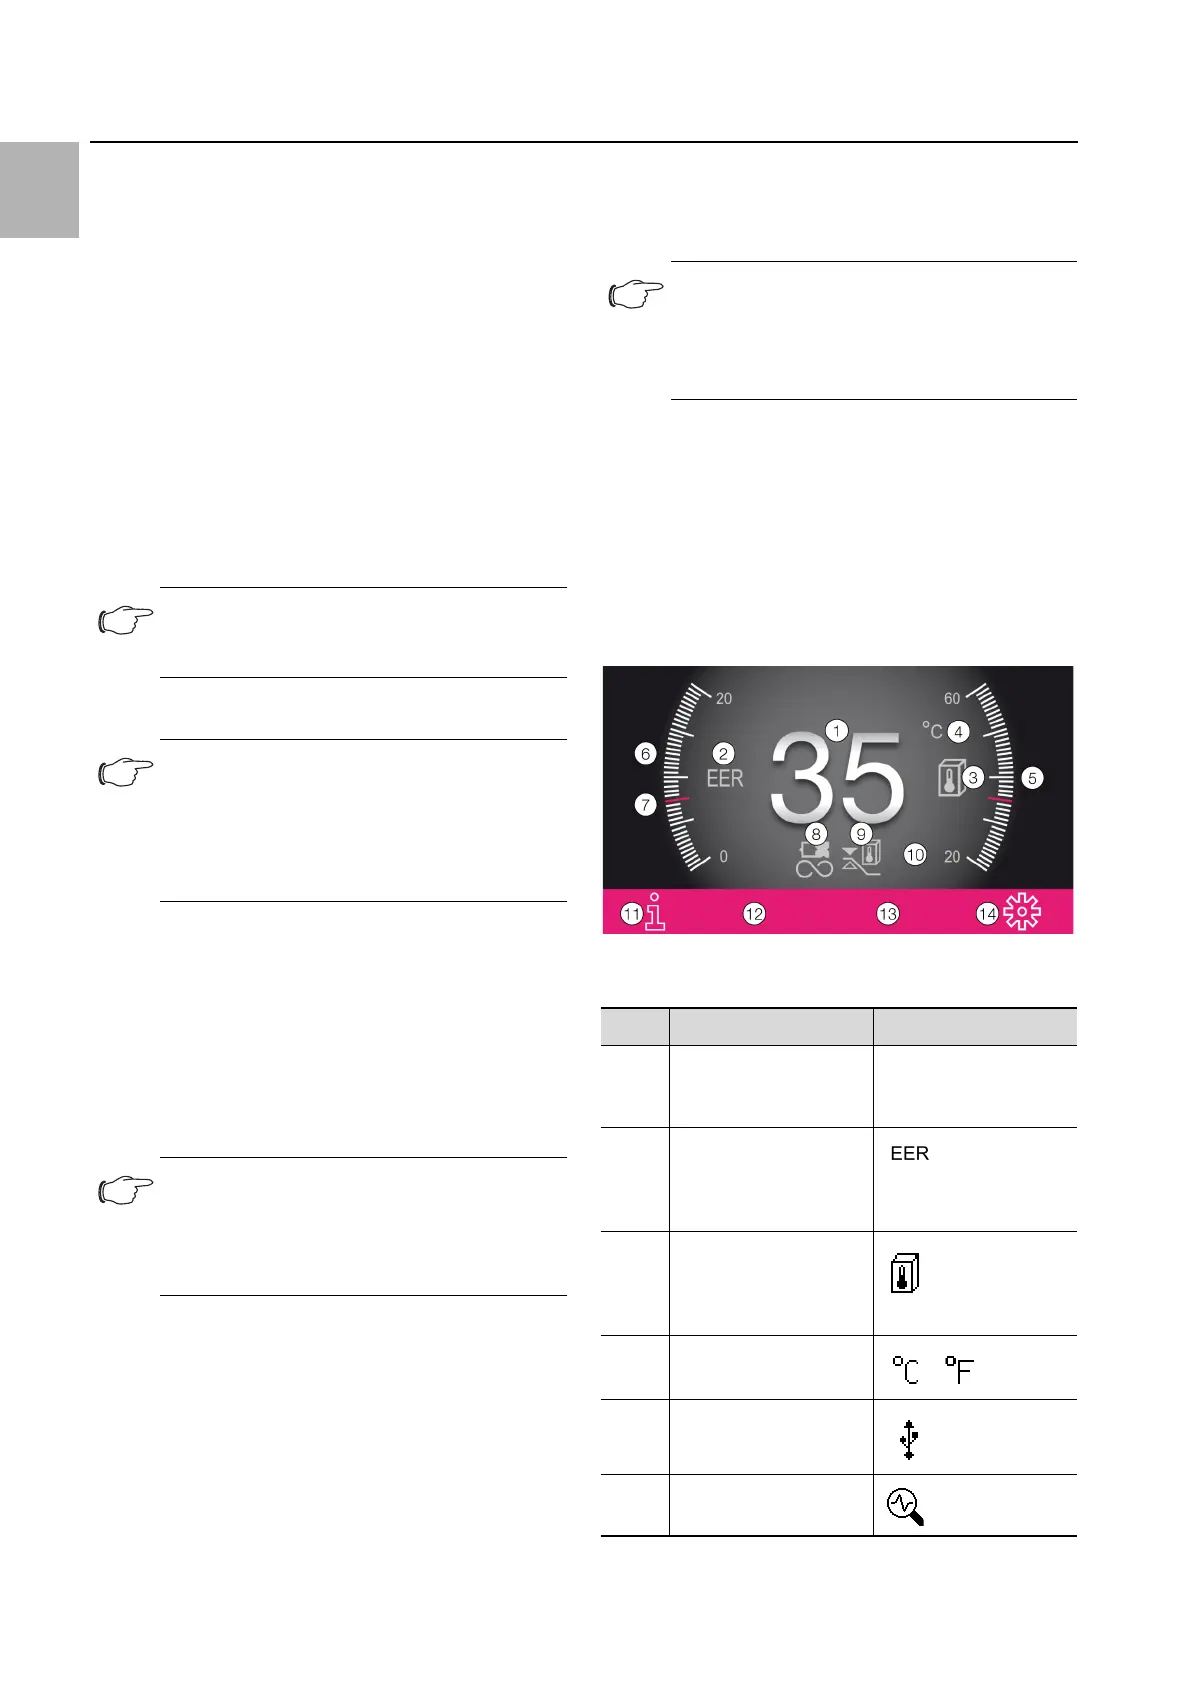
7.2.1 Start screen
The start screen is always displayed while the cooling
unit is in normal operation, provided there are no error
messages.
Fig. 18: Layout of the start screen
Key
Note:
A direct connection to the cooling unit via the
RS 485 interface is not possible.
Note:
The oil must collect in the compressor in or-
der to ensure adequate lubrication and cool-
ing. For this reason, do not operate the
cooling unit for at least 30 minutes after as-
sembling the equipment.
Note:
It is not necessary to carry out leak or pres-
sure tests on the cooling unit prior to com-
missioning. Rittal has already done this in the
factory.
Note:
Install other languages using the RiDiag
software or an online tool, available on the
Rittal website, to enable the use of all the
following functions.
Item Description Possible icons
1 Internal temperature
display (2-digit °C/3-
digit °F)
Numbers from 0-9
2 EER scale: Range
0...20 / current average
EER value of the last 24
hours
3 Ti scale: Range 20 ...60
/ value: Average enclo-
sure internal tempera-
ture of the last 24 hours
4 Display temperature
unit
5 USB connection (if
connected)
6 Self-test (if initiated)
Tab. 6: List of all icons with descriptions