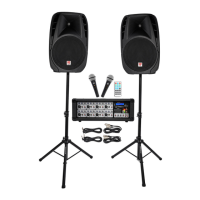
7
Functions (continued)
1. MIC/LINE input section
a. TREBLE
b. BASS
c. REVERB: on/off button
d. VOLUME: controls the MIC/LINE level.
e: MIC/LINE selector switch: When connecting a microphone, make sure that the
Line/Mic button is in the “down” position. When connecting a line level device, make
sure that the specic button is in the “up” position.
f: Hi-Z: press this button when an electric guitar or electric bass with passive audio
pickup is connected to the channel 2 ¼˝ jack .
g: Combo XLR/ ¼˝ TRS inputs
2. BT/AUX input section
a. BT status indicator LED
b. BT/TWS button
c. VOLUME: controls the BT/AUX level.
d. BT/AUX selector switch
e: L/R RCA auxilliary input
f. 3.5mm auxilliary input
3. POWER/ CLIP LED indicator: Will illuminate green when the unit is receiving power.
Will Illuminates red when there is a power overload. This indicates that limiting has
taken place to protect and avoid damage to the amplier or speaker. Continuously
overdriving the system will cause distortion and may cause damage to the amplier
and/or the speaker.
4. REVERB level input control
5. SUB volume control
6. MASTER VOLUME
7. MONITOR STERO/MONO selector button: determines the monitor output signal type.
8. USB 5V/1A charging port
9. XLR monitor output
10. Battery status LED indicators
11. IEC AC input port w/user serviceable fuse
12. Power switch
13. Voltage selector switch