10 REGLAREA MICROÎNTRERUPĂTOARELOR DE DESCHIDERE ȘI ÎNCHIDERE • ADJUSTMENT OF STOP
MICROSWITCHES IN OPEN AND CLOSED POSITIONS • EINSTELLUNG DER ENDANSCHLAG-
MIKROSCHALTER BEIM ÖFFNEN UND SCHLIESSEN • RÉGLAGE MICRO-INTERRUPTEURS D’ARRÊT
EN OUVERTURE ET FERMETURE • REGLAJE DE LOS MICROINTERRUPTORES DE STOP DURANTE LA
APERTURA Y EL CIERRE • AJUSTE DOS MICRO INTERRUPTORES DE STOP EM ABERTURA E FECHO
Opritoarele mecanice ale porții pentru deschidere și închidere
TREBUIE SĂ FIE ÎNTOTDEAUNA la locul lor.
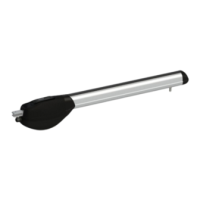
• Deșurubați șurubul (1) și scoateți capul pistonului (2).
• Scoateți profilul de aluminiu (3).
• Deblocați pistonul (4) și aduceți poarta în poziția complet deschisă (5).
• Reglați microîntrerupătorul de oprire în poziția deschis, glisându-l orizontal
(7) peste piulița de bronz.
• Închideți complet poarta și setați microîntrerupătorul de oprire pe poziția
de închidere.
• Prin deplasarea manuală a foilor porții, verificați intervenția
microîntrerupătoarelor de oprire
• Fixați, dar nu strângeți, șuruburile (6) suporturilor pentru
microîntrerupătoare (7).
• Blocați pistonul și efectuați câteva manevre pentru a verifica funcționarea
acestuia
• Fixați bine microîntrerupătoarele cu ajutorul șuruburilor (6).
• Introduceți profilul de aluminiu (3) și închideți capul pistonului (2) cu
ajutorul șurubului (1).
Mechanical stops in the gate open and gate closed positions must
always be used.
• Unscrew the screw (1) and remove the piston head (2).
• Remove the aluminium profile (3).
• Release the piston (4) and move the gate into the fully open position (5).
• Adjust the stop microswitch in the open position by sliding it horizontally (7)
above the bronze nut screw.
• Fully close the gate and adjust the stop microswitch in the close position.
• Move the wings manually and check that the stop microswitches intervene.
• Fasten, but do not tighten, the screws (6) for the microswitch supports (7).
• Lock the piston and perform a few manoeuvres to check that it is working
correctly.
• Secure the microswitches by tightening the screws (6).
• Insert the aluminium profile (3) and fasten the piston head (2) with the screw
(1).
Die mechanischen Anschläge des Tors in Öffnung und Schließung
müssen immer angebracht werden.
• Die Schraube (1) ausschrauben und den Kopfteil (2) des Kolbens entfernen.
• Das Aluminiumprofil (3) herausziehen.
• Den Kolben (4) entriegeln und das Tor in die maximale Öffnungsstellung (5)
bringen.
• Den Endanschlag-Mikroschalter beim Öffnen einstellen, dazu muss er
horizontal (7) auf die Schraubenmutter aus Bronze gleiten.
• Das Tor komplett schließen und Endanschlag-Mikroschalter beim Schließen
einstellen.
• Durch manuelles Bewegen der Flügel das Auslösen der Endanschlag-
Mikroschalter prüfen.
• Die Schrauben (6) der Halterungen (7) der Mikroschalter befestigen aber
nicht festziehen.
• Den Kolben arretieren und einige Bewegungen durchführen, um die korrekte
Funktionsweise zu überprüfen.
• Die Mikroschalter mit den Schrauben (6) endgültig festziehen.
• Das Aluminiumprofil (3) einsetzen und mit der Schraube (1) das Kopfteil (2)
des Kolbens schließen.
Les butées mécaniques du portail en ouverture et en fermeture doivent
toujours être prédisposées.
•
Dévisser la vis (1) et retirer la tête (2) du piston.
•
Défiler le profil d’aluminium (3).
•
Débloquer le piston (4) et porter le portail en position d’ouverture maximale (5).
•
Régler le micro-interrupteur d’arrêt en ouverture, en le faisant coulisser
horizontalement (7) au-dessus de la vis en bronze.
•
Fermer entièrement le portail et régler le micro-interrupteur d’arrêt en
fermeture.
•
Tout en déplaçant manuellement les vantaux vérifier l’intervention des
micro-interrupteurs d’arrêt.
•
Fixer, mais ne pas serrer, les vis (6) des supports (7) des micro-interrupteurs.
•
Bloquer le piston et effectuer quelques manœuvres pour en vérifier le
fonctionnement.
•
Bloquer définitivement les micro-interrupteurs avec les vis (6).
•
Introduire le profil en aluminium (3) et fermer avec la vis (1) la tête (2) du
piston.
Siempre han de estar preinstalados los topes mecánicos de la cancela al
abrirse y al cerrarse.
•
Desenrosque el tornillo (1) y quite la cabeza (2) del pistón.
•
Extraiga el perfil de aluminio (3).
•
Desbloquee el pistón (4) y coloque la puerta en la posición completamente
abierta (5).
•
Ajuste el microinterruptor de stop durante la apertura, haciendo que se
desplace horizontalmente (7) encima de la tuerca de bronce.
•
Cierre la cancela completamente y ajuste el microinterruptor de stop durante
el cierre.
•
Moviendo las puertas manualmente comprobar el funcionamiento de los
microinterruptores de stop.
•
Fije, pero no apriete, los tornillos (6) de los soportes (7) de los micro
interruptores.
•
Bloquee el pistón y haga algunas maniobras para verificar su funcionamiento.
•
Bloquee definitivamente los microinterruptores con tornillos (6).
•
Coloque el perfil de aluminio (3) y cierre con el tornillo (1) la cabeza (2) del
pistón.
Os batentes mecânicos do portão em abertura e em fecho devem
sempre ser predispostos.
•
Desenrosque o parafuso (1) e retire a cabeça (2) do pistão.
•
Extraia o perfil de alumínio (3).
•
Desbloqueie o pistão (4) e leve o portão para a posição de máxima abertura (5).
•
Ajuste o micro interruptor de stop em abertura, deslizando-o horizontalmente
(7) acima da porca de bronze.
•
Feche completamente o portão e ajuste o micro interruptor de stop no fecho.
•
Movendo as portinholas manualmente verifique a intervenção dos micro
interruptores de paragem.
•
Fixe, mas não aperte, os parafusos (6) dos suportes (7) dos micro
interruptores.
•
Bloqueie o pistão e realize algumas manobras para verificar o seu
funcionamento.
•
Bloqueie definitivamente os micro interruptores com os parafusos (6).
•
Insira o perfil em alumínio (3) e feche com o parafuso (1) a cabeça (2) do
pistão.
RO
EN
DE
FR
ES
PT
13 2
5
4 6 7 6 7
 Loading...