12
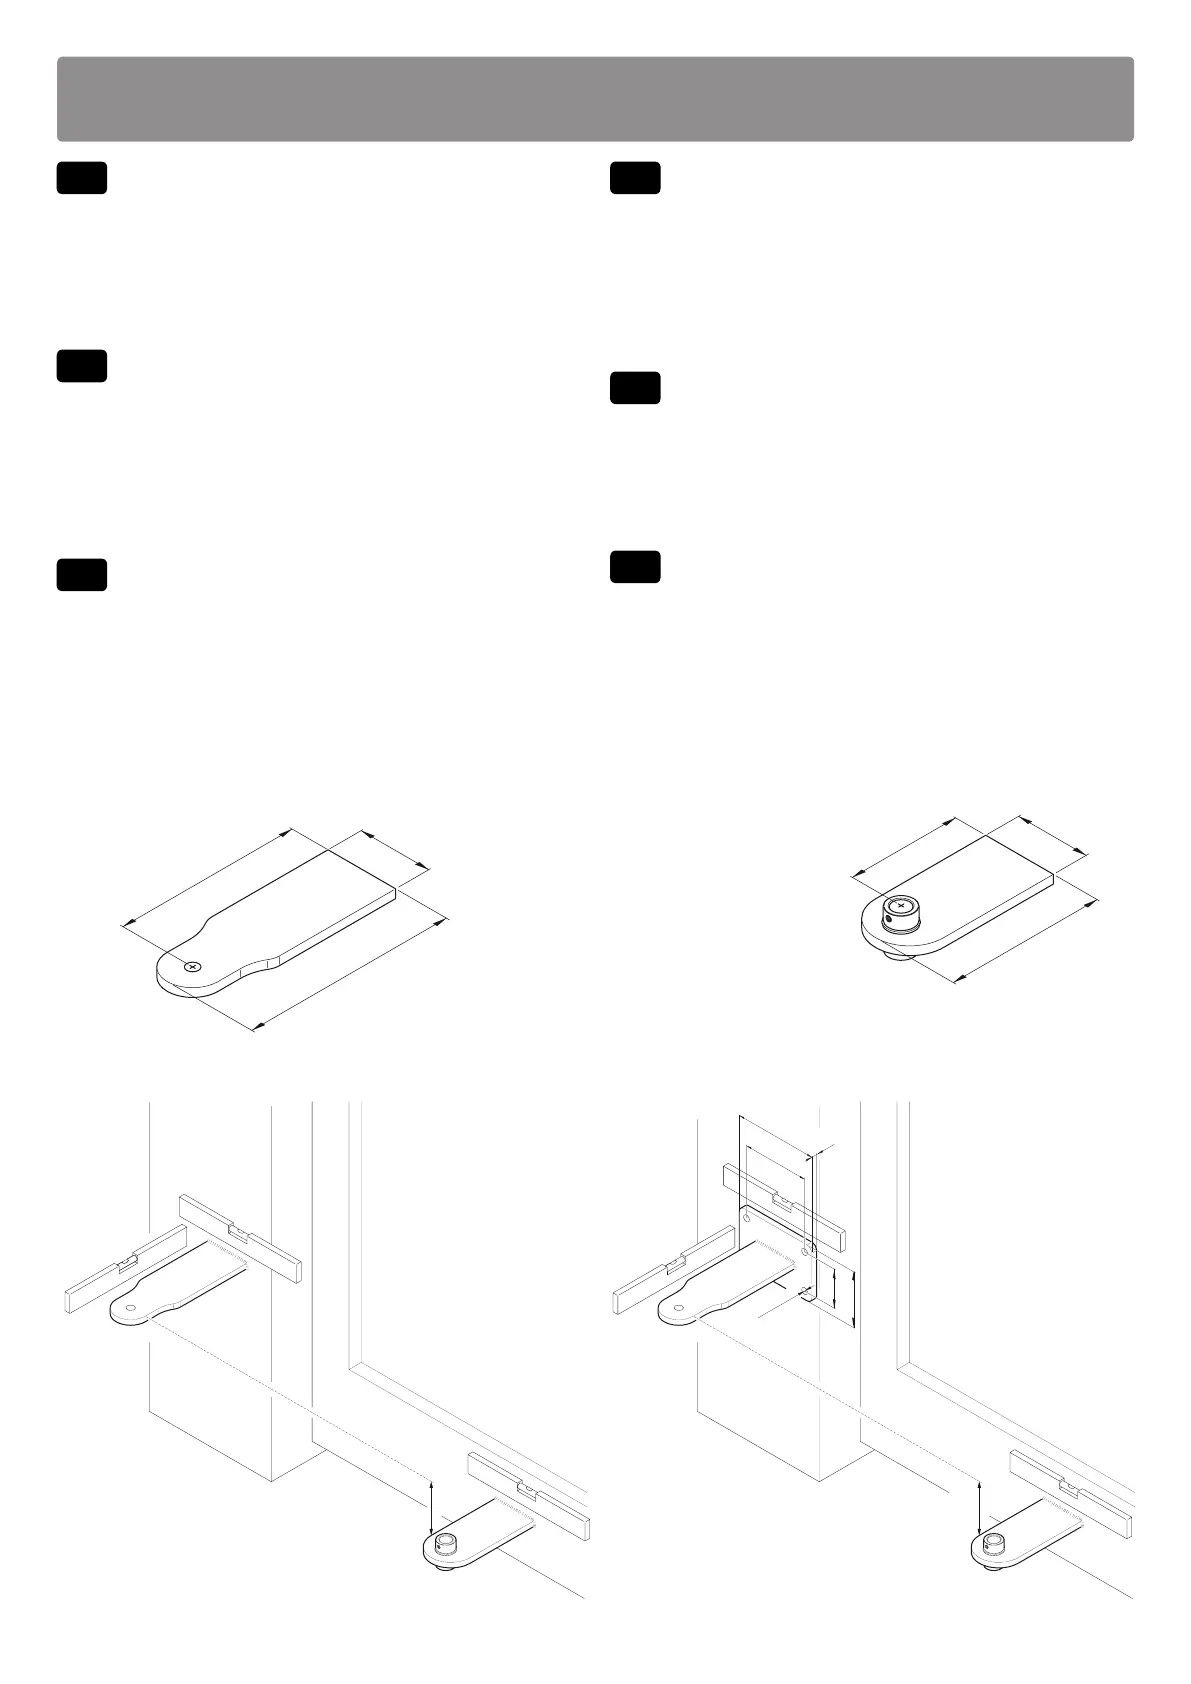
7. FISSAGGIO STAFFE
FIXATION DES ÉTRIERS FIXAÇÃO DOS SUPORTES
IT
FISSAGGIO STAFFE
1. Fissare la staa posteriore in bolla come da misure di installazione indicate al
paragrafo 6.
• Su pilastri in muratura ulizzare le stae predisposte per il po di materiale
con tasselli e vi adeguate.
• Su pilastri in ferro saldare la staa.
2. Con cancello completamente chiuso posizionare la staa anteriore, rispeando
le misure [D] e [E] e ssarla in bolla all’anta del cancello, come indicato in gura.
EN
1. Fasten the rear bracket in a perfectly level posion and in accordance with the
installaon measurements indicated in paragraph 6.
• For masonry/cement pillars, use the specic masonry brackets with suitable
anchor bolts and screws.
• With steel pillars, weld the bracket in place.
2. With the gate completely closed, t the front bracket to obtain the installaon
measurements [D] and [E], and fasten in a perfectly level posion to the gate
leaf as shown in the gure.
DE
1. Den hinteren Bügel nivelliert nach den im Abschni 6 angegebenen Installa-
onsmaßen befesgen.
• Bei gemauerten Pfeilern die für dieses Material vorgesehenen Bügel mit gee-
igneten Dübeln und Schrauben verwenden.
• Bei Eisenpfeilern den Bügel anschweißen.
2. Bei vollständig geschlossenem Tor den vorderen Bügel unter Einhaltung der
Maße [D] und [E] anbringen und nivelliert am Torügel befesgen, wie in der
Abbildung gezeigt.
60 mm 60 mm
150
100
70
120
Ø12
10
PILASTRI IN FERRO - IRON PILLAR PILASTRI IN CALCESTRUZZO - CONCRETE PILLAR
230
80
200
140
170
80
SMARTY 7 - SMARTY 7R
SMARTY 7R
FR
FIXATION DES ÉTRIERS
1. Fixer l’étrier arrière à niveau conformément aux cotes d’installaon indiquées
au paragraphe 6.
• Sur les piliers en maçonnerie, uliser les étriers prédisposés pour le type de
matériau avec chevilles et vis appropriées.
• Sur les piliers en fer, souder l’étrier.
2. Avec le portail enèrement fermé, placer l’étrier avant, en respectant les cotes
[D] et [E] et la xer à niveau avec le vantail du portail, comme indiqué dans la
gure.
ES
1. Fije el estribo trasero a plomo según las medidas de instalación indicadas en
el apartado 6.
• En pilares de hormigón ulice los estribos preinstalados para el po de ma-
terial con tacos y tornillos adecuados.
• Suelde el estribo en los pilares de hierro.
2. Con la cancela cerrada del todo coloque el estribo delantero, respetando las me-
didas [D] y [E] y jelo a plomo a la hoja de la cancela como se indica en la gura.
PT
FIXAÇÃO DOS SUPORTES
1. Fixe o suporte traseiro com um nível de bolha conforme as medidas de insta-
lação indicadas no parágrafo 6.
• Em pilares de alvenaria use os suportes adequados para o po de material
com buchas e parafusos apropriados.
• Em pilares de ferro solde o suporte.
2. Com o portão completamente fechado posicione o suporte dianteiro, respei-
tando as medidas [D] e [E] e xe-o com um nível de bolha à pornhola do
portão, conforme mostrado na gura.

 Loading...