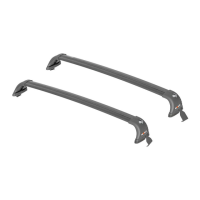
Prior to Assembly, check that your Roof Rack Box contains all the parts
as shown above. Ensure that the vehicle roof is clean and dry.
Please note that some illustrations depicted in these instructions are
only representative and your items may look different.
Read these instructions carefully before commencing.
You can use a protective cloth when installing your racks to protect
of vehicle’s finish.
If the straps have position labels, ensure your straps
correspond with the mounting positions on the vehicle before
installing them into the End Supports. If not, straps can be
installed in any position.
1. Un-fasten and rotate the Covers off the End Supports. The
Covers can remain attached to the Hinge on the Supports.
2. Remove the Gasket Pads by carefully pulling them off the
End Supports. (Pads are clipped on by “T” clips)
3. Feed the Strap neck through the cavity in the End Support. (Fig. 1a)
When the Neck is through rotate the Strap down and then push up to
align the bolt hole and the cage nut.
4.Use the supplied “L” wrench to feed the bolts into the cage nuts.
(Fig. 1b) The “L” wrench is located inside the end support.
5. Leave approximately 1” (25mm) of gap between the top of
the Strap and the bolt head . This will aid in installation to the
door frame. (Fig. 1c)
TIP: Pull the Buffer Strips back
approximately 1-1/2” (40mm)
to allow good access for the “L”
wrench to fit into the bolt
head.
6. The Gasket Pads all have vehicle roof
position text on the top inside surface.
(Left = Drivers side, Right = Passenger side)
These can now be replaced on the end
supports. Re-fasten using the T clips.
7. Using the vehicles B-Pillar place the
cross bars as specified. ( Fig. 2a & 2b)
Note: Gasket only shown for clarity.
Note- You may place the cross bar
position labels in the door frame
below the Straps for future reference.
Ford Fiesta Hatch Back
2011 - on
Roof Rack Installation Guide
PART No.
Fitting Straps into End Supports
Placement of End Supports onto Vehicle Roof
Page 1 of 2
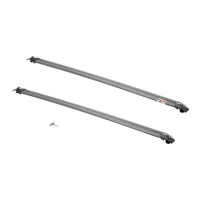
KIT COMPONENTS
Fig. 1a
Fig. 2a
Fig. 1c
Fig. 1b
25mm
(1”)
Front
Gasket Pads are pre-
attached to the Supports.
Note: Keys may be
packaged separately
in the kit.
Carrying Capacity
110 Lbs./
50 Kgs.
59768
59768N Rel. 7-9-12
Front
B-Pillar
Fig. 2b
L-Wrench
Located inside
End Support.
700mm (27-1/2” )
200mm
(7-7/8”)