14
Overall Settings for the JD-XA
Menu
[Shift]+
Cursor [
K
] [
J
]
Parameter
Cursor [
K
] [
J
]
Value
[-] [+]
Explanation
MIC REVERB
Switch OFF, ON Switches the reverb on/o.
Type
ROOM1,
ROOM2,
STAGE1,
STAGE2, HALL1,
HALL2, DELAY,
PAN-DLY
Type of reverb
Time 0–127 Time length of reverberation
Level 0–127 Volume of the reverb sound
MASTER EQ
Switch OFF, ON Switches the master EQ on/o.
Input Gain -15 dB–+15 dB Adjusts the input gain of the master EQ.
Low Freq 16 Hz–800 Hz Frequency of the low range.
Low Gain -15 dB–+15 dB Gain of the low frequency range.
Mid1 Freq
16 Hz–16000
Hz
Frequency of the middle range 1.
Mid1 Gain -15 dB–+15 dB Gain of the middle frequency range 1.
Mid1 Q 0.5–8.0
Width of the middle frequency range 1.
Set a higher value for Q to narrow the range
to be aected.
Mid2 Freq
16 Hz–16000
Hz
Frequency of the middle range 2.
Mid2 Gain -15 dB–+15 dB Gain of the middle frequency range 2.
Mid2 Q 0.5–8.0
Width of the middle frequency range 2.
Set a higher value for Q to narrow the range
to be aected.
Mid3 Freq
16 Hz–16000
Hz
Frequency of the middle range 3.
Mid3 Gain -15 dB–+15 dB Gain of the middle frequency range 3.
Mid3 Q 0.5–8.0
Width of the middle frequency range 3.
Set a higher value for Q to narrow the range
to be aected.
HighFreq
630 Hz–16000
Hz
Frequency of the high range.
High Gain -15 dB–+15 dB Gain of the high frequency range.
Saving the System Settings
System settings revert to their previous state when you turn o the power. If you
want to keep these settings even after the power is turned o, you must save the
system settings.
1.
Press the [Write] button.
2.
Use the Cursor [K] [J] buttons to select “SYSTEM,” and then press the [Enter]
button.
A conrmation message appears.
If you decide to cancel, press the [Exit] button.
3.
Press the [Enter] button.
A screen indicating “Completed!” appears, and the data is saved.
* NEVER turn the power o while you are saving settings.
MEMO
You can also save the system settings by pressing the [Write] button in the system
setting screen.
Convenient Functions (UTILITY)
These functions let you back up the JD-XA’s internal data to a USB ash drive, or to
restore data from a USB ash drive into the JD-XA.
Other utility functions let you return the JD-XA to its factory-set state, or initialize a
USB ash drive.
1.
Press the [Menu] button.
2.
Use the Cursor [K] [J] buttons to select “UTILITY,” and then press the [Enter]
button.
The UTILITY screen appears.
Menu items
Cursor [
K
] [
J
]
Explanation
BACKUP
Backs up data to a le with the name you specify.
System and user setting (. SVD) and pattern (. BIN) les are created.
&
“Backing Up Data (BACKUP)” (p. 15)
RESTORE
Restores data from the le you specify.
Data is restored from the system and user setting (. SVD) and
pattern (. BIN) les.
&
“Restoring Data (RESTORE)” (p. 15)
FACTORY RESET
&
“Returning to the Factory Settings (FACTORY RESET)”
(p. 15)
USB MEM FORMAT
&
“Formatting a USB Flash Drive (USB MEM FORMAT)”
(p. 14)
3.
Use the Cursor [K] [J] buttons to select the item that you want to edit, and
press the [Enter] button.
Formatting a USB Flash Drive (USB MEM FORMAT)
* Never turn o the power or remove the USB ash drives while the screen indicates “Executing.”
* Carefully insert the USB ash drives all the way in—until it is rmly in place.
1.
Press the [Menu] button.
2.
Use the Cursor [K] [J] buttons to select “UTILITY,” and then press the [Enter]
button.
3.
Use the Cursor [K] [J] buttons to select “USB MEM FORMAT,” and then press
the [Enter] button.
A conrmation message appears.
Format USB Mem?
[Exit]:N [Ent]:Y
If you decide to cancel, press the [Exit] button.
4.
Press the [Enter] button to execute.
When formatting is complete, the following screen appears.
Completed!
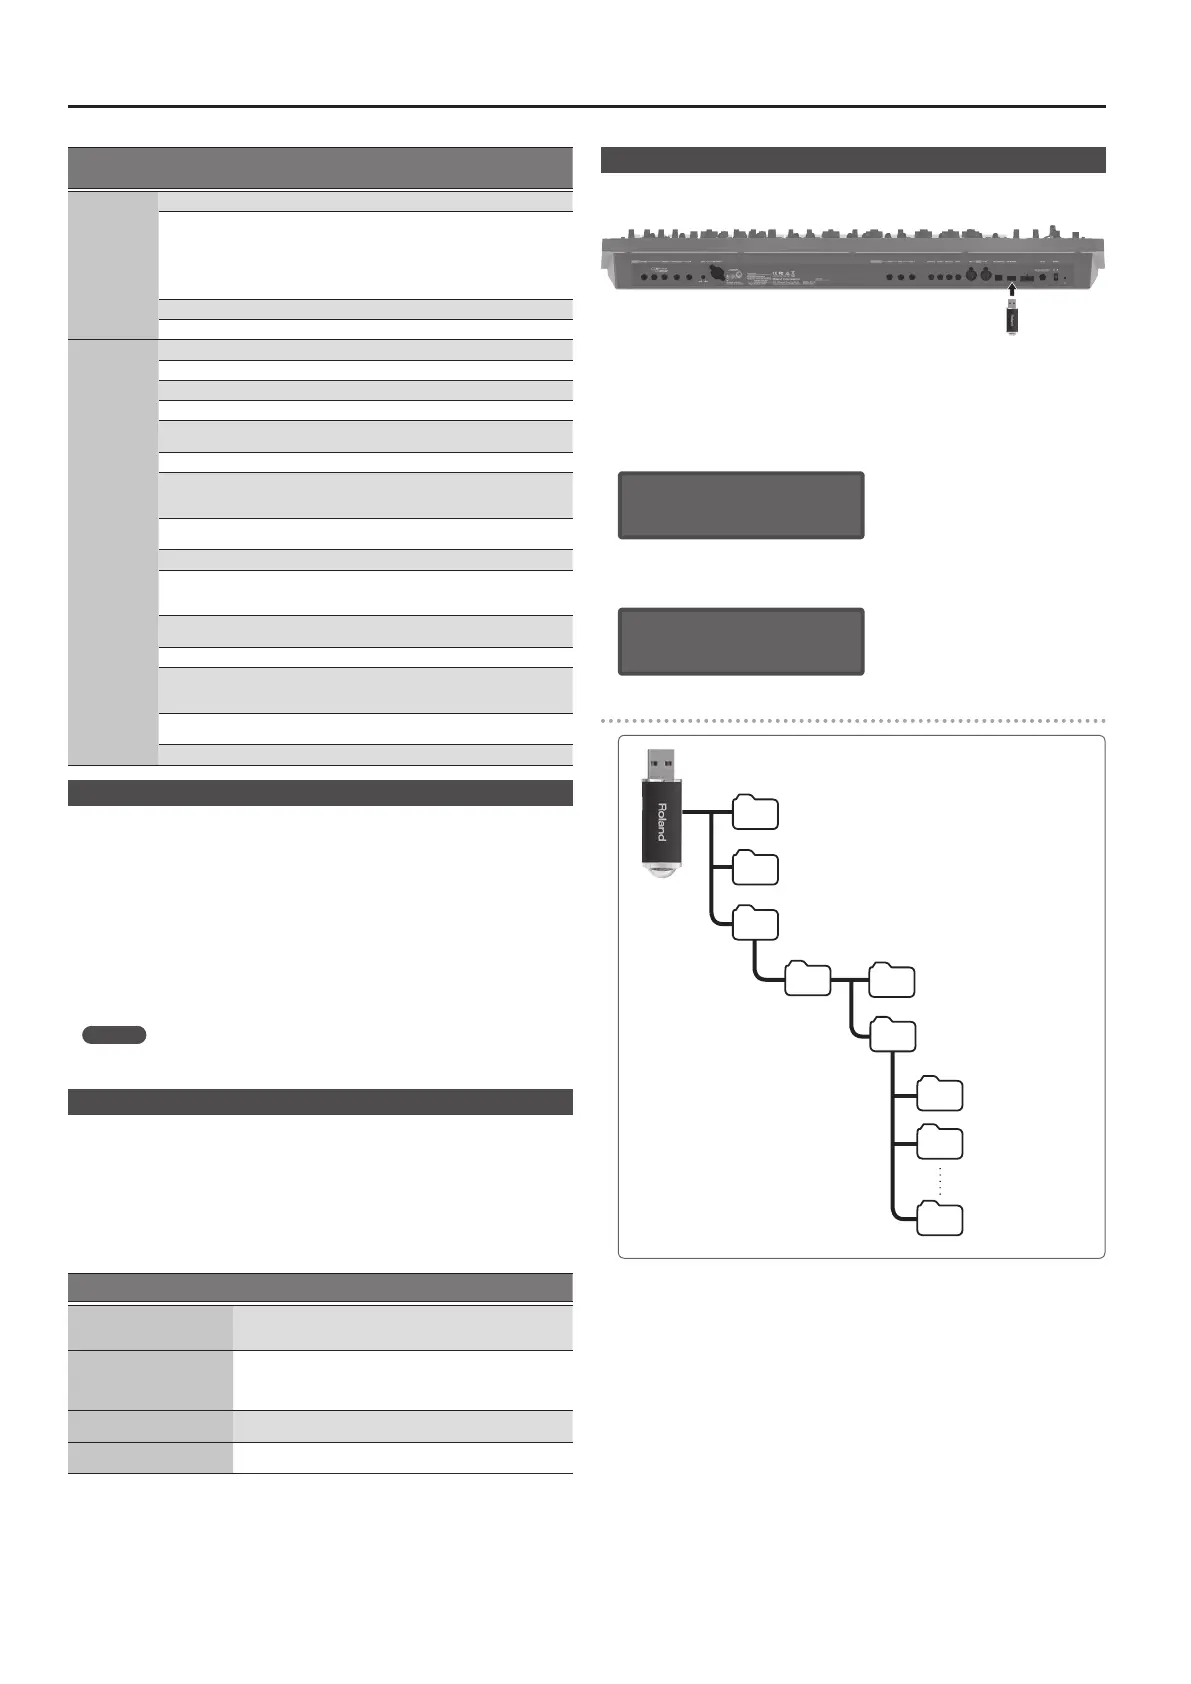
The folder structure of a USB ash drive
EXPORT SMF folder
Exported SMF les are saved here.
IMPORT folder
Files that you want to import to the JD-XA should be copied here.
(File name) . SVD : Tone import
(File name) . MID : SMF import
JD-XA folder
ROLAND folder
JD-XA programs and backup data are saved here.
BACKUP folder
Backup data is saved here.
PROGRAM folder
Programs in the USB ash drive are
saved here.
A folder
Bank A program data
B folder
Bank B program data
P folder
Bank P program data

 Loading...