Do you have a question about the Roland RA-90 and is the answer not in the manual?
Use only the external AC Adaptor supplied with the RA-90 for proper operation.
Ensure the AC Adaptor voltage matches your country's requirements.
Disconnect the AC Adaptor from the wall outlet when the device is not used for long periods.
Disconnect the AC Adaptor immediately in the event of an electrical storm.
Information regarding the safe handling and replacement of lithium batteries.
Guidelines and warnings for radio and television interference compliance.
Explanation of how music styles define accompaniment patterns based on genre.
Ensure the correct power supply voltage matches local requirements.
Use only the AC Adaptor supplied with the RA-90.
Avoid using sockets with noise-generating devices.
It is normal for the unit to become warm during operation.
Unplug the AC Adaptor if the unit will not be used for an extended period.
Disconnect the AC Adaptor immediately during electrical storms.
Turn off all units before connecting MIDI devices.
Connect MIDI cables securely to prevent operational issues.
Be aware of potential computer malfunctions due to static electricity.
Avoid turning the unit on immediately after turning it off.
Avoid operating near neon lights or CRT displays to prevent interference.
Refer all servicing to qualified service personnel to avoid electric shock.
Procedure for resetting the RA-90 to its factory settings.
Avoid extreme heat, humidity, direct sunlight, dust, and vibrations.
Instructions for dusting and cleaning the instrument's cabinet.
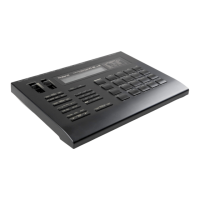
Connect standard stereo headphones for private playing and practice.
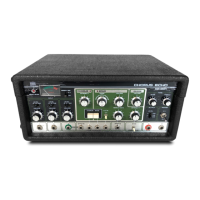
Socket for connecting the supplied external AC Adaptor.
Switch to turn the instrument on and off.
Connectors for MIDI data transmission and reception.
Connect an optional sustain pedal for foot control.
Sockets for amplifying the RA-90's sound through external amplifiers.
Control for adjusting the contrast of the LCD display.
Socket for connecting an optional footswitch for various functions.
Procedure for connecting and powering on the RA-90 unit.
Adjusts the overall volume of the RA-90, including headphones.
Connecting and using an optional expression pedal for volume control.
Instructions on how to select and listen to the built-in demo songs.
List of demo songs and their composers.
How to set MIDI channels for receiving data for each RA-90 section.
Controlling the RA-90 with various MIDI instruments.
Setting a common MIDI receive channel for all sections.
Selecting limits for each section to set split points.
Memorizing section ON/OFF configurations into User Programs.
Procedure for selecting Upper section tones using GROUP, BANK, and NUMBER buttons.
The default lower tone selected upon power-on.
How to select different lower tones using SELECT, GROUP, BANK, NUMBER buttons.
The default bass tone selected upon power-on.
How to select different bass tones using SELECT, GROUP, BANK, NUMBER buttons.
Notes regarding bass tone selection and its effect on arranger parts.
The default M Drum Kit 1 (Dry Set) selected upon power-on.
How to select different drum kits using SELECT and NUMBER buttons.
Introduction to the RA-90's 33 stereo sound effects and 4 effect mixtures.
How to play the keyboard in Sound Effects Mode.
How to briefly hear or hold individual sound effects.
Memorizing sound effect configurations into User Programs.
How to play sound effects using the 8 dedicated pads.
Procedure to assign specific sound effects from the keyboard to the pads.
Pads cannot be played dynamically; they produce full volume effects.
How to hold sound effects played from the pads using the HOLD button.
Description of continuous and rhythmic sound effects.
The balance section comprises 5 rotary encoders for volume and reverb adjustment.
How to use the rotary encoders to adjust the volume of individual sections.
The default music style (11 ROCK 1) selected upon power-on.
How to select styles using BANK and NUMBER buttons.
How to change styles on the fly without interrupting playback.
Information on using optional Music Style Cards for additional rhythms.
Three ways to start a music style: START/STOP, SYNC START, INTRO/ENDING.
How to start a style synchronized with keyboard playing.
How to adjust the tempo using the TEMPO/DATA Dial.
Pressing the VARIATION button to switch between original and variation styles.
How to return to the basic (original) style by pressing the VARIATION button again.
Starting a style with a musical introduction using the INTRO/ENDING button.
Ending a playing style with a musical finale using the INTRO/ENDING button.
Two ways to stop a music style: START/STOP or INTRO/ENDING.
Inserting a one-measure fill-in that returns to the basic style.
Inserting a one-measure fill-in that returns to the variation style.
Transitioning from original style to variation style via fill-in.
Using a footswitch to automatically control fill-in transitions.
Resetting tempo, stopping and restarting the style.
Setting the style tempo by tapping on the RESET/TAP TEMPO button.
Inserting a silent break (mute) into the arrangement.
Using a footswitch to operate the Break Mute function.
How to activate the Melody Intelligence feature for automatic counter-melodies.
Conditions required for Melody Intelligence to function.
Switching between simple and complex arrangements for each style.
How to play major chords by pressing a single key.
How to play major seventh chords by adding a note.
How to play seventh chords using two notes.
How to play minor chords by adding a minor third.
How to play minor seventh chords.
How to play diminished chords using two notes.
How to play augmented chords using three notes.
How to play suspended fourth chords using three notes.
How to play suspended seventh chords using four notes.
Notes on playing chords conventionally or with Chord Intelligence.
Information on obtaining and using optional Music Style Cards.
Instructions for inserting and playing styles from a Music Style Card.
How the Revolving Bass function alters the accompaniment bass pattern.
How to use the Fade Out button to gradually lower the volume.
Introduction to the built-in Digital Reverb unit.
How to select different reverb types using the TEMPO/DATA Dial.
Introduction to the built-in Chorus effect.
How to select different chorus types using the TEMPO/DATA Dial.
How to slightly raise or lower the pitch of the RA-90.
Enables playing music in one key while hearing it in another.
How to assign various functions to the programmable footswitch.
Controls sustain for UPPER tones via foot.
Benefits of using User Programs for saving and recalling panel configurations.
How to select and recall User Programs using SELECT, BANK, and NUMBER buttons.
List of functions that can be recorded into User Programs.
The RA-90 can store a total of 64 User Programs (8 Banks x 8 numbers).
Procedure for writing panel configurations into User Programs.
Steps to activate a stored User Program.
Options for recalling User Programs using UP/DOWN buttons.
Omitting Arranger or Tones parameters when selecting a User Program.
Procedure to save current User Programs before performing a factory reset.
Disabling Arranger parameters when recalling a User Program.
List of parameters not recalled when CANCEL-ARRANGER is active.
List of parameters not recalled when CANCEL-TONES is active.
Explanation of Musical Instrument Digital Interface (MIDI).
Details on the MIDI IN, OUT, and THRU sockets.
Information about the 8 factory MIDI sets for different instruments.
Procedure to recall a specific factory MIDI set.
How to access the MIDI settings menu.
How to cycle through different MIDI parameter displays.
How to increase or decrease parameter values using MIDI DATA tabs.
How to return to the main display from MIDI settings.
Information about the two MIDI IN sockets (rear and front).
Setting the basic MIDI channel for receiving messages.
MIDI settings for the UPPER section, including channel and notes.
Adjusting pitch shift and limits for UPPER section notes.
Parameter to alter the pitch of each note in the musical scale.
How keyboard scaling helps reproduce sounds of various musical cultures.
Procedure to adjust keyboard scaling parameters.
Function to transfer User Programs, Global, and MIDI data to external devices.
Steps to use the Data Dump function for transferring data.
Operating the RA-90 as a GS generation sound module.
Correct power-on sequence when connecting a keyboard with Local ON/OFF.
How the keyboard's sound source disconnects from the RA-90 in this mode.
Table describing various bypass combinations for RA-90 and controller sound sources.
Procedure to enter and exit GS Mode via MIDI Select tab.
How to assign the KBD Recognition Off function to the footswitch.
Steps for using the KBD Recognition Off function with a MIDI guitar.
How to control tones using external MIDI devices and Program Change numbers.
Connecting the RA-90 to a MIDI guitar using MIDI cables.
How to select MIDI sets 3 or 4 for guitar connection.
Connecting the RA-90 to a MIDI synthesizer using MIDI cables.
How to select MIDI sets 5 or 6 for synthesizer connection.
Connecting the RA-90 to a MIDI accordion using MIDI cables.
How to select MIDI sets 7 or 8 for accordion connection.
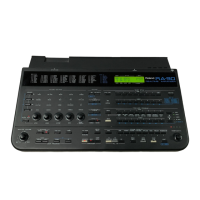
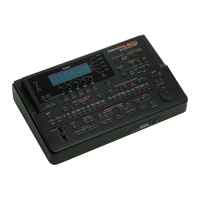
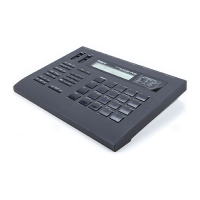
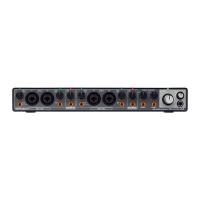
List of all terminals and ports on the rear panel.
List of components located on the front panel.
Details about the external AC/DC power adapter.
Physical dimensions of the RA-90 unit.
List of optional accessories available for the RA-90.
| Brand | Roland |
|---|---|
| Model | RA-90 |
| Category | Recording Equipment |
| Language | English |