Do you have a question about the Rothenberger RP PRO III and is the answer not in the manual?
Read and retain manual; warranty void if misused or damaged by incorrect handling.
Explanation of danger, attention, action required, and protective equipment symbols.
Keep area clean, well-lit, and free of explosive atmospheres; keep children away.
Use correct plug, avoid earthed surfaces, protect from moisture, use RCD if needed.
Stay alert, use common sense, wear PPE, avoid distractions, and do not use when tired.
Operate as designed, ensure controls work, unplug before adjustments, keep away from children.
Serviced by qualified technician; use genuine Rothenberger spare parts for safety.
Ensure the electrical system has an appropriate RCD circuit-breaker for safety.
Always disconnect the pump after each test and before moving or maintenance.
Do not pull by cord, never let unqualified persons use, point water jet safely.
Use waterproof extension cords; inappropriate cords are dangerous.
Do not dispose of with domestic waste; comply with WEEE directive for environmental protection.
Provides voltage, frequency, power, current, and protection class details.
Details maximum pressure, nominal flow rate, and device weight/dimensions.
Specifies supply water type, high pressure hose size, lubricant, and noise level.
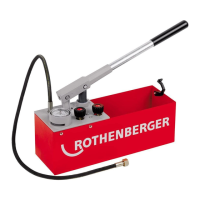
Pressure testing seals on piping systems and vessels for hydraulic, heating, and solar systems.
Check high pressure hose, cord, and water filter; empty if stored long term.
Avoid storing in very cold places to prevent freezing; keep water filter clean.
Use clean freshwater to clean internal circuits after using antifreeze agents.
Kit available for replacing common worn or eroded gaskets to prolong pump life.
Parts replacement, servicing, and electrical inspection must be done by official Service Centres.
Connect water inlet hose to appliance; use direct mains or storage container.
Connect high pressure hose to the appliance and fitting on the system to be tested.
Open V2 fully, set V1 to -BAR; turn V1 clockwise to increase pressure.
Plug into mains (230V 50 Hz or 110V with transformer).
Fill system, switch on pump, bleed air, adjust pressure using V1, close V2 to maintain.
Use V1 to increase or decrease pressure; use V2 to close and stop the pump.
Open V1 & V2 fully, then turn knobs back half a turn to prevent sticking.
Check plug/socket, voltage, or motor seizure; contact service if needed.
Check water supply, input water air, filter, gaskets, or V1 valve setting.
Check for air in supply water or insufficient water supply.
Check V2 valve operation or potential dirt; return to service centre if issues persist.
| Weight | 10.5 kg |
|---|---|
| Max Flow Rate | 6 l/min |
| Power Supply | 230 V |
| Power | 1300 W |
| Power Consumption | 1300 W |