89. Ammeter Faults.
Check for faults in ammeter by substitution.
BATTERY. (Lucas Type PUW7E-5).
90. Topping Up.
When examining a battery, do not hold naked
lights near the vents as there is a danger of igniting
the gas coming from the plates. Remove the vent
plugs and see that the ventilating holes in each are
quite clear. Remove any dirt by means of a bent wire.
A clogged vent plug will cause the pressure in the
cell to increase, due to gases given off during
charging, and this may cause damage. Make sure that
the rubber washer is fitted under each vent plug,
otherwise the electrolyte may leak.
Pour a small quantity of distilled water into each
of the cells to bring the acid level with the tops of the
separators.
Acid must not be added to the battery unless
some is accidentally spilled. Should this happen, the
loss must be made good with acid diluted to the same
specific gravity as the acid in the cells. This should be
measured by means of a hydrometer.
91. Checking Conditions.
First ascertain that the battery is a lead acid type
and not a NiFe (nickel-cadmium alkaline) type, as the
same hydrometer must not be used to take readings
on both types of battery. The state of charge of the
battery should be examined by taking hydrometer
readings of the specific gravity of the acid in the
cells. The specific gravity readings and their
indications are as follows:
1.280-1.300 Battery fully charged.
About 1.210 Battery about half discharged.
Below 1.150 Battery fully discharged.
These figures are given assuming the temperature of
the acid is about 60°F.
Each reading should be approximately the same.
If one cell gives a reading very different from the rest
it may be that the acid has been spilled or has leaked
from this particular cell or there may be a short
circuit between the plates. This will necessitate its
return to a Repair Depot for rectification.
92. Cleaning.
Wipe the top of the battery to remove all dirt or
water.
Note :-Do not leave the battery in a discharged
condition for any length of time. If a motorcycle is
to be out of use, the battery must first be fully
charged and afterwards given a refreshing charge
about every two weeks.
93. Earthing Connections.
See that the lead from the negative terminal of
the battery is securely connected to the cycle frame or
other suitable earth.
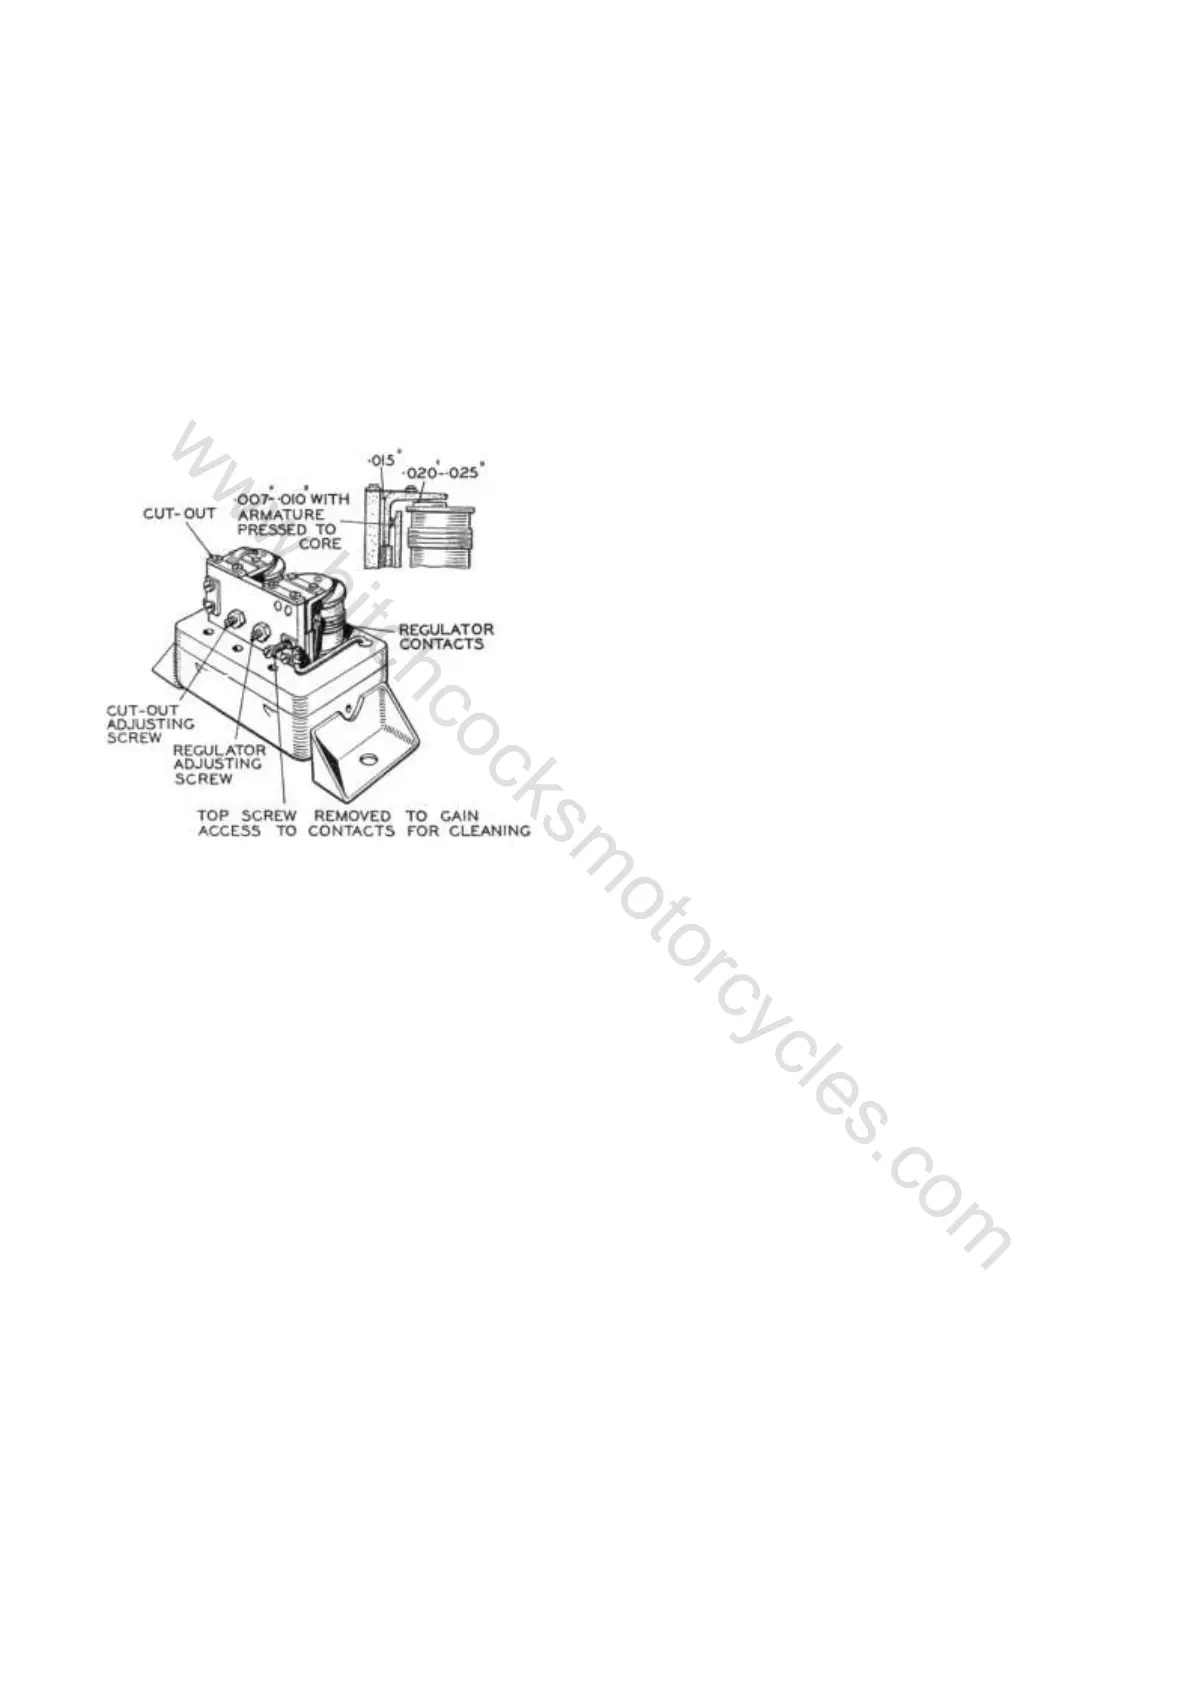
VOLTAGE REGULATOR ADJUSTMENTS
Fig. 58
80. Adjustment of Cut-Out.
If, after adjusting the voltage regulator and
reconnecting the wire to the "A" terminal, no charge is
registered on the ammeter, check the cut-out contact
points. See that these are clean and making good
contact when closed. Set the voltage at which the
points close to 6.2-6.6 volts, adjusting in a similar
manner to the Voltage Regulator (see Para. 83) but
using the cut-out adjusting screw.
87. Regulators for use with NIFE Batteries.
A special regulator marked NiFe is supplied for
use with these batteries. If a NiFe battery is substituted
for the lead acid type a new regulator must be fitted.
AMMETER. (Lucas Type CZ27)
88. Removal and Replacement.
Take out the three screws from the panel on the
headlamp and remove the panel. Unscrew the
ammeter terminal nuts and lift off the cable eyelets.
Bend back the four metal tags securing the ammeter
and remove the ammeter from the panel.
Press the armature back against the regulator
frame and down on to the bobbin core, with the feeler
gauges in position and secure the armature by
tightening the two fixing screws. Adjust the gap
between the regulator contacts when the armature is
pressed down on to the bobbin, to between .007 in.
and .010 in. This is done by inserting or removing
packing shims at the back of the fixed contact. After
completing the mechanical setting, the electrical
setting of the regulator must be checked. See Para.
83.
 Loading...