Do you have a question about the Runva Premium Series and is the answer not in the manual?
Details the function and mandatory installation of the power isolating switch for winch operation and safety.
Locates the wireless remote controller, which is packaged with the control box.
Confirms the possibility of rotating the gearbox and refers to included instructions.
Explains how to rotate the motor by removing and refitting bolts on the main bracket.
Details the procedure for rotating the winch 180 degrees, including rope re-spooling.
Advises referring to winch bar manufacturer for fitting instructions if unsure.
This document provides comprehensive instructions and guidelines for the installation, operation, and maintenance of a Runva Premium Edition Winch, emphasizing safety and proper usage to ensure longevity and preserve warranty.
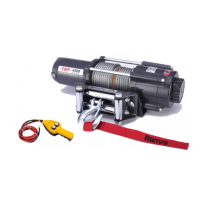
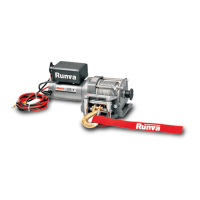
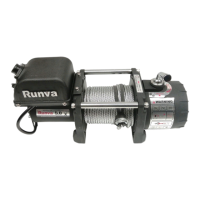
The Runva Premium Edition Winch is designed for vehicle recovery and is supplied with various components to facilitate its installation and use. Key components include the winch motor, gearbox, control box, power leads, and a power isolator switch. The winch is designed for robust performance, but proper installation and adherence to guidelines are crucial for its safe and effective operation.
For optimal performance and to prevent damage, the winch requires a vehicle battery that is in good condition and has a minimum Cold Cranking Amps (CCA) rating of 750CCA. Using a battery with a lower CCA rating can lead to damage to the winch motor or solenoid and will void the product warranty. It is essential to ensure the battery can supply sufficient power to handle the demands of winching operations.
The winch's gearbox can be rotated to suit different installation requirements. Detailed instructions for gearbox rotation are included with the winch and are also available on the Runva website's support page. Similarly, the motor can also be rotated by removing the bolts that secure it to the main bracket, rotating it to the desired position, and then re-fitting the bolts. This flexibility allows for customized fitment depending on the vehicle and winch bar configuration.
Mounting the Winch: The winch should be securely bolted into a winch bar or other winch-rated plate, following the specific instructions provided by the manufacturer of the bar or plate. Runva does not provide vehicle-specific fitting instructions or technical support. If there is any uncertainty regarding the installation process, it is highly recommended to consult a 4x4 specialist or professional installer. Bolt torque settings for installation are available on the Runva website's support page.
Control Box Mounting: The winch package includes a 2-in-1 control box mounting bracket system. This system allows for mounting the control box either on top of the winch itself or to a winch bar using an angled mounting bracket. This versatility ensures that the control box can be positioned conveniently and securely, regardless of the specific vehicle setup.
Proper wiring is critical for the safe and correct operation of the winch. The winch motor terminals are clearly marked with color-coded insulators to simplify the wiring process.
Main Power Leads: The two longer 1.8-meter leads supplied with the winch are the main power leads. These should be connected to the corresponding color-coded terminals on the winch motor.
Earth Connection: The earth lead from the winch motor must be connected directly to the negative terminal of the vehicle battery. Connecting it to the chassis instead of the battery can cause damage to the winch motor or solenoid and will void the warranty. In vehicles equipped with a smart alternator or those that do not allow direct connection of the winch to the battery's negative terminal, the winch earth lead should be bolted to the battery earth on the chassis, rather than directly to the battery itself.
Control Box Earth: A thin black cable from the control box also connects to the same terminal on the winch motor as the main earth lead.
Power Isolator Connection: The long red power lead originating from the control box connects to one of the terminals on the power isolator switch. A shorter 30cm red power lead then connects the other terminal of the isolator to the battery's positive terminal. When the isolator key is inserted and turned to the "on" position, power is supplied to the winch. Turning the key to the "off" position cuts off all power.
The power isolator switch is an essential safety component that must be installed. It provides a convenient way to cut off power to the winch when not in use, preventing accidental operation and enhancing safety. The switch should always remain in the "OFF" position with the key removed until the winch is needed. The key should be stored securely within the vehicle. This practice ensures that the winch cannot be inadvertently activated, which is crucial for safety, especially when the vehicle is unattended or during maintenance.
Once properly fitted and wired, the winch is ready for use. It can be operated using either the plug-in handheld remote or the wireless remote controller, which is packaged with the control box.
Recovery Techniques: Every recovery situation is unique and carries potential risks. There is no single manual that can cover all "how-to" scenarios for recovery, as no two recoveries are identical. Users are expected to understand basic recovery techniques to safely operate the winch. For those new to 4x4 activities, joining a club can be highly beneficial for learning essential skills. Numerous videos on platforms like YouTube also demonstrate various winching and recovery techniques in different scenarios. It is paramount to use the correct and safe recovery equipment in conjunction with the winch.
Rope Management: The winch rope is secured into the drum with an aluminum crimp, held in place by a grub screw. When walking the rope out, care must be taken not to pull it with excessive force, as this could cause the rope to separate from the crimp. Although the crimp is well-secured, it can detach under sufficient force. If the rope needs to be removed for any reason, the grub screw must be undone first before attempting to pull the crimp out of the drum. This applies to both synthetic rope and steel cable.
Minimum Wraps: To prevent damage and ensure safe operation, a minimum of five tightly wrapped turns of cable/rope must remain on the drum before winching any load. Failure to maintain this minimum can compromise the integrity of the rope attachment and potentially damage the winch.
180-Degree Winch Rotation: If a 180-degree rotation of the winch is desired to suit specific fitment needs, it is crucial to unspool all of the rope and then feed it onto the drum in the opposite direction. This will cause the rope to feed over the top of the drum instead of from the bottom. The standard fitment position typically has the motor on the left and the gearbox on the right when viewed from the winch's front. The arrow direction on the winch must be followed. Failure to change the rope direction as instructed will likely damage the winch and void the warranty.
Regular maintenance is essential to ensure the longevity and reliable performance of the Runva winch, as well as to maintain warranty validity.
Regular Exercise: The winch cable/rope must be run in and out at least once every 4 to 6 weeks. Failure to perform this regular exercise will void the warranty. Winches are not designed to sit unused for extended periods. This practice helps to keep the rope flexible, prevents seizing of internal components, and ensures the motor and gearbox remain in good working order.
Connection Checks: Regularly check all connections on the winch motor to ensure they are clean and tight. Loose or corroded connections can lead to poor performance, overheating, and potential damage.
Further Information: Additional detailed information on maintenance requirements and the Runva Warranty policy can be found on the Runva website's support page. Adhering to these guidelines is crucial for maximizing the lifespan of the winch and ensuring it performs optimally when needed.
If longer power leads are required for a specific setup, they can be replaced. However, it is critical to also increase the diameter of the new leads. Failing to increase the lead diameter when extending the length can lead to significant voltage drop, which can damage the winch due to insufficient power delivery.
For users who prefer to hide their control box for aesthetic or security reasons, Runva can supply a remote extension plug. This allows the handheld remote to still be used effectively, even if the control box is not easily accessible. More information on this accessory is available on the Runva website.
| Motor Type | Series Wound |
|---|---|
| Series | Premium |
| Voltage | 12V/24V |
| Gear Train | 3 Stage Planetary |
| Brake | Automatic Load-Holding |
| Fairlead | Steel Roller or Aluminum Hawse |
| Rope Type | Steel or Synthetic |
| Weight | Varies by model |
| Remote Control | Included |
| Rope | Varies by model |