EasyManua.ls Logo

Ryobi BAND SAW - User Manual

Ryobi BAND SAW
24 pages
Print Icon
To Next Page IconTo Next Page
Loading...
OPERATOR'S MANUAL
9 in. (229 mm) BAND SAW
BS902
SAVE THIS MANUAL FOR FUTURE REFERENCE
Your new Band Saw has been engineered and manufactured to Ryobi's high standards for dependability, ease of
operation, and operator safety. Properly cared for, it will give you years of rugged, trouble-free performance.
WARNING: To reduce the risk of injury, the user must read and understand the operator's manual before using
this product.
Thank you for buying a Ryobi tool.
Question and Answer IconNeed help?

Do you have a question about the Ryobi BAND SAW and is the answer not in the manual?

Summary

Introduction

Important Servicing Information

Details on servicing requirements and recommendations for repairs, emphasizing qualified technicians.

General Usage Warning

Warning to read and understand the operator's manual completely before using the tool for safe operation.

Eye Protection Warning

Emphasizes wearing safety goggles or a full face shield to prevent severe eye damage from thrown objects.

Rules for Safe Operation

Safety and International Symbols

Explains the meaning of safety symbols and pictographs used in the manual and on the product.

Electrical

Extension Cords

Guidelines for selecting and using appropriate extension cords, including wire size and type.

Electrical Connection

Instructions for connecting the band saw to a 120-volt, 60Hz AC power supply.

Grounding Instructions

Details on proper grounding to reduce the risk of electric shock and ensure safety.

Glossary of Terms for Woodworking

Features

Product Specifications

Lists technical specifications such as blade width, capacity, input rating, and net weight.

Know Your Band Saw

Familiarizes the user with the saw's operating features, controls, and safety requirements.

Unpacking

Instructions for safely unpacking the band saw and checking all included parts.

Tools Needed

Loose Parts List

Assembly

Mounting Band Saw to Workbench

Provides instructions for securely mounting the band saw to a workbench or stable surface.

Clamping Band Saw to Workbench

Details how to clamp the saw to a workbench using a mounting board for portability.

Mounting the Saw Table

Step-by-step guide for installing the saw table onto the band saw unit.

Squaring the Saw Table to the Blade

Instructions for aligning the saw table perpendicular to the blade for accurate cuts.

Adjusting Blade Tension

Guides on how to set and check the correct tension for the band saw blade.

Tracking the Blade

Procedures for adjusting the blade to run correctly centered on the wheels.

Operation

Basic Operation of the Band Saw

Overview of the band saw's capabilities and fundamental operational principles.

Cutting Procedures

Step-by-step instructions and safety tips for performing various cutting operations.

Relief Cuts

Explains the technique for making relief cuts when cutting intricate curves.

Scroll Cutting

Details techniques for performing general scroll cutting operations on the band saw.

Removing Jammed Material

Safety procedures for safely removing any material jammed in the blade path.

Avoiding Injury

General safety precautions and best practices to prevent injuries during operation.

Locking the Switch

Instructions on how to lock the power switch to prevent accidental startup.

Before Leaving the Saw

Procedures to follow before leaving the band saw unattended or finishing work.

Tilting the Table

How to adjust the saw table's angle for performing bevel cuts.

Using the Miter Gauge

Instructions for using the miter gauge to make accurate angle cuts.

Using the Rip Fence

Guidance on how to properly install and use the rip fence for straight cuts.

Adjustments

Installing and Adjusting the Blade

Detailed steps for installing a new blade and making necessary tension and tracking adjustments.

Adjusting Blade Guide Assembly

Procedures for setting the blade guide assembly to prevent blade twisting or breakage.

Adjusting Thrust Bearings, Blade Guide Support, and Blade Guides

How to adjust thrust bearings, blade guide support, and blade guides for optimal blade stability.

Maintenance

General Maintenance

General cleaning and care instructions, avoiding solvents and keeping the saw clean.

Motor;Electrical

Maintenance advice for the motor, including cleaning sawdust and checking cords.

Tires

Instructions for cleaning accumulated pitch and sawdust from tires and replacing worn tires.

Blade Guides

Maintenance procedures for blade guides, including filing or replacing worn guides.

Lubrication

Information stating that tool bearings are pre-lubricated for life and require no further lubrication.

Brushes

Maintenance and adjustment instructions for the brush that cleans the tire and wheel.

Drive Belt

Steps for replacing the drive belt, located behind the lower wheel.

Troubleshooting

Notes

Extension Cord Caution

Service Information

Model Number Identification

Overview

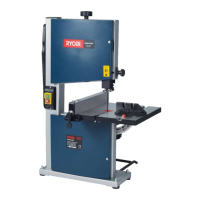
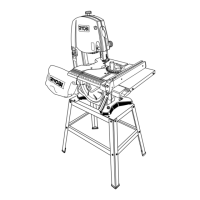
This document is the operator's manual for the Ryobi 9 in. (229 mm) Band Saw, model BS902. It provides comprehensive information on the tool's operation, assembly, adjustments, maintenance, and safety precautions.

Function Description:

The Ryobi BS902 is a 9-inch (229 mm) band saw designed primarily for "curve cutting" operations in wood and wood composition products. It can also perform straight-line cutting tasks such as cross-cutting, ripping, mitering, beveling, compound cutting, and resawing. The saw is not capable of making inside or non-through cuts. It operates by using a continuous band blade that rotates around two wheels, with the workpiece fed into the blade on a worktable.

Important Technical Specifications:

  • Blade Width: 1/8 in. to 3/8 in. (3 mm to 10 mm)
  • Blade Length: 59-1/4 - 59-1/2 in. (1505 mm - 1511 mm)
  • Frame to Blade Capacity: 9 in. (229 mm)
  • Cutting Thickness Capacity: 3-5/8 in. (92.07 mm)
  • Table Size: 11-13/16 in. x 11-13/16 in. (30 cm x 30 cm)
  • Input: 2.5 Amperes
  • Rating: 120 Volt, 60Hz AC Only
  • No Load Speed: 3,000 SFPM (Surface Feet Per Minute)
  • Net Weight: 37 lbs. (17.8 kg)
  • Dust Port: 2-1/4 in. (57.15 mm)

Usage Features:

  • Worklight: Equipped with a worklight to illuminate the work area for safer and more accurate cuts.
  • RapidSet™ Blade Tension Lever: Allows for quick and easy control of blade tension when changing blades and making adjustments for various sawing applications.
  • Tracking Knob and View Window: The tracking knob adjusts the blade's position on the wheels, and the tracking view window makes these adjustments easier to monitor, ensuring the blade stays centered.
  • TrackLock® Blade Guides: Upper and lower blade guides help prevent the blade from twisting during operation, enhancing cutting accuracy and blade longevity.
  • Angle Adjustment Knob: Tilts the saw table for bevel cutting, with a scale and scale indicator to show the exact angle.
  • Miter Gauge: Included for aligning wood for crosscuts, with an easy-to-read indicator and positive stops at 90° and 45°. It can be turned 60° to the right or left and can be stored in a slot on the back of the saw.
  • Rip Fence: A sturdy metal fence guides the workpiece for straight cuts and is secured with a locking handle. It can be used on either side of the saw table.
  • Dust Exhaust Port: A 2-1/4 in. (57.15 mm) port allows for connection to a dust collection system or shop vac, promoting a cleaner and safer work environment.
  • Easy Open Latches: Front cover latches allow for quick access to internal components for adjustments and maintenance.
  • Switch and Switch Key: Features an easy-access power switch with a removable yellow switch key for locking the tool in the OFF position, preventing unauthorized use and accidental starting.
  • Table Lock Knob: Loosens to allow the saw table to be tilted and tightens to secure it in place.
  • Mounting Options: Can be permanently bolted to a workbench or mounted to a portable board for clamping, providing flexibility in setup.

Maintenance Features:

  • Lubrication: All bearings are lubricated for the life of the unit under normal operating conditions, requiring no further lubrication.
  • Cleaning: Regular cleaning of the saw, removal of sawdust from inside the housing, and cleaning of pitch accumulation on the saw table, blade guides, and thrust bearings are recommended. A thin coat of automobile wax on the saw table top helps wood slide easily.
  • Brush Maintenance: A brush located inside the saw housing near the lower wheel helps keep the tire and wheel free of sawdust. It can be adjusted or replaced when worn.
  • Tire Maintenance: Pitch and sawdust accumulation on tires should be removed with a fine wire brush or wood. Worn tires can be replaced by prying them off and stretching new ones around the wheel.
  • Blade Guide Maintenance: Blade guides may become rounded and worn and can be filed or ground flat. They should be replaced when filing or grinding has worn them down to the point where they can no longer be properly secured.
  • Drive Belt Replacement: The drive belt, located behind the lower wheel, can be replaced if worn or broken. Instructions are provided for accessing and replacing the belt.
  • Electrical Maintenance: Periodically inspect tool cords and extension cords for damage. Any damaged cords should be repaired by a qualified service technician. The motor should be frequently vacuumed or blown out to remove sawdust.
  • Service Centers: Ryobi Authorized Service Centers are available for repairs, ensuring that only identical Ryobi replacement parts are used to maintain safety and reliability.

Ryobi BAND SAW Specifications

General IconGeneral
BrandRyobi
ModelBAND SAW
CategorySaw
LanguageEnglish

Related product manuals