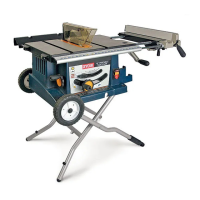
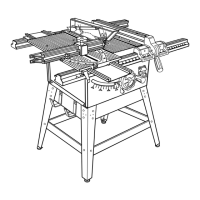
EasyManua.ls Logo

Ryobi BTS10 User Manual

Ryobi BTS10
32 pages
To Next Page IconTo Next Page
Page #1 background imageLoading...
Page #1 background image
OPERATOR’S MANUAL
10 in. TABLE SAW
BTS10
SAVE THIS MANUAL FOR FUTURE REFERENCE
Your table saw has been engineered and manufactured to Ryobi’s high standard for dependability, ease of operation, and
operator safety. When properly cared for, it will give you years of rugged, trouble-free performance.
WARNING: To reduce the risk of injury, the user must read and understand the operator's manual before using
this product.
Thank you for buying a Ryobi product.

Questions and Answers:

Ryobi BTS10 Specifications

General IconGeneral
TypeTable Saw
Blade Diameter10 inches
Arbor Size5/8 inches
Motor15 Amp
Maximum Cut Depth at 90 degrees3 inches
Maximum Cut Depth at 45 degrees2-1/4 inches
Bevel Capacity0-45 degrees
Maximum RPM5000 RPM

Summary

OPERATOR'S MANUAL

Product Introduction

Table saw engineered for dependability, ease of operation, and operator safety.

Mandatory Safety Warning

Users must read and understand the manual before using the product to reduce injury risk.

General Safety Rules

Read Manual and Understand Hazards

Carefully read manual for applications, limitations, and potential hazards related to the tool.

Electrical Shock Prevention Measures

Avoid contact with grounded surfaces to prevent electrical shock. Keep work area well-lit and dry.

Work Area Safety and Cleanliness

Maintain a clean, uncluttered work area. Do not leave tools or wood on the saw during operation.

Personal Safety Gear and Attire

Always wear safety glasses with side shields. Avoid loose clothing, jewelry, or gloves that can get caught.

Tool Security and Maintenance Practices

Secure work with clamps. Keep tools sharp and clean. Remove adjusting keys before operation.

Proper Accessory and Guard Usage

Use recommended accessories. Keep guards and spreaders in place and working. Keep blades clean and sharp.

Operator Alertness and Balance

Maintain alertness, control, and balance. Avoid operating when tired or rushed. Do not overreach.

Blade Path Awareness and Reach Safety

Never stand in line with the blade. Do not reach over or across the blade or within three inches of it.

Kickback Hazards and Prevention Strategies

Guard against kickback using rip fence, panel support, sharp blades, and push sticks.

Specific Safety Rules

Secure Saw Mounting to Workbench

Firmly bolt saw to workbench or leg stand. Never operate the saw directly on the floor.

Push Stick Usage for Narrow Stock

Always use a push stick for ripping narrow stock to keep hands away from the blade.

Blade Guard and Spreader Mandate

Always use the blade guard, spreader, and anti-kickback pawls for all 'through-sawing' operations.

Avoid Freehand Cuts and Improper Fence Use

Never perform 'freehand' operations. Move rip fence for cross cuts; do not use rip fence and miter gauge together.

Kickback Avoidance Techniques

Avoid kickbacks by ensuring blade sharpness, fence parallelism, proper support, and avoiding warped wood.

Work Area Lighting and Obstructions

Ensure ample lighting and clear workspace. Remove obstructions that may interfere with safe operation.

Health Warning: Chemical Exposure

Some dust contains chemicals linked to cancer or reproductive harm. Work in ventilated areas and use approved safety equipment.

Symbols

Electrical Unit and Measurement Symbols

Symbols include Volts (V), Amperes (A), Hertz (Hz), Watt (W), Minutes (min), AC/DC Current, RPM, and Per Minute.

Safety and Operational Symbols

Symbols cover Wet Conditions Alert, Read Manual, Eye Protection, Safety Alert, No Hands Symbol, and Hot Surface warning.

Signal Word Definitions and Meanings

Explains DANGER, WARNING, and CAUTION signal words and their associated risk levels for injury or damage.

Service and Personal Safety Instructions

Servicing must be done by qualified technicians. Read manual thoroughly to avoid injury. Always wear eye protection.

Electrical

Extension Cord Guidelines and Safety

Use 3-wire cords with grounding plugs. Ensure adequate gauge for tool current. Inspect cords for damage before use.

Power Supply and Connection Requirements

Tool requires 120 Volts, 60 Hz, AC only. Do not use DC. Check power supply if saw does not operate.

Grounding Instructions and Plug Usage

Tool has grounding conductor and plug. Plug into a properly installed and grounded outlet. Do not modify the plug.

Glossary of Terms

Cutting Operation and Component Terms

Defines terms like Arbor, Bevel Cut, Cross Cut, Dado Cut, Kickback, Miter Cut, Rip Cut, Riving Knife, and Worktable.

Safety and Process Related Terms

Defines terms such as Featherboard, Freehand, Push Stick, Saw Blade Path, Set, Snipe, Through Sawing, and Throw-Back.

Features

Product Specifications Summary

Lists key specifications: Blade Diameter, Arbor, Cutting Depths, Table Size, Input Power, No Load Speed, and Net Weight.

Table Saw Component Identification

Diagram of the table saw labeling major parts: Blade Guard, Rip Fence, Miter Gauge, Switch, Bevel Indicator, and Handwheels.

Understanding Table Saw Components

Familiarize with blade height adjustment, bevel locking, rip fence, miter gauge, blade guard, spreader, and switch assembly.

Blade Guard and Spreader Functionality

The blade guard assembly includes a spreader and anti-kickback pawls to prevent binding and kickback.

Rip Fence and Miter Gauge Operation

Rip fence guides work for length. Miter gauge sets angle for cross cuts. Scales provide precise measurements.

Blade Selection and Speed Ratings

Use the recommended 10 in., 24-tooth blade. Do not use blades rated below the tool's speed rating.

Power Switch and Safety Lock

Features a power switch with a built-in key lock to prevent unauthorized operation. Remove key to lock OFF.

Overload Reset Button Functionality

Resets the motor if it overheats or trips. Turn off, cool down, check cords, push reset button, then restart.

Pre-Operation Safety Checks

Ensure workpiece is clear of blade before starting. Ensure switch is OFF before plugging in or resetting overload.

Tools Needed

Tools for Assembly and Adjustments

Required tools include two wrenches (10mm, 11mm), Phillips screwdriver, flathead screwdriver, and a framing square.

Loose Parts List

Identification of Loose Parts

Lists key numbers and descriptions for all loose parts, such as the Blade Guard Assembly, Rip Fence, Miter Gauge, and various hardware.

Assembly

Unpacking and Inspection Procedure

Carefully remove tool and accessories. Inspect for damage. Do not discard packing until inspection is complete.

Secure Saw Mounting Instructions

Mount the saw to a workbench or leg stand using 3/8 in. bolts, lock washers, and hex nuts. Ensure all bolts are securely tightened.

Installing Blade Adjusting Handle

Mounts to the height adjusting handwheel using a shoulder bolt, washer, and lock nut. Tighten securely.

Throat Plate Removal and Replacement

Lower blade, loosen screws, lift plate and spacers. Reinstall by aligning holes and securing screws. Avoid overtightening.

Saw Blade Removal and Installation

Check blade installation. Use two wrenches to loosen or tighten the arbor nut. Ensure correct blade orientation.

Blade Guard Assembly Installation

Attach mounting bracket using bolt and washers. Secure guard assembly with cap screws and washers. Ensure it is aligned with the saw blade.

Aligning Blade Guard and Spreader

The spreader must align with the saw blade. Loosen guard assembly screws, reposition, and retighten securely.

Operation

General Operation and Safety Warnings

Avoid complacency. Wear safety goggles. Use only recommended accessories. Understand kickback causes and avoidance techniques.

Table Saw Applications Overview

Suitable for straight line cutting, cabinet making, and woodworking. Designed for wood and wood composition products.

Basic Table Saw Operation Steps

Plug into a grounded outlet. Ensure proper connection. Do not modify the plug. Refer to Electrical section.

Kickback Causes and Prevention Strategies

Kickback results from blade binding. Causes include incorrect depth, knots, warping, forcing cuts. Avoid by proper technique and tool use.

Utilizing Cutting Aids (Push Sticks/Blocks)

Push sticks and blocks feed workpiece safely. Use push stick for narrow stock; push block for non-through cuts.

Types of Cuts Explained

Details six basic cuts: cross, rip, miter, bevel cross, bevel rip, and compound miter cuts, and their variations.

Cross Cut and Rip Cut Procedures

Cross cut: 90° cut across grain with miter gauge. Rip cut: along grain with rip fence to prevent kickback.

Miter, Bevel, and Compound Cut Procedures

Miter: angled cut with miter gauge. Bevel: angled blade. Compound: angled blade and workpiece. Use push sticks for narrow pieces.

General Cutting Tips and Safety

Allow for kerf width. Cut with finish side up. Knock out knots. Support wood as it exits saw.

Featherboard Function and Creation

Featherboard guides workpiece. Useful for ripping small pieces. Creation involves cutting angled fingers into lumber.

Featherboard Mounting and Positioning

Lower blade, position fence. Adjust featherboard for resistance, clamp to table. Do not place behind workpiece to avoid kickback.

Adjusting Blade Depth

Set blade 1/8-1/4 in. higher than workpiece. Gullets should be below surface. Adjust using height adjusting handwheel.

Adjusting Bevel Angle

Allows 90° to 45° cuts. Loosen bevel lock lever, adjust angle with wheel, then tighten lever. Counterclockwise increases angle.

Adjusting Bevel Indicator

If indicator is off at 90°, loosen screw, set to 0°, and retighten. Ensures accurate angle readings.

Installing and Aligning Rip Fence

Place fence on table, push lever to align/secure. Check glide. Verify alignment with blade using framing square.

Setting Rip Fence Scale Indicator

Unplug saw. Loosen fence. Set fence 2 in. from blade tip using square. Align scale indicator with 2 in. mark. Retighten screw.

Using the Miter Gauge

Provides accuracy for angled cuts. Use channels on either side. For bevel cuts, use slot on right. Turn gauge 60° left/right, loosen/retighten knob.

Making Cuts: General Procedures

Use combination blade. Check setups. Do not use lower-rated blades. Use miter gauge for cross, miter, bevel, compound cuts. Lock gauge.

Making a Cross Cut

Remove rip fence. Set depth. Set miter gauge to 0°, tighten. Place support. Ensure wood clear. Turn ON. Feed workpiece. Keep flush. Stand to side.

Switch Operation and Safety

Turn ON by lifting button, OFF by pressing down. Remove switch key to lock. Wait for blade to stop before removing workpiece.

Making a Miter Cut

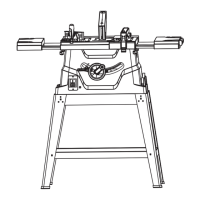
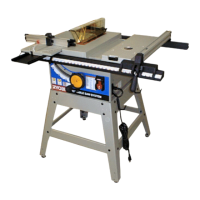
Remove rip fence. Set depth. Set miter gauge to angle, tighten. Place support. Ensure wood clear. Turn ON. Feed workpiece. Use push stick. Stand to side.

Making a Rip Cut

Remove miter gauge. Set depth. Position rip fence, lock. Set blade to 0°. Place support. Ensure wood clear. Turn ON. Feed workpiece. Stand to side.

Making a Bevel Cross Cut

Unlock bevel lever, set angle. Set depth, relock lever. Set miter gauge to 90°, tighten. Place support. Turn ON. Feed workpiece. Stand to side.

Making a Bevel Rip Cut

Rip fence must be on the right side. Ensure blade guard assembly is installed. Follow procedure for positioning workpiece and feeding.

Bevel Rip Cut Details and Safety

Position rip fence right side, lock. Support long pieces. Ensure wood clear. Turn ON. Feed workpiece. Use push stick/blocks. Stand to side.

Making a Compound Miter Cut

Remove rip fence. Unlock bevel, set angle. Set depth, relock. Set miter gauge angle, tighten. Turn ON. Feed workpiece. Keep flush. Stand to side.

Making a Non-Through Cut

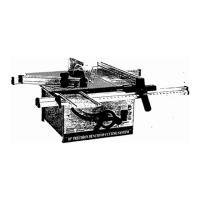
For grooves/rabbets. DO NOT bevel non-through cuts. Reinstall blade guard assembly after. Use push blocks/sticks/featherboards. Be alert to exposed cutter.

Making Dado Cuts

Use inner/outer washers. Replace throat plate. Mount dado blades. Use push blocks/sticks/featherboards. Do not use dado blades rated less than tool speed.

Adjustments

Checking Rip Fence Alignment

Unplug saw. Remove fence. Use framing square to check alignment with blade. Adjust fence screws if dimensions differ. Make test cuts.

Setting 90° Positive Stop

Unplug saw. Raise blade. Adjust angle with wheel. Use square to check 90°. Adjust stop screw if needed. Reset bevel indicator to 0°.

Setting 45° Positive Stop

Unplug saw. Raise blade. Adjust angle with wheel. Use square to check 45°. Adjust stop screw if needed. Reset bevel indicator to 45°.

Maintenance

General Maintenance and Cleaning

Use Ryobi parts. Wear safety goggles. Avoid solvents on plastic. Check fasteners. Clean blade guard. Wax surfaces. Clean sawdust.

Blade Removal and Replacement

Raise blade, remove throat plate. Use wrenches to loosen/tighten arbor nut. Install new blade correctly. Replace throat plate.

Troubleshooting

Vibration, Rip Fence, and Cutting Issues

Addresses excess vibration, smooth rip fence operation, binding/burning work, and wood edges away from fence.

Accuracy, Blade Cut, and Motor Issues

Covers inaccurate 90°/45° cuts, poor blade cuts, blade not lowering, and motor laboring in rip cuts.

Service

Obtaining Service and Parts Information

Contact Ryobi Authorized Service Center for repairs. Visit ryobitools.com for center list. Record model/serial number for parts.

Ordering Repair Parts Information

Always provide MODEL NUMBER (BTS10) and SERIAL NUMBER when ordering repair parts.

Related product manuals