When straight cutting against the fence use a push stick.
During transportation the saw blade guard should be fully
down and close to the table.
When bevel-cutting with the table incline, place the guide
on the lower part of the table.
When cutting round timber use a suitable holding device
to prevent twisting of the workpiece.
Do not use guarding for handling or transportation.
Adjust the adjustable guard as close to the workpiece as
practicable.
THANK YOU FOR BUYING A RYOBI PRODUCT.
To ensure your safety and satisfaction, carefully read through
this OWNER'S MA
NUALand SAFETY INSTRUCTIONS before
using the product.
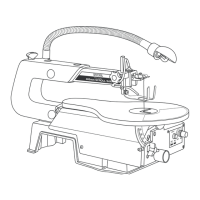
2. Blade guide knob
3. Lock lever
4. Table lock handle
5. Scale
6. Scale indicator
7. Angle adjustment knob
8. Dust exhaust port
9. Blade tension knob
11. Blade guide support
12. Switch and switch key
13. LatchLower
14. Saw table
15. Saw blade
16. Blade guard
18. Tracking view window
19. Table aligning bolt
20. Washer
21. Wing nut
22. Nut
23. Spring
24. Blade guide assembly
25. Set screws
2
6. Upper wheel
27. 8mm Hex nut
28. Lower blade guides
29. Lower wheel
30. To decrease tension
31. To increase tension
32. Blade on wheel
33. Zero stop set screw
34. Small combination square
35. Upper blade guide support
36. Blade guide screws
3
7. Blade guide support screw
38. Thrust bearing screw
39. Thrust bearing
40. Lower blade guide support
41. Blade guide
42. Switch key
4
3. Lock knob
44. Mitre gauge slot
45. Mitre gauge
46. Brush
47. Tire
48. Screw
50. Lower wheel
51. Pulley shaft
52. Motor pulley
53. Drive belt
Angle Adjustment Knob
Tilts the saw table for bevel cutting.
Blade Guard
Protects the operator from coming in contact with the
blade.
Blade Guide Support
Helps keep the blade from twisting during operation.
Blade Guide Knob with Lock Lever
Use the blade guide knob and lock lever to adjust the
blade guide assembly to keep the blade from twisting or
breaki
ng. Always lock the blade guide assembly in place
before turning on the band saw.
Blade Tension Knob
Controls blade tension when changing blades and
making
adjustments for various sawing appl
ications.
Dust Exhaust
Port
and Adaptor
A 44.5 mm (1 - 3/4”) dust exhaust port makes dustless
cutting possible by blowing the dust away from the user.
Attach the adaptor to the dust exhaust port when using
a
dust collection system or vacuum.
Latch
Easy open latches allow front cover to be opened for
making
adjustments.
Saw Blade
Saw comes with a standard 6mm (1/4”) blade.
Saw Table with Throat Plate
Your band saw has a square 290mm (11-3/8”) aluminum
saw table with tilt control for maximum accuracy. The
throat
plate, installed in the saw table at the factory,
allows
for
blade clearance
.
Scale and Scale Indicator
The scale and scale indicator show the angle or degree
the saw table is titled for bevel cutting.
KNOW YOUR BAND SAW
Before attempting to use, familiarise yourself with all the
operating
features and safety requi
rement of your saw.
54. Laser
When transporting use one hand to support the machine
base, and another to hold the machine body in which
the main switch is located.
Laser
Allows accurate and precise location when cutting the
workpiece.
Straight
Allows straight cutting for the workpiece.
Light
Increases workpiece illumination.
Where possible use clamps or a vice to hold the work. It
is safer than using your hand.
Use and correctly adjust the saw blade guard.
56. Light
55. Straight Fence
57. Hex Key (W3, W4, W5)
(Not included)
49. Motor Capacitor
58. Laser cover
59. M3 Tapping screw
60. Laser
ON/OFF switch
61. Button cell protection tube
17. Upper Latch
10. Blade tracking knob
1. Blade tracking knob
Fence
DESCRIPTION
FEATURES