EasyManua.ls Logo

Salto BLUEnet CUC1B0 Series - User Manual

Salto BLUEnet CUC1B0 Series
7 pages
Print Icon
To Next Page IconTo Next Page
Loading...
1/7 226741-ED.-20/10/2023
All contents current at time of publication.
SALTO Systems S.L. reserves the right to change availability of any
item in this catalog, its design, construction, and/or materials.
©
2023 SALTO Systems S.L.
Eng
D
E
Installation guide
Guía de instalación
Montageanleitung
Guide d'installation
Guia de instalação
F
P
Installation Instalacn Installation Installation Instalão
Eng
E
D
F P
Installation guide
BLUEnet Door Controller
70g
Wireless door controller
for 1 door access
control with BLE.
CUC1B0 series
CUCEB122 series
53
(2-3/32")
90
(3-9/16")
32
(1-1/4")
26
(1-1/32")
62
(2-7/16")
1
TAMPER
Connect!
En el Software, configure la
entrada a la que ha conectado
el cable del tamper, como
"Entrada de Tamper".
1 2
2 3
CUC1B0 series
METAL
PLASTIC
Eng
E
In the software, set the
connection that you've
connected the tamper wire to
as "Tamper input".
D
ELECTRICAL CABINET WITH DIN RAIL CUADRO ELÉCTRICO CON CARRIL DIN SCHALTSCHRANK MIT DIN-SCHIENE
COFFRET ÉLECTRIQUE AVEC RAIL DIN ARMÁRIO ELÉCTRICO COM CALHA DIN
Eng
E D
F P
D
ELECTRICAL CABINET WITH DIN RAIL AND TAMPER CUADRO ELÉCTRICO CON CARRIL DIN Y TAMPER SCHALTSCHRANK MIT
DIN-SCHIENE UND SABOTAGE COFFRET ÉLECTRIQUE AVEC RAIL DIN ET SABOTAGE ARMÁRIO ELÉCTRICO COM CALHA DIN E TAMPER
Eng
F
D
E
P
Stellen Sie in der Software die
Verbindung ein, über die Sie
den Sabotagekontakt als
"Sabotage-Eimgang"
angeschlossen haben.
Dans le logiciel, définissez la
connexion à laquelle vous avez
connecté le fil de sabotage
comme « entrée de sabotage ».
No software, configure o input
onde ligou os fios do tamper
como "Input de tamper".
Eng
E
D
F
P
Question and Answer IconNeed help?

Do you have a question about the Salto BLUEnet CUC1B0 Series and is the answer not in the manual?

Salto BLUEnet CUC1B0 Series Specifications

General IconGeneral
BrandSalto
ModelBLUEnet CUC1B0 Series
CategoryController
LanguageEnglish

Summary

Electrical Cabinet with DIN Rail Installation

Electrical Cabinet with DIN Rail and Tamper Installation

Wiring Connections

Input;Output Connections

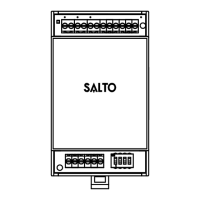
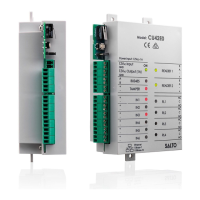
Power input/output and proprietary serial bus for communication with expansion boards.

Relay Outputs

Specifies relay outputs with a rating of 1A/30VDC.

Wall Reader Connection

Consult wall reader guide for detailed wiring, connections, and maximum distances.

External Configuration Inputs

Inputs for external configuration, including default, IN2, and tamper.

Clear Button Functionality

Button for pairing readers/devices or accepting a new Portable Programmer (PPD).

Factory Configuration Inputs and Relays

Factory Configuration: Door Status and Exit

Configures door status input (IN1) and exit input (IN2) with unsupervised NC/NO.

Factory Configuration: Door Relay and Alarms

Configures door relay (RL1) and alarms for tamper, loss of communication, DLO, intrusion (RL2).

Power and Cable Requirements

Power Specifications

Details input voltage, maximum current consumption, and reader output voltage.

Cable Requirements

Specifies recommended wire gauges for EXT BUS, Inputs, and Readers.

Operating Conditions

Defines temperature and humidity ranges for device operation.

Input Specifications

Details electrical characteristics and configuration for inputs.

Output Relay Specifications

Specifies the rated load for output relays.

BLUEnet Characteristics and Installation Example

BLUEnet Wireless Characteristics

Details frequency range, standard, TX power, and indoor range for BLUEnet connectivity.

Installation Example: Cable Connection

Illustrates cable connections using color-coded wires for installation.

Installation Example Details

Wiring Connections in Example

Shows specific wire connections (e.g., SP224861, SP224895) in an installation example.

Minimum Reader Distance

Specifies the minimum distance required between readers for optimal performance.

Signalling and Operational Test

LED Status Indicators

Describes the meaning of different LED states (blinking, solid, off) for device status.

Operational Test Procedure

Instructions to verify correct installation by checking the LED status upon powering the device.

Related product manuals