EasyManua.ls Logo

Samba Model Prestige 2PK - User Manual

Samba Model Prestige 2PK
6 pages
Print Icon
To Next Page IconTo Next Page
Loading...
Congratulations for choosing the right model! Your new Prestige 2PK.
The model is a handmade product, carefully packed for your convenience.
Please check that all items ordered are included and not damaged during transportation.
A basic model includes:
3 wing sections (including GFK horns if no IDS is ordered)
1 fuselage with nose cone
1 rudder
1 Elevator
2 carbon joiner 6 degrees
2 pcs clevis couplers
Wire harness fuse with plastic holders for tip connection
4 plastic servo covers
2+2 screws for Elevator and Wing
Wing and fuse bag
Additionally you can order:
ballast set
8 degree joiners (6 degree standard)
The model can be ordered fully assembled
or partly
To complete a model you will need:
2 pcs +/-20g metal geared servos for the flaps.
4 pcs 9-12g metal geared servos for fuse and tips.
IDS from Servorahmen.de or alternately 8 clevises and 2mm threaded rods for
the wings
Motor, regulator and battery
Spinner and propeller in 30mm or 32mm according to your order
a high quality receiver
epoxy to glue in the servos and thin cyano (CA) to secure clevises
strong clear tape (8-12mm wide) to join the wings and rudder to the fuselage
Assembling the wing:
Sand the surface of the servos and the servo trays where the servos will be glued
Connect the servos and the fuse harness to the respective channels on the
receiver. Check that the aileron servo arms are set 90 degrees on the servo and
that the transmitter also is set to neutral. Check that the flap servo arms are set
identically to approximately 20 degrees (measured from the 90°-angle) towards
the flap. The transmitter should later be set to an offset so that the flap servo
arms are 90 degrees on the servos. With full butterfly the servo arms on the flaps
are almost straight towards the flap. This ensures full deflection of the flaps for
butterfly brake
Check again the servo settings and also set the offset of the flap servos. Check
also that the servos move the right way
Mark where the servos will be glued in place by a pencil in the servo trays. Use a
Dremel tool with grinder to open up the pushrod hole and the aileron/flap horn.
Ensure that the servo arm is aligned (straight line) to the line defined by the hole
in the subspar and the aileron/flap horn
Now are available IDS for
IDS Typ MKS 6110 Foam Mono
IDS Typ KST 08 Foam Mono (KST X08 H)
IDS Typ MKS 75K Foam
IDS Typ KST X10 Mini Foam
IDS Typ MKS 6130 Mini Foam
IDS Typ JRDS 181, JRDS 189 Foam
Question and Answer IconNeed help?

Do you have a question about the Samba Model Prestige 2PK and is the answer not in the manual?

Summary

Assembling the Wing

Assembling the Fuselage

Assembling the Model

Check and Adjust CG

Check and adjust the Center of Gravity (CG) for optimal flight balance.

Check Radio Range

Verify radio control range to ensure reliable operation before flying.

Important Notice for F3 J Version Pilots

Model Settings

Overview

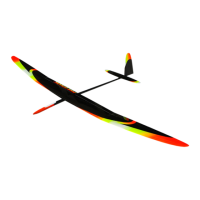
The Prestige 2PK is a high-performance, handmade F5J competition glider designed by Philip Kolb and produced by Samba Model. It is delivered as a kit, requiring assembly and the integration of various electronic components.

Function Description:

The Prestige 2PK is an advanced radio-controlled glider intended for F5J competition flying, which emphasizes efficient flight and precise landing. Its design focuses on aerodynamic efficiency, light weight, and structural integrity to achieve optimal performance in thermal soaring and distance flight. The model is equipped with multiple control surfaces—ailerons, flaps, elevator, and rudder—allowing for fine-tuned control and various flight modes such as thermal, speed, distance, and crow braking. The IDS (Integrated Drive System) option, or traditional clevis and pushrod setup, facilitates precise and slop-free control surface actuation. The model's modular wing design, consisting of three sections, allows for easier transport and assembly.

Important Technical Specifications:

  • Wingspan: 3900 mm
  • Wing Area: 79.3 sqdm
  • Aspect Ratio: 19.18
  • Surface Area: 86.63 sqdm
  • FAI Minimum Weight: 1040 gr.
  • Ballast Capacity: Up to an additional 1400 gr.
  • Wing Sections: PK-1162f (7.4%) - PK-1168f (6%)
  • Center of Gravity (CG): Recommended 107-113mm from the leading edge (110mm for general conditions, 112mm in calm conditions).
  • Control Throws (measured from neutral):
    • Elevator: Neutral 24mm, -15/+15(17)mm. Crow brake: 16.5mm (measured from boom) for 50% flap, 13mm for 100% flap.
    • Ailerons: Up/down range varies by flight mode (e.g., Cruise: -19/+24mm, Thermal 1: -20/+22mm). Crow brake: No movement.
    • Rudder: 35/35mm.
    • Flaps: Crow brake: +38mm for 50%, +70mm for 100%.
    • Camber (measured on flaps): Thermal: +1-5mm, Distance/Speed: -1 to -2mm.
    • Snap Flap (Elevator-Flap Mix): Up to 5mm on full elevator throw.
  • IDS Compatibility: MKS 6110 Foam Mono, KST 08 Foam Mono (KST X08 H), MKS 75K Foam, KST X10 Mini Foam, MKS 6130 Mini Foam, JRDS 181, JRDS 189 Foam.
  • Servo Requirements: 2 pcs +/-20g metal geared servos for flaps, 4 pcs 9-12g metal geared servos for fuse and tips.
  • Motor/Propeller/ESC/Battery: User-supplied, with nose cone adjustable up to 105mm to accommodate different setups and achieve correct CG.

Usage Features:

The Prestige 2PK is designed for competitive F5J flying, offering a range of flight modes and precise control.

  • Modular Wing Design: The three-section wing facilitates easy transport and field assembly. Clear tape is recommended on wing ends to prevent paint damage during repeated assembly/disassembly.
  • Customizable Control Settings: The manual provides detailed control throw recommendations for various flight conditions (Cruise, Distance, Speed, Thermal L/D max, Thermal 1, Thermal 2, Crow Brake). These settings are a starting point, and pilots can find more detailed settings from top pilots on www.F3J.com.
  • IDS or Traditional Linkage: Pilots can choose to use IDS from Servorahmen.de for a clean, slop-free control surface actuation, or opt for traditional clevises and threaded rods.
  • Ballast System: The model supports up to 1400g of additional ballast, allowing for flight in varying wind conditions and optimizing performance.
  • Receiver Installation: The receiver is installed in a dedicated slot under the wing, with antenna routing designed to minimize sharp bends and optimize range. Range testing is crucial after installation.
  • Motor Integration: The nose cone is adjustable to accommodate different motor, propeller, ESC, and battery combinations, ensuring proper CG balance.

Maintenance Features:

Proper assembly and ongoing maintenance are crucial for the Prestige 2PK's performance and longevity.

  • Careful Assembly: The model is handmade, and careful assembly is emphasized. This includes sanding servo surfaces, precise gluing of horns and servo frames, and meticulous installation of control linkages to ensure smooth, slop-free operation.
  • Adhesive Recommendations: Cyanoacrylate (CA) glue is recommended for connector holders and securing threads to clevises, while epoxy is used for servos/IDS frames and gluing the rudder to the fuselage (for F3J version). Thixotropy agent can be added to thin epoxy.
  • Pre-Flight Checks: Regularly check servo settings, control surface throws, and the direction of movement. Ensure all connections are secure and free of slop.
  • Antenna Placement and Range Test: Critical for reliable radio control. Antennas should exit behind the wing (min 2-4cm) without sharp bends. A range test is mandatory to confirm proper installation.
  • Wing Protection: Wing covers are essential to prevent excessive heating of the model in the sun, which can lead to deformations, surface distortions, and fading of reflex-painted parts.
  • Post-Landing Inspection: After harder landings, it is necessary to check the joiner and look for cracks, as this could cause failure of the complete model in subsequent flights.
  • Structural Integrity: The manual explicitly states that Prestige 2PK specifications are without guarantee for structural stiffness and prohibits sudden changes in control deflection at high speeds. The model is intended for F5J competition flying, not aerobatics.
  • Rudder Attachment (F3J Version): For the F3J version, the rudder must be glued to the fuselage with epoxy for a fixed connection. Both surfaces must be roughened before gluing, and care must be taken not to glue the rudder pushrod or apply glue near it. This is because the original design is for F5J, and the rudder-fuselage connection is not strong enough for F3J starts.

Samba Model Prestige 2PK Specifications

General IconGeneral
BrandSamba Model
ModelPrestige 2PK
CategoryToy
LanguageEnglish

Related product manuals