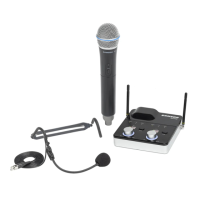
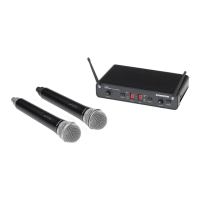
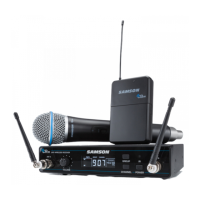
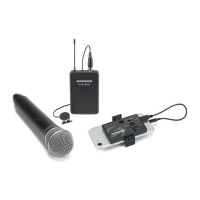
The Samson Concert 288m is a dual-channel micro UHF wireless system designed for applications requiring two wireless microphones. It offers frequency-agile UHF operation with 100 available channels, ensuring reliable wireless performance. The system is designed for ease of use, featuring one-touch scan for optimal channel selection and infrared (IR) set for pairing transmitters with the receiver.
AR299m Receiver Features:
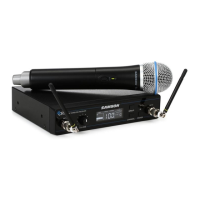
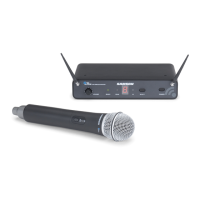
The AR299m receiver is the central unit of the system, providing versatile output connections including XLR, 1/4", and 1/8" jacks.
- Antennas: The receiver is equipped with two antennas that can be fully rotated for optimal placement. For normal operation, both antennas should be positioned vertically. They can be folded inward for convenient transport.
- SCAN Button: This button is crucial for setting up the system. Pressing it for more than 2 seconds initiates a scan mode, during which the LED display flashes quickly as the receiver searches through 100 operating channels to find the clearest one. Once an optimal channel is found, the AR299m enters IR Set mode and transmits the selected channel to the transmitter. For manual channel selection, holding the button for more than 10 seconds will make the display flash slowly, allowing the receiver to send its current selected channel to the transmitter.
- LED Display: A two-digit, 7-segment LED display shows the receiver's current operating channel, providing clear visual feedback.
- READY Indicator: This indicator lights green when the AR299m successfully receives an RF signal from the transmitter, signifying that the system is ready for use.
- IR Transmitter: During the "IR SET" process, an infrared light is used to transmit the selected channel information to the transmitter, facilitating quick and accurate pairing.
- PEAK Indicator: This red indicator illuminates when the transmitted audio signal is overloaded, alerting the user to potential distortion.
- VOLUME / Power Control: This rotary knob serves a dual purpose: it controls the output level of the receiver and powers the AR299m on and off. Turning it clockwise powers the system on, while turning it counterclockwise until it clicks powers it off.
AR299m Receiver Rear Panel Features:
- DC Input: This is where the supplied power adapter connects. It is important to use only the provided adapter to avoid damage and voiding the warranty.
- MIX OUTPUTS: These unbalanced 1/4" and 1/8" jacks are used for connecting the AR299m to consumer-level audio equipment. Both jacks carry a combined signal from both channels (CH1 & CH2).
- CH 1 & CH 2 XLR OUTPUTS: These electronically balanced low impedance XLR jacks are designed for connecting the AR299m to professional audio equipment, providing separate outputs for each channel.
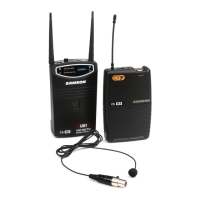
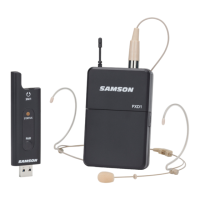
CB88 Belt Pack Transmitter Features:
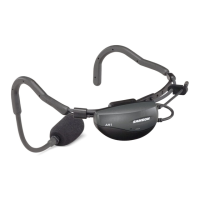
The CB88 belt pack transmitter is designed for use with lavalier or headset microphones.
- Input Connector: A mini-XLR connector is used to connect the input device, such as a lavalier or headset microphone.
- Status Indicator: An LED provides visual feedback on the transmitter's operational status: green for normal operation, red for mute, and flashing green for low battery.
- Power/Mute Switch: This switch allows the user to turn the unit on or off by pressing and holding it. A quick press and release will mute or unmute the transmitter.
- Belt Clip: A convenient clip is provided to fasten the CB88 transmitter securely to a belt.
- Battery Cover Release: Pushing in both sides and pulling back opens the battery cover.
- Antenna: The permanently attached antenna should be fully extended during normal operation to ensure optimal signal transmission.
- Input GAIN Control: This control adjusts the transmitter's input sensitivity to match the connected microphone and prevent overload/distortion. It should be set using the included screwdriver, observing the AR299m PEAK indicator to ensure optimal levels.
- Battery Holder: Two standard AA (LR6) batteries are inserted here, observing polarity markings. Rechargeable Ni-Cad batteries can be used, but they may not provide adequate current for more than four hours. Incorrect battery insertion can damage the unit and void the warranty.
- IR Lens: This window captures the infrared signal from the AR299m receiver during the IR SET process to channelize the transmitter.
- Screwdriver: A small screwdriver is included for adjusting the input GAIN control.
CH88 Handheld Transmitter Features:
The CH88 handheld transmitter is designed for vocal applications.
- Status Indicator: Similar to the belt pack, an LED indicates normal operation (green), mute (red), or low battery (flashing green).
- Power/Mute Switch: Press and hold to turn the unit on or off; press and release to mute or unmute.
- Battery Cover: Unscrews and slides down to reveal the battery compartment.
- Battery Holder: Pressing a tab and lifting the cover opens the battery holder. Two standard AA (LR6) batteries are inserted, observing polarity. Incorrect insertion can cause damage and void the warranty.
- Input GAIN Control: This control adjusts the transmitter's input sensitivity. It should be set using the included screwdriver, monitoring the AR299m PEAK indicator to achieve optimal levels without distortion.
- IR Lens: This window captures the infrared signal from the AR299m receiver during IR SET to channelize the transmitter. The battery cover must be open, and the IR Lens should face the receiver.
- Screwdriver: Included for adjusting the input GAIN control.
Transmitter Battery Installation:
For both CH88 and CB88 transmitters, two fresh AA batteries are required.
- CH88: Turn the battery cover counter-clockwise to remove, press the tab to open the compartment door, insert batteries observing polarity, slide the cover back, and turn clockwise to close.
- CB88: Press both sides of the battery release to open the door, insert batteries observing polarity, and close the door.
Quick Start Guide:
- Receiver Placement: Position the AR299m receiver where it will be used, extending its antennas vertically. Maintain a "line of sight" between the receiver and transmitters.
- Power Connection: With the AR299m powered off, connect the included power adapter.
- Audio Connection: With your amplifier or mixer off and volume control down, connect the AR299m receiver's output (balanced XLR or mixed unbalanced 1/4" or 1/8") to the mic or line level input of your audio equipment. Turn the receiver's VOLUME 1 knob clockwise to power it on, keeping the level low.
- Channel Scan (CH 1): Press the CH 1 SCAN button for more than 2 seconds. The display will flash quickly as it scans for an available channel. Once selected, the receiver enters IR Set mode (display flashes slowly). To manually enter IR Set mode, press and hold the SET button for more than 10 seconds.
- Transmitter Pairing: With the transmitter powered on, position it 6-12 inches (15-30 cm) from the AR299m's front panel. For CH88/CB88, ensure the battery door is open and the IR window faces the receiver's IR transmitter.
- Confirmation: Once the operating channel is transmitted, the AR299m will receive the RF signal, and the READY indicator will light green, confirming successful wireless signal reception.
- Second Transmitter: Repeat steps 4-6 to set up the second transmitter for CH 2. You can use either the balanced Channel 2 XLR output or the mixed unbalanced output.
Troubleshooting:
The manual provides a comprehensive troubleshooting guide for common issues:
- No Audio: Check power for both transmitter and receiver, battery installation, mute status, adapter connection, receiver power, secure audio connections, and line of sight between units. Verify that the transmitter and receiver are on the same operating channel and perform an IR set if unsure.
- Distorted Audio: Lower the receiver output level or audio input device level. Check and replace low transmitter batteries. Reduce the input gain on the transmitter (CB88/CH88) or the audio source level if too high.
- Audio Dropout: Move the transmitter closer to the receiver or reposition the antennas. Remove potential sources of RF interference like cell phones, cordless phones, lighting equipment, computers, or metal structures.
- Receiver Will Not Power On: Check the adapter connection to ensure it is properly plugged into a live outlet.
- Transmitter Will Not Power On (LED lights RED): Replace the transmitter batteries.
- Unwanted Noise or Interference: If using multiple systems, ensure they are not operating on the same channel. If the problem persists, change one or all of the system channels.
Maintenance:
With proper care and maintenance, the Concert 288m system is designed for many years of trouble-free operation. For servicing, a Return Authorization (RA) number must be obtained from Samson before shipping the unit. It is recommended to retain original packing materials and, if possible, return the unit in its original carton. For international purchases, contact your local distributor for warranty and service information. The device should be cleaned only with a dry cloth. Ensure good ventilation around the unit and do not block any ventilation openings. Batteries should not be exposed to excessive heat.