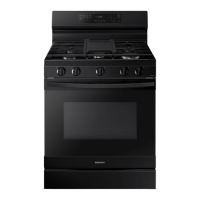
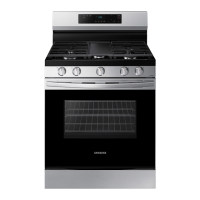
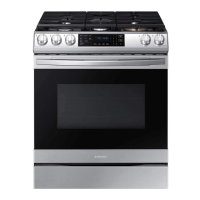
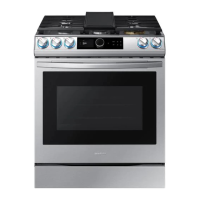
This document is the user manual for the Samsung Gas Slide-in Range, model NX60**831512. It provides comprehensive information on the appliance's features, safety instructions, usage, and maintenance.
Function Description:
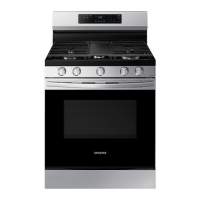
The Samsung Gas Slide-in Range is a versatile kitchen appliance designed for indoor, household use. It combines a gas range, a gas oven, and a storage drawer, offering multiple cooking modes and features for enhanced convenience and cooking experience.
Important Technical Specifications:
- Capacity: The oven boasts a large capacity of 6.0 cubic feet, providing ample space for cooking.
- Burners: The cooktop features 5 burners, including power burners for high heat, simmer burners for low heat, and a center oval burner for even heat distribution, ideal for griddle cooking.
- Temperature Range (Oven):
- Convection Bake: 175 °F (80 °C) to 550 °F (288 °C)
- Convection Roast: 175 °F (80 °C) to 550 °F (288 °C)
- Bake: 175 °F (80 °C) to 550 °F (288 °C)
- Broil: LO (Low) to HI (High)
- Air Fry: 350 °F (177 °C) to 500 °F (260 °C)
- Keep Warm Temperature: 175 °F (80 °C) for up to 3 hours.
- Electrical Requirements: Dedicated 120-volt, 60-Hz, 20-amp, AC electrical circuit with a time-delay fuse or circuit breaker.
- Oven Light: Standard 40-watt appliance bulb.
- Gas Type: Designed for natural gas or LP gas, requiring specific orifice replacements and GPR adapter reversal for LP gas conversion by a qualified technician.
- Clearance: Minimum 40 inches (102 cm) clearance between the cooking surface and the bottom of cabinets, or a range hood projecting horizontally a minimum of 5 inches (12.7 cm) beyond the bottom of cabinets.
Usage Features:
Cooktop:
- Ignition: Electronic ignition system activated by pushing and turning the control knob to the "Lite" position. Manual ignition is possible during power failures using a long gas grill lighter.
- Flame Level Adjustment: Burner knobs allow adjustment of flame level from LO (Low) to HI (High). Flames should always stay under the cookware bottom.
- Cookware Compatibility: Recommended cookware has flat bottoms, straight sides, tight-fitting lids, and is well-balanced. Materials like aluminum, copper, stainless steel, cast-iron, enamelware, and glass (specified for range top or oven use) are suitable.
- Griddle: A coated griddle provides an extra cooking surface, especially useful for meat, pancakes, or other foods requiring a large cooking area. It is used with the center burner. Preheating is recommended, with suggested times and heat settings for various foods (e.g., pancakes, hamburgers, fried eggs, bacon, breakfast sausages).
Oven:
- Oven Racks: Comes with 2 racks and 7 rack positions, delineated by rack guides with stops to prevent accidental removal. Instructions are provided for inserting and removing racks.
- Cooking Modes:
- Bake/Roast: Standard baking and roasting functions. The oven preheats to the set temperature (175 °F to 550 °F).
- Convection Bake/Roast: Utilizes a convection fan to circulate hot air evenly, resulting in faster and more uniform cooking. The oven automatically adjusts the temperature for convection baking.
- Broil: Uses the top oven burner for cooking and browning food. Preheating for 5 minutes is recommended. Offers Hi (High) and Lo (Low) temperature settings.
- Air Fry: Uses hot air for crispier, healthier frozen or fresh foods with less oil. Best results are achieved in single oven mode with the Air Fry tray in position 4. Temperature can be set between 350 °F and 500 °F.
- Special Features:
- Keep Warm: Maintains cooked food at a low temperature (175 °F / 80 °C) for up to 3 hours.
- Bread Proof: Provides an optimum temperature for bread proofing (no temperature adjustment needed). It is recommended to start this function when the oven is cool.
- Sabbath Option: Allows the oven to remain on continuously for baking during Jewish Sabbath and Holidays. Temperature can be adjusted, but the display will not change or beep. The oven light can be turned on before activating this function and will remain on.
- Cooking Options:
- Timer: An auxiliary timer (1 minute to 9 hours 59 minutes) for timing cooking tasks, independent of oven operations.
- Cook Time: Sets the oven to cook for a specified duration (1 minute to 9 hours 59 minutes), after which it automatically turns off.
- Delay Start: Delays the automatic start of a cooking operation by up to 12 hours.
- Settings: Various settings can be customized, including:
- Temperature Adjust: Recalibrates oven temperature by ±35 °F (±19 °C).
- Temp. Unit: Changes temperature display between Fahrenheit and Celsius.
- Auto Conversion: Automatically converts regular baking temperatures to convection baking temperatures.
- Time Format: Sets clock display to 12-hour or 24-hour format.
- Energy Saving: Automatically turns off the oven 12 hours after baking starts or 3 hours after broiling starts.
- Sound: Turns oven sound (beeps) on or off.
- Wi-Fi On/Off: Activates or deactivates Wi-Fi mode.
- Smart Control: Connects to the SmartThings app for remote monitoring and control of oven settings (e.g., checking status, adjusting temperature/time, turning off the oven). Remote turning on of the gas oven is not permitted for safety reasons.
- Voice Control: Compatible with Bixby, Amazon Alexa, and Google Assistant for voice commands to control various oven functions (e.g., turning on/off oven light, checking temperature/time, setting timer, adjusting temperature).
Maintenance Features:
Cleaning:
- Control Panel: Clean with a soft cloth dampened with plain water, warm soapy water, or glass cleaner. Avoid spraying cleansers directly onto the panel.
- Stainless Steel Surface: Clean spills, spots, and grease stains with a soft, wet cloth, then apply an approved stainless steel cleanser to a cloth or paper towel, rubbing with the grain.
- Oven Racks: Remove from the oven cavity, soak in lukewarm soapy water, and scour with a plastic scouring pad. Lubricate side rail guides with wax paper or cooking oil if they don't slide smoothly. Do not put racks in a dishwasher.
- Oven Interior: Manual cleaning with soapy plastic scouring pad for inner door surface. Inner glass is cleaned automatically during self-cleaning.
- Burner Controls: Pull knobs off control valve stems, clean in warm, soapy water, rinse, dry, and re-attach.
- Cooktop Surface: Remove food spills immediately. Clean with a soft cloth. Remove burner caps and heads to clean spills in gaps. Ensure burner components are dry before reassembling.
- Door: Do not remove the inner gasket. Clean outer glass with glass cleanser or soapy water.
- Storage Drawer: Slide open, locate roller guide clips, pull down the left clip while lifting the right clip to remove. Clean with warm, soapy water, rinse, and dry.
Self-Cleaning Oven:
- Process: Uses high temperatures to burn off grease and residue, reducing them to ash. The oven is extremely hot during this cycle.
- Preparation: Remove all racks, cookware, and utensils from the oven before starting. Wipe off excess grease and food soils. Do not leave the lower drawer in the oven cavity.
- Cycle Options: Offers 3-hour, 5-hour, and 2-hour cycles.
- Safety: The door locks automatically and remains locked until the oven temperature drops below 400 °F (204 °C). Do not force the door open. Do not use surface burners during self-cleaning.
- Post-Cleaning: Wipe ash residue with a damp cloth once the oven has cooled and unlocked. Stubborn stains can be removed with a steel-wool pad or vinegar-soaking cloth.
Replacing Oven Light:
- Procedure: Turn off the oven, ensure it's cool, open the door, remove the glass cover by turning it counterclockwise, remove the old 40-watt bulb, insert a new bulb, and reinsert the glass cover.
Removing and Reinstalling Oven Door:
- Procedure: The door is heavy. Turn off power. Open the door completely, pull hinge locks down to the unlocked position, grasp both sides of the door at the top, close the door to the removal position (approx. 5 degrees from vertical), and lift the door up and out. Reinstallation involves sliding hinge arm indentations into hinge slots, opening the door fully, and pushing hinge locks up to the locked position.