

H
Hayden ReynoldsAug 20, 2025
What to do if the tape has almost reached its end in Samsung VP-W70?
- HhuntershaunAug 20, 2025
If the tape in your Samsung Camcorder has almost reached its end, prepare a new one.
What to do if the tape has almost reached its end in Samsung VP-W70?
If the tape in your Samsung Camcorder has almost reached its end, prepare a new one.
What to do if the tape reached its end in Samsung VP-W70?
If the tape in your Samsung Camcorder has reached its end, change to a new one.
What to do if my Samsung VP-W70 says 'TAPE END!'?
The 'TAPE END!' message appears when the tape has almost reached its end or has reached its end. Prepare or change to a new tape.
What to do if there is no tape in my Samsung Camcorder?
If there is no tape in your Samsung Camcorder, insert a tape.
What to do if the battery of my Samsung Camcorder is almost discharged?
If the battery pack of your Samsung Camcorder is almost discharged, exchange it with a charged one.
What to do if the battery of my Samsung VP-W70 Camcorder is fully discharged?
If the battery pack of your Samsung Camcorder is fully discharged, exchange it with a charged battery.
Why does my Samsung VP-W70 Camcorder display blink?
The display might be blinking because the battery pack is almost or fully discharged. Exchange it with a charged one.
What to do if the battery pack of my Samsung VP-W70 is quickly exhausted?
The battery pack might be quickly exhausted if the atmospheric temperature is too low or the battery pack has not been charged fully. If the battery pack is completely dead and cannot be recharged, use another battery pack.
What to do if moisture condensation has formed in my Samsung VP-W70 Camcorder?
Open the cassette compartment and remove the battery for at least two hours in a warm dry room. Also, you can take the battery pack out, then take the lithium battery out, put the lithium battery back, and finally put the battery pack back.
What to do if my Samsung VP-W70 says 'TAPE!'?
The 'TAPE!' message indicates that there is no tape in the camcorder. Insert a tape.
Ensures proper battery handling, terminal cleanliness, and prevents short circuits.
Warns against pointing the lens at the sun to prevent CCD damage.
Advises against direct sunlight exposure to the electronic viewfinder.
Explains how temperature changes cause condensation and how to manage it.
Covers lithium battery safety, clock function, and replacement advice.
Guidance on hand strap adjustment and cleaning video heads with dry cleaners.
Explains the camcorder's auto-off feature in STANDBY mode to save power.
Lists key functions like Snap Shot, PIP, BLC, DSE, Program AE, DIS, Zoom, and Macro.
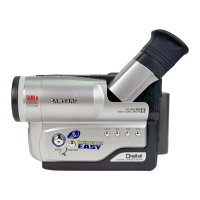
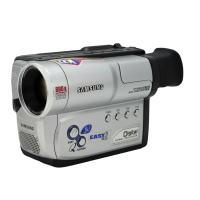
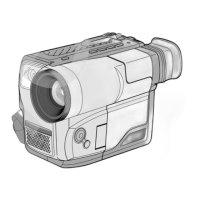
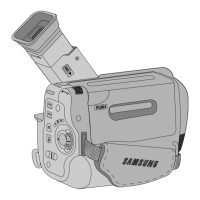
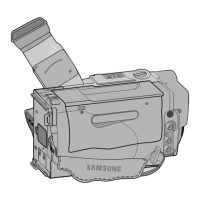
Identifies and explains the functions of controls located on the front of the camcorder.
Identifies and explains the functions of controls located on the side of the camcorder.
Identifies and explains the functions of controls located on the rear of the camcorder.
Explains various indicators displayed on the viewfinder and monitor screens.
Explains additional indicators like Time, Title, Self diagnosis, DSE, Tape counter, and Operation mode.
Lists all basic and optional accessories included with the camcorder.
Details remote control parts, battery installation, and self-timer recording features.
Instructions on adjusting the hand strap for a stable and comfortable grip.
How to attach and adjust the shoulder strap for safe carrying.
Steps for installing the lithium battery for clock and memory functions.
Guides on connecting the AC power adapter for indoor recording.
Explains battery life during recording and the battery charging process.
Table showing approximate continuous recording times based on battery type.
Explains battery indicators and tips for identifying charged/discharged batteries.
Step-by-step instructions for inserting and ejecting video cassettes.
Pre-recording checks and initial steps for first-time users.
How to stop recording and use the REC SEARCH function to review footage.
Tips for steady shots, viewfinder use, and adjusting viewfinder focus.
Steps to review recorded footage on the camcorder's viewfinder.
How to pause playback and use FF/REW to find specific scenes.
How to use the zoom function to change subject size in CAMERA mode.
Details using digital zoom beyond optical limits and its effect on picture quality.
Instructions for enabling or disabling the digital zoom feature.
Guide to using the simplified EASY mode for easy recording.
How to customize and save personal recording settings.
How to use the DIS feature to stabilize images and reduce handshake blur.
Explains the use of manual and auto focus modes for optimal clarity.
How to use BLC to improve subject visibility against bright backgrounds.
Overview of different automatic exposure modes for various shooting scenarios.
Steps to select and configure the desired automatic exposure mode.
Introduces various digital special effects to enhance recordings creatively.
How to choose and apply specific digital special effects during recording.
Guides on setting and recording date and time information onto video footage.
How to select whether to record date only or both date and time.
How to choose titles and languages for text overlays on recordings.
How to set title recording time and record titles with video.
How to use fade effects for professional transitions at the beginning or end of a sequence.
How to use the PIP feature with Digital Zoom for a clearer view of the subject.
How to capture single still pictures, functioning like a film camera.
How to adjust white balance for accurate color reproduction under different lighting conditions.
How to use the demo mode to automatically showcase camcorder functions.
How to select the color for displaying date and title text on recordings.
Guidance on optimal lighting conditions and brightness levels for recording.
Guides on connecting the camcorder to a TV for playback using various methods.
Step-by-step instructions for playing recorded tapes and viewing them on a TV.
How to pause playback and use FF/REW to find specific scenes.
How to automatically return the tape counter to zero.
How to apply Digital Special Effects during playback.
Instructions for safely cleaning the camcorder's viewfinder.
How to clean the video heads using a dry cassette cleaner.
Recommendations for storing the camcorder properly to prevent damage.
Factors to consider for international use: power sources and TV systems.
Lists error codes displayed on screen and their meanings.
A guide to resolving common camcorder problems by checking basic functions.
Further problem-solving steps for issues like poor playback quality or blurred images.
Procedures for handling moisture condensation and clearing the DEW indicator.
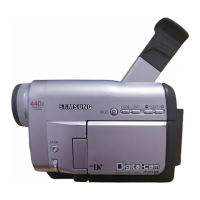
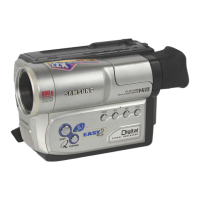
Detailed technical specifications for the camcorder model, including system, power, and dimensions.
| Manufacturer | Samsung |
|---|---|
| Model | VP-W70 |
| Recording Media | MiniDV |
| Image Sensor | CCD |
| Image Sensor Size | 1/6 inch |
| LCD Screen Size | 2.5 inches |
| Still Image Resolution | 1024 x 768 |
| Battery Type | Lithium-Ion |
| Effective Pixels | 680, 000 pixels |
| Video Resolution | 720x480 pixels |
| Interface | IEEE 1394 (FireWire) |