Do you have a question about the Sanctuary DIAMOND SA-DIA1-COM and is the answer not in the manual?
Information required to access safe contents if combination is lost. Keep this information for records.
This document is an instruction manual for the Sanctuary Diamond series of security safes, specifically covering models SA-DIA1-COM, SA-DIA2-COM, SA-DIA3-COM, SA-DIA1-COM-DP, SA-DIA2-COM-DP, and SA-DIA3-COM-DP. It provides essential information for safe setup, operation, and maintenance, emphasizing the importance of reading the manual thoroughly to avoid voiding the warranty.
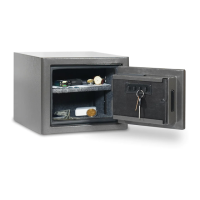
The Sanctuary Diamond security safe is designed to protect valuables, important documents, and keepsakes from theft, fire, forced entry, and natural flood. It features a combination lock mechanism for secure access, along with a handle for opening and closing the door. The safe is equipped with internal lighting to illuminate the contents when the door is open. For enhanced security, the safe can be bolted down to a floor or wall, utilizing pre-drilled holes and provided hardware. The internal layout includes adjustable shelves (the SA-DIA1-COM model has one shelf) for organizing items, a door organizer storage pocket, and key hooks. The locking mechanism incorporates both active locking plates and dead locking plates to resist forced entry.
Registration: To ensure expedited support and address any potential issues, users are required to register their Sanctuary safe on the manufacturer's website (www.saproducts.com). Registration helps in obtaining assistance without the need for a notary letter and proof of payment in case of access problems. The manual provides a section to record purchase details, model and serial numbers, retailer name, and key number for future reference.
The safe operates using a three-digit combination lock. It is crucial to dial all numbers exactly. If a number is passed, the user must restart the process by spinning the dial three times clockwise. All numbers must be dialed to the top notch at the 12 o'clock position on the dial ring.
The safe features internal lighting that automatically activates when the handle is in the open and unlocked position. To enable this feature, two AA batteries must be installed into the battery compartment located on top of the door panel. The unit will beep upon successful battery installation. Users are warned to insert batteries with correct polarity, remove exhausted batteries safely, and avoid mixing old and new batteries, or alkaline and standard batteries, or using rechargeable batteries. The lighting will turn off automatically when the handle is returned to the locked position. To keep the lighting activated while accessing contents, the handle must remain in the open and unlocked position.
When loading the safe, specific guidelines are provided to maximize protection and maintain the safe's integrity:
To enhance burglary protection and stability, bolting the safe to the floor or wall is recommended. The manual provides detailed instructions for securing the safe to a concrete surface:
To prevent moisture, mildew, and rust damage, it is recommended to place a moisture/protective barrier between the safe and a concrete floor. Installing the safe in a climate-controlled environment (with heat in winter and cooling in summer) is highly recommended. In areas of high humidity or frequent temperature fluctuations (e.g., garages), precautions should be taken against moisture damage. The use of an internal dehumidifier and/or desiccants is strongly encouraged to protect contents from rust or mildew. Internal dehumidifiers should not be in direct contact with the side or back walls of the safe.
The hinges and internal locking mechanism are permanently lubricated and do not require maintenance. Opening the door panel of the safe may void the warranty. Users should always consult customer service experts before attempting any internal repairs or modifications.
SA Consumer Products, Inc. offers a lifetime warranty to the original owner, covering repair or replacement of any Sanctuary Safe damaged by fire, forced entry, forced attack, or natural flood. The warranty also covers defective parts, paint, or lock for the lifetime of the original owner. If a replacement safe is deemed necessary, SA Consumer Products, Inc. will cover the freight costs. The warranty is limited to the safe itself and excludes any loss associated with its contents. To claim the warranty, proof of registration and a copy of the sales receipt must be on file. The warranty is valid only within the United States and Canada. SA Consumer Products, Inc. is responsible only when the safe is used in compliance with the manual's directions. Repairs will be performed in-home if possible; otherwise, factory replacement will be shipped freight prepaid, curbside delivery. The warranty is inclusive and in lieu of all other warranties, express or implied, specifically excluding merchantability and fitness for a particular purpose, and does not cover consequential damages of any kind.
In case the combination is forgotten, the primary action is to refer to the owner's manual, which contains a copy of the combination. If the manual is lost or difficulties persist, customer service can be contacted at cs@saproducts.com or (888) 792-4264. Proof of purchase is required to obtain the combination.
| Lock Type | Electronic Keypad |
|---|---|
| Fire Protection | Yes |
| Color | Black |
| Battery Type | AA |
| Fire Rating | 30 minutes at 1400°F |
| Security Features | Live-locking bolts, pry-resistant door, interior hinges |