This document is an instruction manual for Sanctuary Platinum security safes, specifically covering models SA-PLAT1, SA-PLAT2, SA-PLAT3, SA-PLAT4, SA-PLAT1-DP, SA-PLAT2-DP, SA-PLAT3-DP, and SA-PLAT4-DP. It provides comprehensive guidance on the setup, operation, and maintenance of these safes.
Function Description:
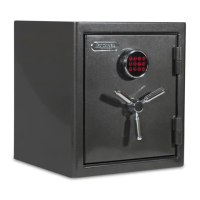
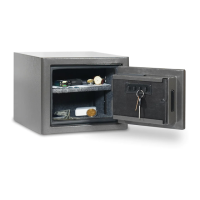
The Sanctuary Platinum security safes are designed to protect valuables, important documents, and keepsakes from theft, fire, forced entry, and natural floods. They feature an electronic lock system for primary access and a backup key entry for emergency situations. The safes are equipped with internal lighting, tempered glass shelves (number varies by model), and a door organizer storage pocket for efficient organization. Bolt-down holes are provided for securing the safe to the floor or wall, enhancing burglary protection and stability. The safes also incorporate security features such as lockout mode and tamper protection to deter unauthorized access.
Important Technical Specifications:
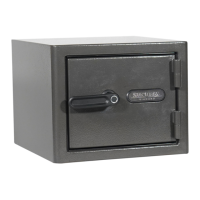
- Lock Type: Electronic lock with a touch pad for security code entry.
- Security Code: Programmable 3 to 8 digit security code.
- Backup Access: Backup key entry system.
- Power Source: Requires a 1x9V battery for the electronic lock.
- Internal Lighting: Activates for 30 seconds upon door opening, with an activation button for extended illumination.
- Shelving: Tempered glass shelves; SA-PLAT1 has one shelf, SA-PLAT4 has three shelves.
- Construction: Features active locking bolts and dead locking bolts for enhanced security.
- Back Wall: Acrylic mirror back wall.
- Handle: 3-spoke handle (SA-PLAT1 has one spoke).
- Bolt Down: Equipped with bolt-down holes for securing to a concrete floor or wall. Recommended drill bit size for concrete is 7/16" and a 11/16" (17MM) socket wrench.
Usage Features:
- Initial Entry: The manual details a step-by-step process for initial entry, including locating backup keys and spokes, installing the handle spoke, unlocking with the backup key, opening the door, and installing the lock face with the 9V battery and electronic cable.
- Electronic Lock Setup: Users are guided to reprogram the factory code (159#) to a new personal 3-8 digit security code. The process involves pressing a reset button located inside the safe door, entering the new code, and confirming with the '*' symbol. Visual and auditory feedback (beeps and LED flashes) indicate successful or unsuccessful programming. An inactivity timeout feature ensures the touch pad shuts down if programming is not completed within 10 seconds.
- Opening the Safe: To open the safe with the programmed code, users swipe their finger(s) across the touch pad to "wake up" the lock face. Two random numbers illuminate, which must be pressed individually before entering the security code followed by the '#' button. Green LED and beeps indicate successful entry, while yellow LED and beeps indicate rejection.
- Locked Out Procedure: In case of lockout, users are instructed to use the backup keys. If keys are lost or difficulties persist, customer service can be contacted, requiring proof of purchase for key replacement.
- Internal Lighting: The internal light automatically activates for 30 seconds when the door is opened. An internal "Lighting Activation Button" can be pressed to extend the illumination for an additional 30 seconds per press.
- Low Battery Warning: The safe alerts users to low battery mode after a successful code entry. Both red (low battery) and green (unlock) LEDs illuminate for 3 seconds, prompting immediate battery replacement to prevent lockout.
- Lockout Mode / Tamper Protection:
- Basic Lockout: Three consecutive rejected security code entries deactivate the touch pad for 30 seconds.
- Severe Lockout: Six consecutive rejected entries deactivate the touch pad for 5 minutes.
- During lockout, the yellow lock LED flashes every 10 seconds. A single beep and green unlock LED flash signal the end of lockout.
- Tamper Indicator: After any lockout mode, the next successful code entry triggers a tamper warning: the yellow lock LED flashes 3 times, accompanied by a 3-second long beep.
- Silent Entry Mode: This feature allows users to disable audible sounds from the safe. To activate/deactivate, users swipe the touch pad, press and hold the '*' symbol for 3 seconds. Yellow LED flashes indicate mode change.
- Loading Recommendations:
- Store heat-sensitive documents at the bottom for maximum fire protection.
- Store ammunition separately from other valuables.
- Avoid placing items that exert pressure on the door when closed.
- Place heavier items on the floor of the safe or away from the middle of shelves for stability.
Maintenance Features:
- Battery Replacement: Users are warned to replace the 9V battery immediately upon a low battery warning. Instructions specify correct polarity, and advise against mixing old/new or alkaline/standard batteries, or using rechargeable batteries.
- Shelf Installation: Detailed instructions are provided for installing the tempered glass shelves, including removing protective film, screwing in brackets, rotating front brackets, and maneuvering shelves into place. Set screws under each bracket secure the shelves.
- Securing the Safe: The manual provides instructions for bolting the safe to a concrete floor using provided hardware. This includes drilling pilot holes, inserting anchoring plugs, and threading anchor bolts. It emphasizes the importance of having a second person stabilize the safe during this process to prevent tipping and injury. A specific warning is given to ensure the metal washer sits on top of the rubber washer to prevent water entry in case of a flood.
- Proper Placement: Recommendations include storing the safe in a closet, office, basement, or bedroom, out of direct sight. It must be in an isolated, dry area, never in direct contact with a wet floor. A moisture/protective barrier is highly recommended for concrete floors.
- Keeping the Safe Dry: To prevent moisture, mildew, and rust, a moisture/protective barrier is recommended between the safe and concrete floors. Installing the safe in a climate-controlled environment is advised. In high humidity areas, using an internal dehumidifier and/or desiccants is strongly encouraged, ensuring they do not directly contact the safe's side or back walls.
- Hinges and Internal Mechanisms: These components are permanently lubricated and require no maintenance. Opening the door panel may void the warranty, and users are advised to consult customer service experts before attempting any such action.
Warranty:
The product comes with a lifetime warranty for the original owner, covering damage from fire, forced entry, forced attack, natural flood, defective parts, paint, or lock. SA Consumer Products, Inc. will repair or replace the safe at its discretion. If a replacement is sent, freight costs are covered. The warranty is limited to the safe itself and excludes contents. Proof of registration and sales receipt are required for claims. The warranty is valid only within the United States and Canada and requires the safe to be used according to the manual. Repairs may be in-home or factory replacement (curbside delivery). This warranty is inclusive and replaces all other warranties, express or implied, specifically excluding merchantability and fitness for a particular purpose, and consequential damages.