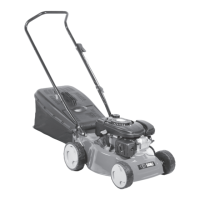
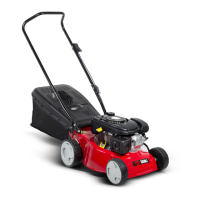
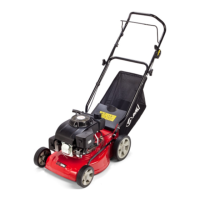
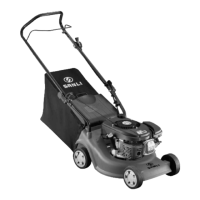
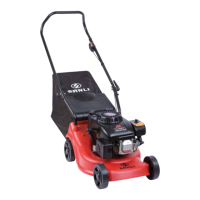
The Sanli LazerCut LCS400 is a petrol engine lawn mower designed for domestic use, offering a blend of power, ease of use, and maintenance features to keep lawns tidy.
Function Description:
The primary function of the Sanli LazerCut LCS400 is to cut grass efficiently and effectively. It is a walk-behind mower, meaning the user guides it across the lawn. The mower features a petrol engine that drives a rotating blade underneath the chassis, which cuts the grass. The cut grass is then collected in a rear grass catcher, ensuring a clean finish. The mower includes a comfort grip handle for user comfort and a throttle control lever for adjusting engine speed. A height adjustment lever allows the user to set the cutting height according to lawn conditions and desired grass length.
Important Technical Specifications:
- Model: LCS400
- Engine: SL1P64F-A
- Displacement: 135 cm³
- Maximum Power: 2.75 kW
- Maximum Operating Speed: 3100 rpm
- Cutting Width: 420 mm
- Adjustable Cutting Heights: 10 positions
- Cutting Height Range: 15-75 mm
- Engine Oil Capacity: 0.6 L
- Fuel Tank Capacity: 1.0 L
- Grass Collection Capacity: 50 L
- Noise Level: 75 dB
- Chassis: Heavy duty steel
- Dimensions (cms): a = 127 (height of handle), b = 101 (height of mower body), c = 49 (width)
- Fuel Type: Min 95 octane premium unleaded petrol (NO E10 PETROL)
Usage Features:
The LCS400 is designed with user convenience in mind. Assembly is straightforward, involving the attachment of the lower and upper handle bars, and fitting the cable clip. The handle knobs and bolts, along with a bolt and nut assembly, are provided for secure attachment. A spark plug socket and spanners are included for basic maintenance.
Starting the engine requires a specific sequence:
- Ensure the mower is on a safe, flat area away from fuel.
- Slide the 'Red' petrol tap lever to the 'On' position.
- Move the throttle control lever to the 'Cold Start' position.
- Firmly hold the top handle and pull the starter cord vigorously with a steady action.
- Once the engine has run for at least 15 seconds, adjust the throttle control lever to the 'Run' position.
For hot engine restarts, the throttle control lever should be moved directly to the 'Run' position before pulling the cord. To turn off the mower, slide the throttle control lever to the 'Stop' position, then move the petrol tap lever to 'Off'.
The grass catcher is easily attached by lifting the rear flap and sliding it into position. The cutting height can be adjusted centrally using the height adjustment lever located on the mower's right-hand rear wheel. Moving the lever outwards releases it, allowing adjustment towards the front for increased height or towards the rear for reduced height.
Safety tips for operation include:
- Always inspect the mower before use for loose parts.
- Walk, never run, while operating.
- Keep hands, feet, and clothing away from moving parts; wear appropriate footwear.
- Never place hands or feet under the chassis while the engine is running.
- Clear the mowing area of debris.
- Maintain a safe distance (over 14 meters) from people and animals.
- Mow across slopes, not up and down, and avoid very steep slopes, rain, nightfall, or poor light.
- Push the mower; do not pull it towards you.
- Do not fill the tank or start the mower indoors or in poorly ventilated areas.
- Do not alter engine governing settings.
- Do not smoke when filling the fuel tank or near a naked flame.
- Use fresh 95 octane premium unleaded petrol (less than 4-6 weeks old).
- Do not transport the mower with petrol in the tank.
- Be aware that engine parts get very hot.
- Turn off the engine before emptying the grass catcher or clearing grass.
- Store fuel and oil in a cool, well-ventilated place.
- Wear ear protectors, safety goggles, and safety boots.
- When inspecting the underside, tilt the mower to its right or back (exhaust near the ground) to prevent oil leakage. Never tilt when the engine is running.
Maintenance Features:
The manual outlines a comprehensive maintenance schedule to ensure the longevity and optimal performance of the mower.
Before Each Mowing:
- Cutting System: Check and verify its condition.
- Oil Level: Check the oil level.
After 5 Hours (First Use):
- Spark Plug: Check the spark plug.
- Oil: Drain and renew the oil.
Every 25 Hours or Once a Year (Minimum, before winter lay-up):
- Cutting System: Sharpen and balance the blade; replace worn or damaged blades.
- Spark Plug: Clean and check electrode clearance; replace if necessary.
- Air Filter: Clean the filter; replace if necessary.
- Oil: Drain and renew the oil.
Detailed Maintenance Procedures:
- Filling Oil Sump: The mower is supplied with oil in the engine, but 600ml of SAE 30 oil must be added before first use. The oil level should be checked before each use, ensuring it's between the min and max marks on the dipstick.
- Filling Fuel Tank: Use min 95 octane premium unleaded petrol (no E10 petrol). Fill the tank using a clean funnel, leaving about 13mm from the filler neck for expansion. Securely tighten the cap.
- Cleaning: After mowing, allow the engine to cool, then remove grass clippings with a brush. Clean the grass collection bag annually. Clean underneath by disconnecting the spark plug cap and tilting the mower on its back, then scraping off cut grass. Do not use a pressure washer or hot water. Dry the machine before storing.
- Storing: Store in a dry, well-ventilated area away from flames, sparks, or heat sources. Disconnect the spark plug cap. Avoid storing under a tarpaulin to prevent condensation.
- Transporting: Ensure the fuel tank is empty by running the engine until all fuel is consumed. Allow the engine to cool and turn the fuel tap to 'Off'.
- Cutting System (Blade): Check the blade, attachment bolts, and drive shaft for damage or wear before and after each mowing session. Replace damaged or worn blades with genuine SANLI parts. Excessive vibration indicates a problem with the cutting system.
- Removing/Mounting the Blade: Wear protective gloves. Disconnect the spark plug cap and tilt the mower on its side (air filter and carburettor uppermost). Loosen the blade screw with a spanner or socket. When mounting, ensure all components are present and clean, position the blade with cooling fins facing the engine, check alignment, and tighten screws firmly.
- Spark Plug: Check the spark plug after the first five hours, then every 25 hours. Remove the cap with a rotary motion, then the plug with the wrench. Clean carbon deposits with a copper brush and check the electrode gap (approx. 0.7 mm). Replace and tighten the plug and cap. Replace worn or damaged plugs with a new one of the same type.
- Air Filter: Check and clean the air filter every 25 hours or more often in dusty conditions. Remove the cover and foam cartridge. Clean the cartridge in warm water with a few drops of washing-up liquid, rinse, squeeze gently, and air dry. Clean the cover and box with a lint-free cloth. Apply a uniform layer of clean engine oil to the outside of the cartridge filter before reinserting. Replace damaged or very dirty cartridges.
- Changing Oil: The first oil change is after 5 hours, then every 25 hours or annually. Warm the engine for several minutes to make the oil more fluid. Remove the spark plug cap and oil dipstick. Place a container beneath the oil filler pipe and tilt the mower to drain the oil. Refill with new oil.
The manual also includes a troubleshooting guide for common issues like the engine not starting, engine stopping often, engine losing power, mower vibrating too much, and poor cutting/catching. Warranty conditions are detailed, covering a 2-year period for domestic use (90 days for commercial use) and outlining what is and isn't covered, emphasizing that repairs due to failure to follow manufacturer's instructions are chargeable.