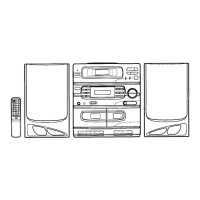
RECORDING
Recording compact discs (Synchronous recording)
Recording from the tuner or video input
1.
2.
3.
4.
5.
6.
Load a blank cassette into deck B.
1.
Select “CD”.
Load the disc(s) to be recorded.
2.
For programmed recording, programme the material in advance 3.
(as described under “PROGRAMMED PLAY”).
4.
Press the DISC button (1, 2 or 3) to select the disc to be recorded first,
Tune in the radio station to be recorded or play a video cassette or
video disc.
Load a blank cassette into deck B.
Press the REC button to start recording.
Press the STOP/EJECT button to stop recording.
then press the STOP button. Select the track number to be recorded When beat interference is heard
if required. A high-pitched noise called “beat” is sometimes heard during the record-
For programmed recording, this step is unnecessary. ing of radio broadcasts.
Press the REC button on deck B. The PLAY button is engaged
In cases like this, set the DUBBING/BEAT CANCEL button to the position
simultaneously and CD recording starts.
that reduces the level of the beat noise.
Press the STOP/EJECT button on deck B to stop recording. Also the
CD player stops automatically.
When the end of the tape is reached, the CD player and deck B stop
automatically y.
TAPE DUBBING (Deck A to Deck B)
1. Load the cassette to be played back into deck A and a blank cassette
into deck B.
2. Select “TAPE”.
3. Set the cassette in deck A to the point where recording will begin.
4. Select the dubbing speed with the DUBBING/BEAT CANCEL button.
NOR:
For dubbing whale monitoring at normal speed.
HIGH:
For dubbing tape at high speed (twice normal speed).
5. Press the PAUSE button on deck B.
6. Press the REC button on deck B.
7. Press the PLAY button on deck A to start dubbing.
8. To stop dubbing, press both STOP/EJECT buttons
Automatic stop during dubbing
If deck B stops automatically, deck A continues playback mode at
normal speed.
If deck A stops automatically, deck B erases the tape to the end.
Do not change the dubbing speed during the dubbing operation.
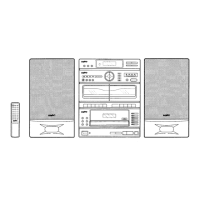
MAINTENANCE
Cleaning the decks A and B heads
To ensure playback and recording with good-quality sound, use cotton
swab to clean the heads, pinch rollers and capstans of the decks after
DECK B
DECK A
about every 10 hours of use.
//9
l—
IIg
//
l—
//
If the dirt persists, soak the swab in a little methylated spirit or head
cleaning fknd and then clean.
Main unit
Use a soft cloth to remove dirt on the main unit.
##
If the dirt persists, dip a soft cloth into a diluted solution of neutral
543
78
detergent, wring it out, wipe away the dirt, and then take up any moisture
with a dry cloth.
1. Cotton swab
Do not use benzene, thinners or alcohol since they will mar the finish of
the surfaces.
2, 6. Capstan
3, 8.
Pinch roller
4, 5, 7, Head
-9-