The provided manual describes the Schacht Matchless Bulky Plyer Flyer Head, an accessory designed to enhance the capabilities of Schacht Matchless spinning wheels. This device allows spinners to create bulky yarns, expanding the range of fibers and techniques that can be used with their existing wheel.
Function Description
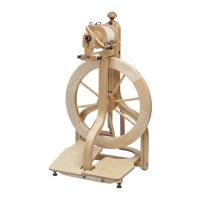
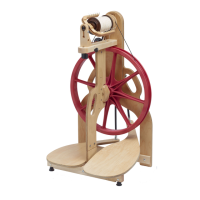
The Bulky Plyer Flyer Head replaces the standard flyer assembly on a Matchless spinning wheel, enabling the spinning of thicker, bulkier yarns. It consists of a bulky front maiden, a bulky flyer, and a bulky bobbin. The system is designed to accommodate larger volumes of fiber and handle the increased tension associated with spinning heavier yarns. The flyer features adjustable hooks, allowing the spinner to customize the take-up points for even yarn distribution on the bobbin. The manual details installation procedures for two different versions of the Matchless wheel: those built before January 19, 2012, and those built on or after that date, indicating a design evolution in the wheel's front maiden attachment mechanism.
The core function of the Bulky Plyer Flyer Head is to facilitate Scotch tension spinning for bulky yarns. While the manual mentions double drive in the context of take-up adjustment, it explicitly recommends using the Bulky Flyer Plyer Head in Scotch tension mode for optimal performance. Scotch tension is a common braking system in spinning wheels where a string or band creates friction on the bobbin, controlling the take-up of yarn. The manual provides detailed instructions for setting up the Scotch tension spring and string for both clockwise and counter-clockwise spinning directions.
Important Technical Specifications
The manual highlights several key components and their specifications:
- Bulky Front Maiden & Bearing: This component houses the front end of the bulky flyer shaft. Its installation varies based on the wheel's manufacturing date. For older wheels (before 1/19/2012), it attaches with a bolt and T-knob. For newer wheels (on or after 1/19/2012), it uses a quick-release lever and knob. A critical adjustment involves ensuring a 1/16" gap between the burgundy bearing and the black shoulder of the flyer shaft for proper operation.
- Bulky Flyer: This is the main rotating component that guides the yarn onto the bobbin. It features eight small dimples along each arm, into which spring-loaded ball bearing flyer hooks snap.
- Bulky Bobbin: Designed to hold a larger quantity of bulky yarn compared to standard bobbins.
- 5mm Hex Wrench: This tool is essential for adjusting the maiden stop screw on the front maiden, which controls the 1/16" gap for optimal flyer fit.
- Drive Band: The manual recommends doubling the drive cord over the whorl when using Scotch tension for the Bulky Plyer Flyer Head. It also suggests using a longer drive band if spinning with a slow speed whorl to prevent stretching of the usual drive band.
- Maiden Stop: A black hex head screw on the front maiden, crucial for adjusting the flyer's fit.
- Bearing Adjustment Screw: Located on the side of the front maiden, this Phillips head screw can be loosened in quarter-turn increments if the flyer does not turn freely.
Usage Features
The manual provides comprehensive guidance on using the Bulky Plyer Flyer Head:
- Installation: Detailed, step-by-step instructions are provided for installing the bulky front maiden and bulky flyer, catering to the two different wheel versions. This includes removing existing components, aligning holes, and securing the new parts.
- Scotch Tension Setup: Clear instructions are given for installing the Scotch tension spring and string for both clockwise and counter-clockwise spinning. This involves hooking the spring, placing the string over the bobbin pulley, and inserting the string into the tension rod.
- Take-Up Adjustment: For Scotch tension, take-up is adjusted by tightening the Scotch tension brake band. In double drive (though Scotch tension is recommended), take-up is adjusted by turning the drive band tension knob to the right. The manual notes that the small end of the bobbin should face the front maiden in Scotch tension and be next to the whorl in double drive.
- Flyer Hook Adjustment: The adjustable flyer hooks slide along the flyer arms, snapping into dimples. They are moved by holding the hooks above and below the flyer, allowing spinners to choose the optimal take-up point for even bobbin filling.
- Spinning Direction: The manual explicitly covers setup for both clockwise and counter-clockwise spinning, ensuring versatility for different spinning styles.
Maintenance Features
While the manual primarily focuses on installation and initial setup, it includes important checks and adjustments that can be considered maintenance-related:
- Checking the Flyer: After installation and with the drive band off, spinners are instructed to spin the flyer arms with a finger to ensure it turns freely. This is a crucial check for proper installation and function.
- Adjusting the Front Maiden: If the flyer does not turn freely, the maiden stop (black hex head screw) needs to be adjusted using the 5mm hex wrench to achieve the correct 1/16" gap between the bearing and the flyer shaft shoulder. This ensures smooth operation and prevents resistance.
- Loosening the Bearing Adjustment Screw: If the flyer still doesn't turn freely after adjusting the front maiden, the Phillips head bearing adjustment screw on the side of the front maiden can be loosened in quarter-turn increments. This addresses potential friction within the bearing itself.
- Drive Band Management: The recommendation to use a longer drive band for slow speed whorls and to double the drive cord for Scotch tension helps in maintaining the longevity and optimal performance of the drive band system, preventing premature stretching or wear.
- Lever Tension Adjustment (for newer wheels): For wheels with the quick-release lever, the knob should be adjusted so that the lever closes with firm pressure. If it's too loose or too tight, adjustments are needed to ensure secure attachment of the front maiden without undue strain.
The manual also includes a section on "Spinning Accessories," which, while not directly related to the Bulky Plyer Flyer Head's maintenance, showcases other tools like Niddy Noddys, Dizzy Yarn Gauges, Curved Carders, and Collapsible Tensioned Lazy Kates that complement the spinning process and can contribute to the overall care and use of spun fibers. The emphasis on leaving both hooks on the flyer to maintain balance is a key maintenance tip for the flyer assembly itself.