www.scheppach.com / service@scheppach.com / +(49)-08223-4002-99 / +(49)-08223-4002-58
18
|
GB
To remove residual liquid, take o the machine head
(2) by releasing the locking hooks (4) from the stain-
less steel container (9). Pour out the liquid residue.
Clean the container with a damp cloth.
• Replace paper lter bag when full
• Always keep the device clean. Do not use cleaning
agents or solvents.
• Keep the ventilation slots clean and free of dirt and dust.
• Clean the device only with a soft brush or a damp cloth.
• Clean the foam lter (17) with a little soap and run-
ning water and then leave it to air dry.
Maintenance
The device is maintenance-free.
Service information
Please note that the following parts of this product
are subject to normal or natural wear and that the fol-
lowing parts are therefore also required for use as
consumables. Wear parts*: Foam lter, Paper lter
bag, Folded lter for dry vacuuming
* Not necessarily included in the scope of delivery!
10. Storage
Store the device and its accessories in a dark, dry and
frost-proof place that is inaccessible to children. The
optimum storage temperature is between 5 and 30˚C.
Store the electrical tool in its original packaging.
Cover the electrical tool in order to protect it from
dust and moisture.
Store the operating manual with the electrical tool.
• Wind the mains cable (3) around the top cable hold-
er (13) at the connection port for the blower func-
tion (14) and the bottom cable holder (24). (Fig. 19)
• There are four recesses on the top side of the ma-
chine head (2) for storing the oor nozzle (20) and
the joint nozzle (21). There are also recesses on
the wheel mounting base (5) for attaching the met-
al extension tube (22). (Fig. 20)
• The remaining accessories can be stored in the
stainless steel container (9).
11. Electrical connection
The electrical motor installed is connected and ready for
operation. The connection complies with the applicable
VDE and DIN provisions.
The customer‘s mains connection as well as the exten-
sion cable used must also comply with these regulations.
Important information
In the event of an overloading the motor will switch
itself o. After a cool-down period (time varies) the
motor can be switched back on again.
2 switch setting II: On
Press the on/o switch (12) to switch on.
Press the on/o switch (12) again to switch the device
o.
3 switch setting I: Automatic mode (the vacuum
cleaner will be switched
on by an electric tool).
• Plug your electrical tool’s cable into the automatic
socket (g. 17).
• Connect the suction hose to the suction connection
on your electrical tool.
Check that the connection is secure and airtight.
• Set the switch on the vacuum system to position “I”
= Automatic mode.
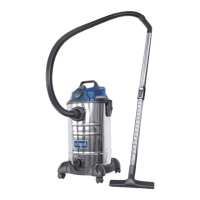
Dry vacuuming (g. 3+9+10)
Use the folded lter (19) for dry vacuuming. The pa-
per lter bag (18) can be used in addition. This en-
sures that the folded lter (19) remains free of dust for
longer and maintains the vacuum power for longer.
In addition, the disposal of the dust is also easier.
Always ensure that the lters are correctly tted.
Wet vacuuming (g. 3+8)
Use the foam lter (17) for wet vacuuming. Ensure
that the foam lter (17) is correctly tted.
If the stainless steel container (9) is full, the safety
oat valve (15) closes the suction port and suction
operation is interrupted.
m IMPORTANT!
The device is not suitable for vacuuming ammable
liquids. For wet vacuuming, use the only the foam lter
(17) provided.
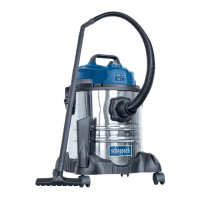
Water drain plug (8) (g. 18)
The stainless steel container (9) is equipped with a
water drain plug (8) in order to make it easier to drain.
Open the water drain plug (8) by turning it counter-
clockwise and drain out the liquid.
9. Maintenance and cleaning
m WARNING!
Prior to any adjustment, maintenance or service
work disconnect the mains power plug!
Cleaning
It is recommended to clean the device after each use.
Do not spray the device with water or clean it under
running water. This can result in electric shocks and
can damage the device.
Empty the stainless steel container (9) after each use:
After opening the screw cap to drain out the liquids
(8), the liquid collected can be drained out. Residual
liquid remains in the stainless steel container (9).
 Loading...