www.scheppach.com
GB
|
25
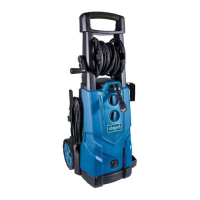
5. Attach mounting bracket for high-pressure hose
(11) to the back of the device with two screws (27).
Use a Phillips screwdriver for this (not included in
the scope of delivery).
6. Plug the mounting bracket for the mains connec-
tion cable (2) and the mounting bracket for acces-
sories (7) onto the two connection points on the
side of the device.
7. Insert one of the high-pressure hose connection
coupling plugs (21) into the spray gun high-pres-
sure hose connection (19) and the other coupling
plug into the high-pressure hose connection (6) so
that they snap into place.
8. To remove the high-pressure hose (21), actuate
the locking button (20) on the spray gun (16) and
the locking button (5) on the product and pull out
the high-pressure hose (21).
9. Screw the coupling for the water connection (22)
onto the water connection (9).
10. Use a garden hose with quick coupling (not includ-
ed in the scope of delivery) and connect it to the
water connection coupling (22).
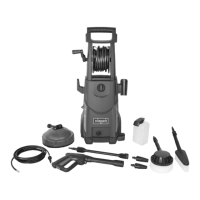
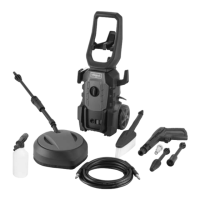
11. Depending on the work you want to do, connect
the lance (14), the washing brush (23) or the spray
bottle (25) to the spray gun (9) by plugging it in and
turning it (bayonet lock).
12. Once the lance (14) is mounted, connect either the
variable nozzle (12), the turbo nozzle (15) or the
patio cleaner (24) to the lance (14). To do this, in-
sert the attachments into the lance (2) so that they
latch into place. To remove the attachments, press
the nozzle release button (13) on the front end of
the lance (14) and pull the attachment o towards
the front.
11. Starting operation (Fig. 1 + 2)
m Attention!
Always make sure the product is fully assembled
before commissioning!
Selecting attachments
Choose a suitable attachment depending on the work
you need to do:
Variable nozzle (12): The variable nozzle (12) with its
at jet is particularly suitable for surface cleaning. The
width of the water jet can be adjusted by turning the
nozzle tip.
• When ordering please provide our article number as
well as type and year of manufacture for the product.
m WARNING!
The product and the packaging material are not
children‘s toys! Do not let children play with plas-
tic bags, lms or small parts! There is a danger of
choking or suocating!
9. Before commissioning
In accordance with the applicable regulations, the
high-pressure cleaner must never be operated in the
drinking water network without a system separator.
A suitable system separator in accordance with EN
12729 type BA must be used.
Water that has owed through a system separator
backow prevention device is considered non-pota-
ble. A system separator is available from specialist
dealers.
A system separator (backow preventer) prevents wa-
ter and cleaning agent from owing back into the drink-
ing water pipe.
• Use a standard 1/2” garden hose with at least 5 m
length for the water inlet. Do not exceed 30 m length.
• Use the product with a domestic water connection
with at least 500 l/h ow rate.
• You can also use the product independently of the
water supply (e.g. rain barrel) thanks to the integrat-
ed water suction function. This function can only
be used with a suction hose with lter basket. A
suction hose with lter basket is not included in the
scope of delivery.
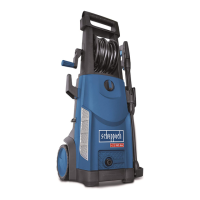
10. Assembly (Fig. 1 + 2)
1. Place the product upright on a level, rm surface.
2. Put the wheels (10) on the wheel axles so that they
lock into place.
3. Slide the bracket handle (1) onto the connection
on the top of the product and x it with two screws
(27). Use a Phillips screwdriver for this (not includ-
ed in the scope of delivery).
4. Attach the mounting bracket (8), with four screws
(27) to the attachment points on the bracket han-
dle (1). Use a Phillips screwdriver for this (not in-
cluded in the scope of delivery).
 Loading...