www.scheppach.com
GB
|
37
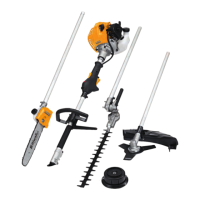
• Place the chain round the chain wheel (Item H).
Make sure that the teeth of the chain engage se-
curely in the chain wheel. The cutter bar must be
hooked into the chain tensioning bolt (Item G).
• Fit the chain wheel cover
Important! Do not fully tighten the fastening screw
until after you have adjusted the chain tension (see
section 7.1).
7.1 Tensioning the chain, Fig. 45-48
Important! Always pull out the spark boot plug be-
fore performing any checks or adjustments.
• Undo the fastening screw (Item I) of the chain
wheel cover by a few turns (Fig. 45).
• Adjust the chain tension with the chain tensioning
screw (Fig. 47/ Item K). Turning the screw clock-
wise increases the chain tension, turning it coun-
terclockwise decreases the chain tension. The
chain is correctly tensioned if it can be raised by
around 2 mm in the middle of the cutter bar (Fig.
46).
• Tighten the xing screw of the chain wheel cover
(Fig. 48).
• Important! All the chain links must lie properly in
the guide groove of the cutter bar.
Notes on tensioning the chain:
The chain must be properly tensioned to ensure
safe operation. When the saw chain can be raised
by around 2 mm in the middle of the cutter bar, you
know that the chain tension is ideal. During cutting,
the temperature of the chain rises and its length
changes. It is important therefore to check the chain
tension at least every 10 minutes and to adjust it
again as required. This applies in particular to new
saw chains. When you have nished working, slack-
en the chain again as it will shorten when it cools
down. This will help to prevent damage to the chain.
8. Filling with fuel
mDanger of injury! Fuel is explosive!
Turn the motor o and let the machine cool down.
Wear safety gloves.
Avoid contact with skin and eyes.
Make sure you observe the “Safety Instructions” par-
agraph.
• Only ever refuel the tool outdoors or in suciently
ventilated rooms.
• Clean around the lling area. Contaminants in the
tank will cause operating problems.
• Before refuelling, shake the container with the fuel
mixture.
• Carefully open the fuel ller cap (B) so that poten-
tial pressure can be release. Fig. 19
• Carefully pour in the fuel mixture to the lower edge
of the ller.
• Close the fuel ller cap (B). Ensure the fuel ller
cap closes tightly.
• Clean the fuel ller cap and the area around it.
• Check the tank and the fuel line for leaks.
Before starting the motor, remove yourself from the
fuelling place by at least three metres.
Draining fuel, Fig. 36
Only ever empty the tank outdoors or in well-
ventilated rooms. Make sure not to spill fuel or
chain oil into the soil (environmental protection).
Use a proper base.
• Hold a collection container beneath the fuel drain
bolt.
• Unscrew the tank cap and remove it.
• Allow the fuel to run out completely.
• Screw the tank cap on rmly by hand.
9. Start on the unit
Do not start the unit until it has been completely as-
sembled.
m Danger of injury!
Only start the petrol multi garden tool if an at-
tachment is connected! Remove the appropriate
transportation protection and inspect the unit in
good working condition. Never use a damaged,
poorly adjusted or serviced or not completely
and securely assembled device.
Check before use!
• Check the safe condition of the device:
• Check the device for leaks.
• Check the device for visual defects.
• Check that all parts of the device have been se-
curely tted.
• Check that all safety devices are in proper condi-
tion.
Start, Fig. 17, 19-23
Choke lever
• Warm engine / choke closed:
• Cold engine / choke open:
Once the machine has been set up properly, start the
engine as follow:
1. Turn the engine switch to the ON position. Fig. 20
2. Open the choke lever. Fig. 20
3. Press the fuel pump more than 5 times. Fig. 19
4. Pull the recoil starter handle (9) 3-5 times to start
the engine. Fig. 21
Never place feet on the shaft or kneel on it.
5. Once the engine is running, briey wait, then
close the choke lever. Fig. 22