11 І 16
This physical injuries or damage to the machine can
be avoided.
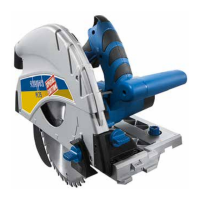
Sawing with dust suction
Connect the suction hose to the exhaust nozzle - Ø 38
mm (12).
Splitter protection Fig.1b
The splinter protection (15) improved signicantly at
0° cuts are the quality of the cut edge of the sawed-off
workpiece part on the upward side.
• Place the machine on the workpiece and guide rail.
• Splitter protection (15) down until it rests on the
workpiece and tighten the knob.
• Splitter protection (15) sawing. At the rst use of
Splitteschutzes (15) we sawed this to generate an
exact stop area.
17. Electrical connection
The installed electric motor is completely wired rea-
dy for operation.
The customer’s connection to the power supply sys-
tem, and any extension cables that may be used,
must conform with local regulations.
Important remark:
The motor is automatically switched off in the event of
an overload. The motor can be switched on again after a
cool ing down period that can vary.
Defective electrical connection cables
Electrical connection cables often suffer insulation dam-
age. Possible causes are:
• Pinch points when connection cables are run through
window or door gaps.
• Kinks resulting from incorrect attachment or laying of
the connection cable.
• Cuts resulting from running over the connecting cable.
• Insulation damage resulting from forcefully pulling out
of the wall socket.
• Cracks through aging of insulation.
Such defective electrical connection cables must not be
used as the insulation damage makes them extremely
hazardous.
Check electrical connection cables regularly for dama-
ge. Make sure the cable is disconnected from the mains
when checking.
Electrical connection cables must comply with the regu-
lations applicable in your country.
Single-phase motor
• The mains voltage must coincide with the voltage spe-
cied on the motor’s rating plate.
• Extension cables up to a length of 25 m must have a
cross-section of 1.5 mm2, and beyond 25 m at least
2.5 mm2.
• The connection to the mains must be protected with
a 16 A slow-acting fuse.
16. Operations
After having performed all the above procedures and
opera tions, you may begin cutting.
ATTENTION: Always keep hands away from the cutting
area and do not try to approach it when the machine is
running.
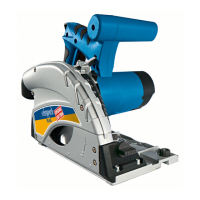
Switching the product on/off, Fig. 1
To switch the plunge-cut saw on, press the on/off switch
(4). To switch off, release the on/off switch (4).
Operating and holding the plunge-cut saw, Fig. 8
1 Secure the work piece so that it cannot get displaced
or moved while sawing.
2 Only move the saw forwards.
3 Grip the saw tightly with both hands ensuring that one
hand is placed on the main handle and the other on
the front handle.
4 When using a guide rail, it must be fastened with screw
clamps.
5 Make sure the power cable is not placed in the sawing
direction.
Sawing
1 Place the front part of the machine onto the work piece.
2 Switch the machine on using the on/off switch (4).
3 Press the plunge-cut trigger (3).
4 Push the saw downwards to reach the sawing depth.
5 Push the saw forward evenly.
6 After nishing the sawing cut, switch the machine off
and move the saw blade upwards.
Plunge-cuts, Fig. 9
1 Place the saw onto the work piece.
2 Place the cutting indicator with the rear arrow (A) on
the marked plunge-cut position.
3 Switch the machine on and push the saw downwards
until you reach the set cutting depth.
4 Move the saw forwards until the cutting indication (C)
has reached the marked point.
5 After completion of the plunge-cut, move the saw blade
upwards and switch the saw off.
Cutting with rails (otional)
1 Place the machine in the guide rails. can be readjusted
using the hex driver included in the delivery, when
there is the risk of the adjusting screws releasing by
themselves.
2 Turn on the machine by pressing the on/off switch (4).
3 Press the dip trigger (3).
4 Press the saw downwards to reach the sawing depth.
During rst use the rubber lip is sawn off and thus
splitter protection is guaranteed up to the saw blade.
5 Push the saw uniformly forwards.
6 Turn off the machine and tilt the saw blade to the top
when the saw cutting is complete.
Tilt Protection (Fig.10)
Put the rail saws with a the supplied anti-tilt (20). This
prevents the machine from tilting sideways when tilting.