Do you have a question about the Scosche GM1482 and is the answer not in the manual?
Disconnect vehicle's negative battery terminal before installation. Avoid air bag wiring.
Refer to vehicle instructions for special tools. Read stereo instructions for wiring/mounting.
Scosche not responsible for discrepancies, inconsistencies, or damage during installation.
Procedure for removing factory bezel, tape player/equalizer, and dash panel for cavity prep.
Instructions to prepare the GM1482 kit by attaching clips and mounting A/C vents.
Steps to install the GM1482 kit into the dash and mount the stereo unit.
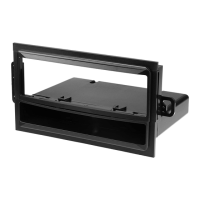
The Scosche GM1482 is an in-dash installation kit designed to facilitate the integration of aftermarket car stereos into specific General Motors 1500 Series Full Size Trucks manufactured between 1988 and 1994. This kit serves as a crucial interface, allowing owners of these vehicles to upgrade their audio systems while maintaining a factory-like appearance in the dashboard. It accommodates both DIN-sized and shaft-style aftermarket radios, offering flexibility for various stereo choices.
The primary function of the GM1482 kit is to provide a secure and aesthetically pleasing mounting solution for a new car stereo after the removal of the original factory tape player/equalizer and radio tuner pack. It effectively bridges the gap between the dimensions of standard aftermarket stereos and the unique dashboard opening of the specified GM trucks, ensuring a flush and professional installation. Beyond just mounting, the kit also helps in organizing the dashboard cavity, making space for the new stereo and its associated wiring.
One of the key usage features of the GM1482 is its comprehensive approach to replacing the factory audio components. The installation process begins with the careful removal of the factory bezel, which is typically secured by fastening clips. This step emphasizes a gentle approach to avoid damage to the dashboard. Following this, the factory tape player/equalizer, if present, is extracted by removing its securing screws. The kit also accounts for the removal of the dash panel under the steering column and, importantly, the radio tuner pack, which is often located under the dash above the accelerator pedal. This tuner pack, once disconnected from all its connectors, is completely removed from the vehicle. The instructions then guide the user to pull the tape player/equalizer from the dash, carefully routing the plug harness from the tuner pack location into the tape player/equalizer cavity. This ensures that the necessary factory power, speaker, and antenna plugs are accessible for the new aftermarket radio.
A significant aspect of the kit's design is its integration with existing vehicle components. For instance, the metal fastening clips from the bottom of the factory dash bezel are transferred and attached to the corresponding locations on the GM1482 kit. This detail highlights the kit's intention to replicate the original mounting mechanism, ensuring a secure fit. Furthermore, the kit requires the removal of the A/C vents from the factory dash bezel and their subsequent mounting into the GM1482 kit. This process involves releasing spring fastening clips, inserting the inner edge of the vent into a center alignment slot, and then the outer edge into another alignment slot. The same spring clips and mounting procedures used for the factory vents are then applied to mount them into the new kit, preserving the original functionality and appearance of the vents within the new stereo housing.
Once the kit is prepared with the transferred clips and mounted A/C vents, it is ready for installation into the dash. The top mounting clips of the GM1482 kit are inserted into the corresponding slots in the dash and pushed up until they snap into place. Subsequently, the bottom clips are pressed into their respective slots at the bottom of the dash to fully secure the kit. This clip-based mounting system simplifies the installation process, making it accessible for users with basic automotive knowledge.
For connecting the new stereo, the manual directs users to consult the "Wire Codes" (presumably found on the manufacturer's website or a separate document) and the stereo installation manual for proper wiring instructions. This emphasizes the importance of correct electrical connections for optimal audio performance and to prevent damage. Finally, the stereo itself is mounted into the GM1482 kit. For DIN radios, this typically involves using a mounting sleeve and the radio's supplied trimplate, as depicted in Illustration C. For shaft-style radios, the mounting process would follow the guidelines shown in Illustration A, which likely involves securing the shafts directly to the kit.
In terms of usage considerations, the manual provides crucial preliminary advice. It strongly recommends disconnecting the vehicle's negative battery terminal before starting the installation to prevent electrical damage. This is a standard safety precaution in automotive electrical work. It also advises using a volt/ohm meter over a test light for checking wiring, as a test light or grounded wire probe could potentially damage the vehicle's computer and/or diagnostic systems. A critical safety warning is also included regarding factory air bag wiring, explicitly stating to avoid it due to the risk of accidental deployment and serious injury or death. These warnings underscore the importance of careful and informed installation practices.
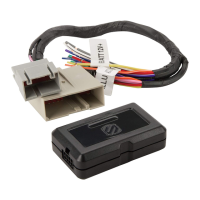
The manual also notes that specific tools might be required for the installation, advising users to consult their vehicle's instructions. It also highlights the need for additional components, specifically the Scosche MDA-1 antenna adapter and the GM02 factory connector (both sold separately), to complete the installation. This indicates that the GM1482 kit provides the physical mounting solution but relies on other Scosche accessories for electrical connectivity, ensuring a complete and integrated system.
Maintenance features for the GM1482 kit itself are minimal, as it is a passive mounting component. Once installed, it is designed to be a permanent fixture in the dashboard. The durability of the plastic and metal components ensures a long lifespan, typically matching that of the vehicle or the aftermarket stereo. Any "maintenance" would primarily involve ensuring the clips remain securely fastened over time, though this is rarely an issue once properly installed. The focus is more on the initial correct installation rather than ongoing upkeep. Should the stereo need to be replaced in the future, the kit is designed to allow for easy removal and reinstallation of a new head unit, provided it fits the standard DIN or shaft dimensions. The robust construction of the kit means it should withstand the vibrations and temperature fluctuations typically experienced within a vehicle's dashboard without degradation.
| DIN Size | Double DIN |
|---|---|
| Color | Black |
| Material | Plastic |
| Warranty | Limited Lifetime Warranty |
| Compatibility | Chevrolet/Geo/GMC/Oldsmobile/Pontiac Vehicles |
| Installation Type | Dash |
| Function | Allows for the installation of an aftermarket stereo |