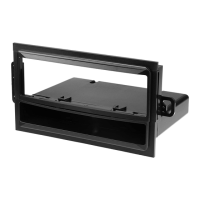
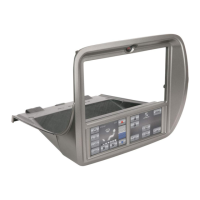
1990-06 ACURA/HONDA/ISUZU KIT
HA1563B
ACURA
1994-01 INTEGRA ..... 2
1990-93 INTEGRA ..... 3
1992-95 LEGEND ...... 3
1992-94 VIGOR ......... 3
HONDA
1998-02 ACCORD ..... 3
1994-97 ACCORD ..... 3
1990-93 ACCORD ..... 3
2006-UP CIVIC ........... 3
1999-00 CIVIC ........... 4
2002-04 CRV ............. 4
1997-01 CRV ............. 4
1999-04 ODYSSEY .... 4
1995-98 ODYSSEY .... 4
1997-01 PRELUDE .... 4
1992-96 PRELUDE ... .4
ISUZU
1996-98 OASIS .......... 4
LIABILITY DISCLAIMER
This instruction booklet is based on carefully documented data and research of automobile dash disassembly, wire
harness/codes and information pertaining to installation of this kit in the listed vehicles. Manufacturer cannot be held
responsible for discrepancies/inconsistencies that may occur due to the automobile manufacturing changes or options,
or damage that may occur in the automobile during the installation of components while using this booklet.
INTRODUCTION
NOTES:
•
See your vehicle’s instructions for any special tools your installation might require.
•
Read all instructions accompanying your car stereo/cassette player for proper wiring and mounting instructions.
This premium installation kit is for 1990-06 select Acura, Honda and Isuzu vehicles. Included are all the parts you need to mount your
car stereo/cassette, or CD player into your vehicle’s dash. Refer to the individual instruction in this manual to remove your vehicle’s
factory radio and assemble the kit.
VEHICLES APPLICATIONS
4
1999-00 Honda Civic
RADIO REMOVAL:
1. Extract (2) screws from center panel below radio.
2. Extract (4) screws from driver's side underdash panel, and unsnap to remove.
3. Extract (2) screws from left side of center dash panel.
4. Open glove box, push stoppers inward to let glove box hang all the way open.
5. Extract (2) screws from right side of center dash panel.
6. Pull the center dash panel down, unplug lighter socket and remove panel.
7. Looking up into dash from underneath, extract (4) screws securing the radio/pocket assembly.
8. Carefully pull out complete center console/radio/climate control assembly.
9. Unplug all control, radio, antenna, and remove entire assembly.
See Illustration "G"
2002-04 Honda CRV
RADIO REMOVAL:
1. Remove (2) screws from under the center dash air vents.
2. Using a panel removal tool pry out the dash bezel around the radio.
3. Remove (4) screws securing the radio. Disconnect and remove.
1997-01 Honda CRV
RADIO REMOVAL:
1. Unsnap push-pin fasteners from bottom of center console and remove bottom panel.
2. Extract (4) screws from bottom edge of bezel. Extract (4) screws from inside dash below pocket. Pull cup holder/pocket assembly out of dash and
remove.
3. Open glove box and remove stoppers. Extract (2) screws from right side of center dash bezel.
4. From below steering wheel extract (2) screws from bottom edge or panel, unsnap upper edge of panel, unplug, and remove.
5. Unsnap top edge or center lower bezel, unplug, and remove.
6. Extract (2) screws from sides of pocket.
7. Unsnap radio/AC control dash bezel, unplug, and remove
8. Extract (4) screws from each side of the radio bracket assembly to remove radio from dash/AC bezel.
See Illustration "E"
1995-98 Honda Odyssey
1996-98 Isuzu Oasis
RADIO REMOVAL:
1. Open glovebox and unsnap glove box’s rubber stoppers at the sides and remove (1) screw at restraining arm at the right side to let glove box
open all the way down.
2. Extract (2) screws from right side of center console assembly.
3. Extract (2) screws from bottom of center console near carpet.
4. Open console storage compartment and extract (2) screws from near top.
5. Extract (2) screws from driver’s side underdash panel and pop out the right side of panel only to access (1) screw holding center console
assembly.
6. Carefully pull back on the lower center console assembly to unsnap, unplug, and remove.
7. Extract (2) screws from each side of slide out cup holder and remove cup holder.
8. From underneath, extract (2) 8mm screws holding back edge of radio/pocket to dash structure.
9. Slide radio out of dash unplug connectors, antenna and remove.
See Illustration "A" and "E"
1997-01 Honda Prelude
RADIO REMOVAL:
1. Carefully unsnap radio/AC control trim bezel and remove.
2. Extract (4) screws from radio/pocket assembly, unplug radio, and remove.
1992-96 Honda Prelude
RADIO REMOVAL:
1. Carefully reaching behind the console, access and untighten the 8mm bolt securing the rear of the radio.
2. Carefully pull the unit from the cavity, unplug all connectors and remove.
See Illustration "D"
See Illustration "A"
See Illustration "A" and "F"
1999-04 Honda Odyssey
RADIO REMOVAL:
NOTE: The Factory Radio is a Double Din/ISO. An installation kit is necessary when using an Aftermarket radio. We recommend the use of a
Scosche HA1560 or HA1562.
1. Unsnap bezel, lift away, unplug and remove
See Illustration "H"
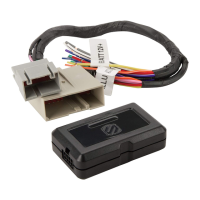
FACTORY WIRING CODES
CAR STEREO CONNECTORS
PROVIDE EASY CONNECTION OF YOUR CAR
STEREO TO FACTORY WIRING HARNESS.
HA02B
1996-UP Honda/Acura
HA08
1998-UP Honda
RADIO’S
SUPPLIED
TRIMPLATE
RADIO
SLEEVE
REAR
SUPPORT
STRAP
BEND
TABS
OUTWARD
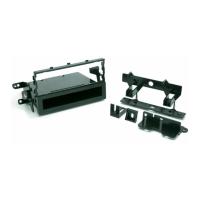
5439
MOUNTING
PANEL
DIN RADIO
Slide the mounting sleeve (metal shroud) into the
panel's radio opening and bend all available
mounting tabs outward (see inset). Slide the
radio into the mounting sleeve once it has been
fastened to the kit panel until the radio locks into
place.
MOUNTING THE RADIO
DIN RADIO INSTALLATION
(DETACHABLE FACE/PULLOUT)
NOTE:
REAR SUPPORTING THE
RADIO ADDS TO THE
INSTALLATIONS
STRUCTURAL INTEGRITY.
5125
POCKET
5699R
RIGHT
BRACKET
1888B
SPACER
(PRESS IN)
5438
REAR
SUPPORT
BRACKET
5324
REAR SUPPORT
BRACKET
5439
KIT PANEL
5699L
LEFT
BRACKET
1888
REAR
SUPPORT
BRACKET
6027
REAR
SUPPORT
BRACKET
HA10
2006-UP Honda Civic Power/4 Speaker Conn.
No photo available
HA10B
HA02B HA08B