2. Description
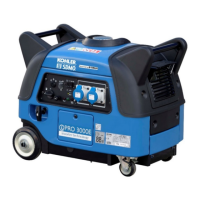
Figure A
1 Earth connection 6 Fuel tap 11 Circuit breakers
2 Oil filler cap 7 Air filter 12 Electrical sockets
3 Oil draining screw 8 Choke 13 Starter battery
4 Fuel gauge 9 Hare – tortoise switch 14 Exhaust silencer
5 Fuel tank plug 10 Ignition key 15 Working hours counter
Figure B
1 Oil gauge 3 Lower limit of gauge
2 Upper limit of gauge 4 Oil filter
Figure C
1 Fuel tap 2 Fixing clamps 3 Fuel filter
Figure D
1 Wheel 3 Filtration elements nut 5 Foam element
2 Air filter cover 4 Paper element
Figure E
1 Spark plug cap 2 Spark plug
3. Preparation before use
3.1. Positioning the generating set for operation
Choose a site that is clean, well ventilated and sheltered from bad weather. Place the generating set on a flat, horizontal surface which
is firm enough to prevent the set sinking down (under no circumstances should the set tilt in any direction by more than 10°). Store the
additional supplies of oil and fuel within close proximity, whilst maintaining a certain distance for safety.
European Union Member States and affiliated countries: This equipment is not intended for use outside an enclosure that significantly
affects sound transmission (exhaust gases must be discharged outdoors and suitable ventilation must be provided to guarantee that
persons or animals in the vicinity of the equipment will not be affected).
3.2. Earthing the generating set
The generating sets supply electrical current when in operation: risk of electrocution.
Connect the generating set to the ground at each use.
Dange
To connect the set to the ground: Attach a 10 mm
2
copper wire to the set’s earth connection and to a galvanised steel earthing rod
driven 1 meter into the ground.
3.3. Checking the oil level
Before starting–up the generating set, always check the engine oil level.
Make sure the recommended oil is used (see § Specifications) and use a funnel to fill-up to the maximum limit
indicated on the dipstick.
Allow the generating set to cool down for at least 30 minutes before checking the oil level.
Attention
n Retract the oil-level dipstick (fig. B - mark 1) and wipe it.
o Replace the oil-level dipstick and pull it out again.
p Check the level visually. It should be within the upper limit shown on the dipstick (fig. B – mark 2) and the lower limit on the dipstick
(fig. B - mark 3). Correct as required.
q Replace the dipstick.
r Wipe off excess oil with a clean cloth, check that there are no leaks.
3.4. Checking the fuel level
Filling with fuel must be carried out when the engine is switched off and as per the safety
instructions (see § Filling with fuel).
Dange
Check the fuel level on the fuel gauge (fig. A - No. 4). If necessary, fill-up:
n Unscrew the fuel tank filler cap (fig. A - No. 5).
o Fill the tank until the fuel gauge shows "F ", using the funnel and taking care not to spill any fuel.
Only use clean fuel without any water.
Do not overfill the tank (there should not be any fuel in the filler neck).
After filling-up, always check that the fuel tank filler cap is tightly closed.
If any fuel has been spilled, make sure that it has dried out and that any associated fumes have dissolved in the
atmosphere before starting-up the generator set.
Attention
p Screw down the fuel tank filler cap tightly.