6. Remote control
① Press the key to open the power of the matrix
or set it as a standby mode.
② Press the DISPLAY A, B,C, D, E, F, G or H button
to select output firstly, then corresponding press the
SOURCE 1, 2, 3, 4, 5, 6, 7 or 8 button to select input
source.
③ Press the DISPLAY A, B, C, D, E, F, G or H button
to select output firstly, then corresponding press the
left or the right button to select the last or the next
input source.
④ Press the‘ALL’key to select all output firstly, then
corresponding select only one input source. At this
moment, The left and the right keys have no function.
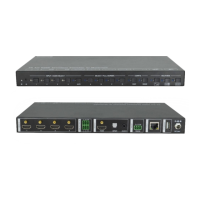
LAN
RS-232
CONTROL
5
This port is the link for TCP/IP control, connect to an
active Ethernet link with an RJ45 terminated cable.
Connect to a PC or control system with
phoenix jack
for transmission of RS-232 commands.
6
7 HDMI INPUT
Connect to the HDMI input source devices such
as a DVD player or a Set-top Box with HDMI
cable.
8
HDMI/HDBaseT
OUTPUT
The HDMI OUTPUT connect to HDMI equipped
TVs or monitors and the HDBT OUTPUT connect
to the HDBT Receiver.
9 AC POWER INPUT Connect to AC power with AC power cable.
GND Connect the Housing to ground.
4/12
4 Audio OUTPUT
De-embedded audio output ports. By default, it
outputs HDMI out A audio. But user can select
other output ports audio via Web GUI.
NOTE: Optical port can support PCM and compressed
audio formats, but L/R port only supports PCM audio.
3
IR OUTPUT
IR OUTPUT interface. For further details, please
refer to the IR control system introduction.
A
B
C
D
DISPLAY
1
A
B
C
D
SOURCE
DISPLAY
1 2 3 4
5 6 7 8
A B C
D
E F G
H
ALL
1
2
2
3
4
Website: www.seada.co.uk E-mail: sales@seada.co.uk