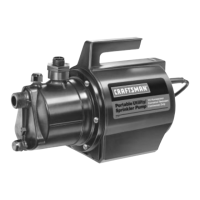
This document is the owner's manual for the Sears Portable Utility Pump, Model No. 390.260251. It provides comprehensive information regarding the pump's safety, installation, operation, service, and repair.
Function Description:
The Sears Portable Utility Pump is designed for pumping clean water. It is a non-submersible unit, meaning the motor must be kept dry at all times. The pump is equipped with a 3-wire, grounded cord and plug, and must be connected to a properly grounded, GFCI-protected outlet. It is suitable for various applications where water needs to be moved, such as draining, transferring, or circulating. The pump is not intended for pumping gasoline, flammable liquids, chemicals, corrosive liquids, or water containing solids, foreign material, silt, or abrasives. Running the pump dry can cause damage to internal parts, overheating, and will void the warranty.
Important Technical Specifications:
- Model Number: 390.260251
- Power Requirement: 115 Volt, 60 Cycle outlet only.
- Suction Port: Must be 15 feet (4.6m) or less above water levels.
- Maximum Water Temperature: 120°F (49°C).
- Piping: Both suction and discharge ports are tapped for 3/4" pipe. Reinforced hose or plastic pipe is recommended for the suction line.
- Priming: The pump body must be filled with water through the priming port before starting. It should pump water within 10 minutes of starting.
- Motor: Equipped with carbon brushes and an auto-reset thermal overload. The motor is lubricated at the factory for the life of the bearings.
- Pump Seal: Water-cooled and self-lubricating.
| Suction Lift |
5 GPM |
10 GPM |
15 GPM |
20 GPM |
25 GPM |
30 GPM |
35 GPM |
40 GPM |
| 0' |
21.2 |
20.3 |
18.6 |
16.2 |
13.0 |
9.7 |
6.6 |
3.1 |
| 5' |
19.5 |
18.5 |
17.0 |
15.0 |
12.2 |
9.2 |
6.3 |
2.8 |
| 10' |
17.5 |
16.6 |
15.5 |
13.8 |
11.3 |
8.6 |
5.9 |
2.6 |
| 15' |
15.6 |
14.8 |
13.9 |
12.6 |
10.3 |
7.8 |
5.3 |
|
Maximum Discharge Pressure (PSI) At Shut Off:
| Suction Lift |
Pressure |
| 0' |
44 PSI |
| 5' |
42 PSI |
| 10' |
40 PSI |
| 15' |
38 PSI |
Usage Features:
- Safety First: Emphasizes reading and following all safety rules and operating instructions. Warnings are provided for hazardous voltage, pressure, and the risk of fire or explosion.
- GFCI Protection: Requires connection to a Ground Fault Circuit Interrupter (GFCI) protected grounded outlet.
- Strainer Use: A strainer or puddle gulper must always be installed on the end of the suction line and inspected/cleaned frequently to prevent clogging and damage to the shaft seal.
- Air-tight Connections: All suction connections must be airtight to ensure proper priming and performance.
- Location: The pump should be located as near as possible to the water source, on a level support, and protected from excessive moisture and flooding.
- Priming: The pump body must be filled with water through the priming port before operation.
- No Dry Running: Operating the pump without water will damage the impeller and seal, voiding the warranty.
- Thermal Overload Protection: The motor has an auto-reset thermal overload that cuts off power if the motor overheats and resets after cooling.
Maintenance Features:
- Cleaning: The strainer should be cleaned frequently, and the pump should be flushed out after each use.
- Seal Replacement: Detailed instructions are provided for replacing the pump seal, including tools and techniques to avoid scratching polished surfaces.
- Motor Brush Replacement: Instructions are given for replacing carbon brushes when they wear down to 1/2" length. An extra set of brushes is included with the pump. It is crucial to match the curve on the end of the new brush to the commutator's curve and replace both brushes simultaneously to avoid fire hazards.
- Troubleshooting Chart: A comprehensive chart lists common problems (e.g., failure to pump, reduced capacity, low speed, air leaks) and their corresponding remedies.
- Repair Parts: A detailed repair parts list with key numbers, descriptions, and part numbers is included for ordering replacement components.
- Warranty: A full one-year warranty covers repairs or replacement if the pump is defective in materials or workmanship, provided it is installed, adjusted, and operated according to the owner's manual. The warranty does not cover damage due to abuse, negligence, or failure to follow instructions.
Ordering Parts and Service:
Sears provides multiple contact options for parts, repair service, and maintenance agreements:
- Repair or Replacement Parts: 1-800-366-PART (1-800-366-7278)
- In-home Major Brand Repair Service: 1-800-4-REPAIR (1-800-473-7247)
- Sears Repair Service Center Location: 1-800-488-1222
- Maintenance Agreement Information: 1-800-827-6655
The model number (390.260251) is located on a sticker attached to the top of the pump body and should be provided when requesting service or ordering parts.