Short user manualIntruder alarm system
KM24, KM24A, KM24G keypadKM24, KM24A, KM24G keypad
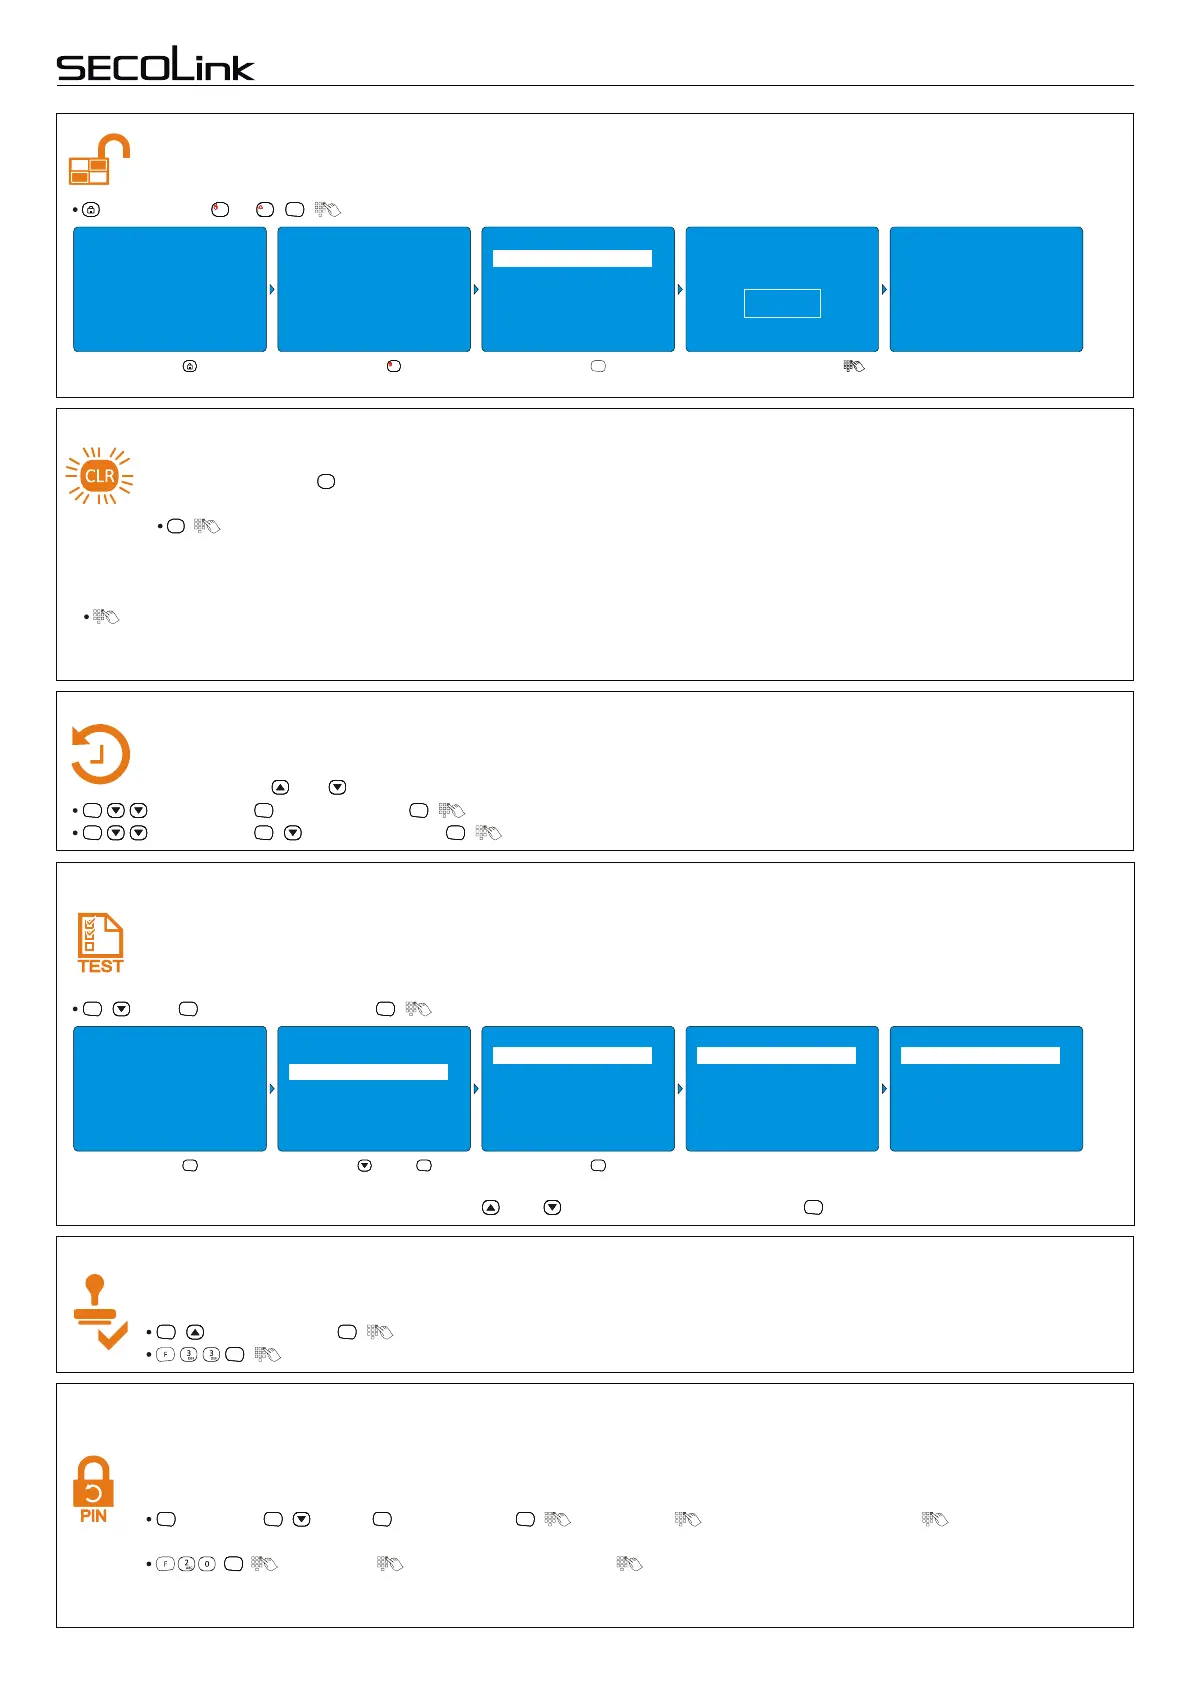
, Disarming, ... , , .
1111
4
GHI
!
4
GHI
!
4
GHI
!
4
GHI
!
ENTENTENTENT
Partial disarming
Partial disarming is used when you want to disarm certain areas while leaving other areas armed, or to limit access
to certain areas to other users. Below is an example explaining how to disarm a first partition of two.
2 2nd Floor #
Partitions
Entry Delay
30
seconds
Enter PIN
ÜÜÜÜ
Press the key. Press the key.
1111
Press [ENT] to disarm
Press [1]..[4] to select part.
All partitions
Disarming
Press the key.
ENT
Enter your PIN code . First partition is disarmed,
second partition remains armed.
1 1st Floor
Disarm
10/ 02 . # 25°C 14:02
2nd Floor
Armed
Alarm clearing
During an alarm the keypad screen will display a message “Alarm!!!” with an explanation and reasons that caused it.
Red LED light of the key will turn on, the siren will start to sound aloud, and a report about the alarm will be sent to
CMS or (and) the user. There are two ways to clear the alarm and turn off the red colored LED light.
, - this type of clearing will stop the siren sound, turn off the red LED light, and the system will return to the
CLRCLRCLRCLR
CLRCLRCLRCLR
, Event Log , Alarm Events , ;
, Event Log , Trouble Events , .
ENTENTENTENT ENTENTENTENT ENTENTENTENT
ENTENTENTENT ENTENTENTENT ENTENTENTENT
All events related to protected premises and statuses of the system are stored in the event log. This log will display
all events chronologically and includes information, such as types of alarms, troubles or breakages, control events,
and more. Use and keys for navigation and viewing next or previous events in the event log.
Event log review
prior pre-alarm status. The system will cause an alarm if the system has a smoke detector and an alarm was caused by
smoke from domestic reasons, whether it was armed or disarmed. It is possible to clear this type of alarm by bypassing the
smoke detector (see page 3, "Bypassing zone - B").
- this type of clearing will stop the siren sound, turn off the red LED light, and the system will be disarmed, even if it was
armed previously by entering the PIN code. It is not recommended to use a PIN code for alarm clearing when all partitions
(areas) controlled by the user are disarmed due to a possible casual arming.
, Test , Burglary zone test , .
ENTENTENTENT ENTENTENTENT ENTENTENTENT
Sensor operation testing, testing zones
It is recommended to perform sensor operating testing at least once per month. During testing it will be necessary to
make some type of violation in order to check the functionality of available sensors. For example, opening a door or
windows with magnetic contacts, stimulating movement near the motion sensors, or by hard clapping of hands to
test the glass break detectors.
Violated zones (#) can be checked by pressing and keys. To end testing press .
ENTENTENTENT
10/02 . . 25°C 14:02
2nd Floor
1st Floor
READY TO ARM
Press the key.
ENTENTENTENT
Press , then .
ENTENTENTENT
Press the key.
ENTENTENTENT
Testing zone is not
violated.
Testing zone is violated
(passed test).
2 Hallway 2 Hallway
3 Living room3 Event Log 3 Send test report
4 Technical information
3 Living room
4 Bedroom4 Controls 4 Bedroom
5 Kitchen5 Service Mode 5 Kitchen
6 Bathroom 6 Bathroom
ZonesMain Menu Tes t Zones
1 Entry Door1 Settings 1 Burglary zone test 1 # Entry Door
2 Tes t 2 Fire zone test
Permission to make system changes (service mode entry)
An installer will have permission to make system changes settings only after a user approves it by entering a
PIN code for security reasons. There are two ways to allow the installer to begin system changes:
, Service Mode , .
, .
ENTENTENTENT ENTENTENTENT
ENTENTENTENT
Change activated user's PIN code
SECOLINK manufacturer will provide a 4-digit PIN code of the system which is generated in a sequential order,
unique to each user, and is related to his/her number in the system. For example, first user’s default PIN code will be
0001, second user’s default PIN code will be 0002, and so on. It is strongly recommended to change your default
PIN code in one of these two ways:
, Settings , Users , Change PIN , , New PIN:, enter new PIN, Repeat:, repeat the new PIN,
Changed.
, , , New PIN:, enter new PIN, Repeat:, repeat the new PIN, Changed.
ENTENTENTENT ENTENTENTENT ENTENTENTENT ENTENTENTENT
ENTENTENTENT
Page 4
The factory default PIN should be used temporary and changed as soon as possible to new one. It is recommended to
change old PIN to new one avoiding the PIN that could be used as default for other users (default PIN range 0000 to 0063). It
 Loading...