- 4 -
10/2023
2023, .
• Thank you for purchasing our SENCOR product; we hope you will be
satisfied with it.
• Before using this appliance, please familiarise yourself with the
user’smanual, even if you are already familiar with using similar
types of appliances. Use the appliance only as described in this
user'smanual. Keep the manual for future reference.
• We recommend to keep the original packaging, packaging materials,
receipt, and proof of the seller'sliability or warranty certificate for
aminimum of the duration of statutory right of faulty performance or
warranty of quality. When transporting the appliance, we recommend
packaging it again in the original box provided by the manufacturer.
. . . . . . . . . . . . . . . . . . . . . . . . . . . . . . . . . . . . . . . . . . . . . . . . . . . . . . . . . . . . . . . . . . . .
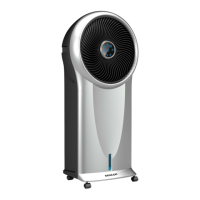
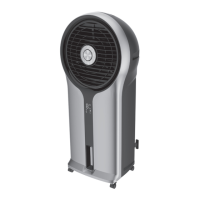
DESCRIPTION OF THE APPLIANCE
A1 Front cover
A2 Front protective grille
A3 Fan
A4 Display
A5 Remote control signal receiver
A6 Water level indicator with MIN
and MAX lines
A7 Castors (rear castors are
equipped with abrake)
A8 Control panel
A9 Storage space for the remote
control
A10 Rear cover
A11 Handles (located on both
sides)
A12 Latch to release the rear grille
A13 Rear grille
A14 Cooling insert
A15 Brackets for attaching the
power cord
A16 Removable water tank
A17 Water tank swivel lock
A18 Remote control
A19 Cooling boxes (2 pcs)
. . . . . . . . . . . . . . . . . . . . . . . . . . . . . . . . . . . . . . . . . . . . . . . . . . . . . . . . . . . . . . . . . . . .
DESCRIPTION OF THE CONTROL PANEL
B1 On/Off
button
B2 Button
to adjust fan speed
B3 Button
to set the timer
B4 Button
to select the
operating mode
B5 Button to rotate the
protective grille
B6
Cooling andhumidifying
mode selection button
B7 Button
toswitch off the
display
. . . . . . . . . . . . . . . . . . . . . . . . . . . . . . . . . . . . . . . . . . . . . . . . . . . . . . . . . . . . . . . . . . . .
DESCRIPTION OF THE DISPLAY
C1 Numeric display
C2 Natural breeze mode indicator
light
C3 Cooling andhumidifying
mode indicator light
C4 Fan indicator light
C5 Timer indicator light
C6 Sleep mode indicator light
C7 Front grille rotation light
. . . . . . . . . . . . . . . . . . . . . . . . . . . . . . . . . . . . . . . . . . . . . . . . . . . . . . . . . . . . . . . . . . . .
DESCRIPTION OF THE REMOTE CONTROL
D1 On/Off
button
D2 Button
toswitch off the
display
D3 Button
to set the timer
D4 Button
to turn the front
grille
D5 Button
to set the fan
speed
D6 Button
to select the
operating mode
D7
Cooling andhumidifying
mode selection button
. . . . . . . . . . . . . . . . . . . . . . . . . . . . . . . . . . . . . . . . . . . . . . . . . . . . . . . . . . . . . . . . . . . .
PURPOSE OF USE
• The air cooler is designed to cool the air in the room. The warm air is
drawn in at the rear of the cooler, passes through acooling insert that
cools and humidifies it, and is then discharged into the surroundings
via afan at the front.
. . . . . . . . . . . . . . . . . . . . . . . . . . . . . . . . . . . . . . . . . . . . . . . . . . . . . . . . . . . . . . . . . . . .
BEFORE FIRST USE
• Before first use, remove the appliance and its accessories form the
packaging and remove all promotional labels and tags. Check that
neither the appliance nor any of its components is damaged.
• Remove the water tank from the back of the air cooler. Wipe the tank
with asoft sponge slightly dampened with warm water and neutral
detergent. Wipe dry using aclean wiping cloth. Place the tank back
into the air cooler.
. . . . . . . . . . . . . . . . . . . . . . . . . . . . . . . . . . . . . . . . . . . . . . . . . . . . . . . . . . . . . . . . . . . .
INSTALLATION
• Locate the appliance on an even, dry and stable surface within reach
of aproperly grounded power socket.
• Toensure sufficient air circulation, leave aclear space of at least 30
cm on all sides of the appliance.
. . . . . . . . . . . . . . . . . . . . . . . . . . . . . . . . . . . . . . . . . . . . . . . . . . . . . . . . . . . . . . . . . . . .
OPERATING THE APPLIANCE
Switching the Appliance On/Off
Insert the mains cord plug into apower socket. An audible warning
sounds and the air cooler switches to standby mode.
Press the
button briefly to switch the air cooler on. It will start by
default:
• Low fan speed (the fan mode indicator light
is on; “1” will appear on
the numeric display)
• Normal operating mode (no operating mode indicator light on)
• Other indicator lights on the display are off.
Note:
If you turn on the air cooler for the first time, the fan speed
will be medium speed for 3 seconds and then switch to low
speed. If you switch on the air cooler from standby mode
and the last set speed was slow speed, the fan speed will
be medium speed for 3 seconds and then switch to low
speed.
• Toswitch off the air cooler, press the
button. An audible warning
sounds and the air cooler switches to standby mode. To switch off
completely, disconnect from the mains socket.
Note:
When the air cooler is switched off with the
button and
switched to standby mode, the last settings are stored
in memory (except for the timer, sleep mode and drying
function). If you disconnect the air cooler from the mains
socket, it will start by default when you switch it on again.
Fan Speed Setting
• The
button is used to set the fan speed. Press the button
repeatedly to set the desired fan speed in the following order:
1 (low speed) – 2 (medium speed) – 3 (high speed).
• The indicator light will light up on the screen regardless of the set
speed.
Setting the Cooling and Humidifying Mode
• Before starting this mode, you need to fill the tank with water. To fill
the water tank, follow the instructions inthe “FILLING THE WATER
TANK” section.
• Press the
button to turn on the cooling andhumidifying mode.
The indicator will light up on the screen and the pump will start.
• Use the
button to adjust the fan speed. For the first 3 minutes after
switching to cooling and humidifying mode, only two speeds will
be available: 1 (low speed) – 2 (medium speed). After 3minutes of
operation, high speed will also be available.
EN
Air Cooler
User’sManual
 Loading...