- 10 - Copyright © 2021, Fast ČR, a.s.
03/2021
EN
Versatile Cordless
Vacuum Cleaner 4 in 1
User´smanual
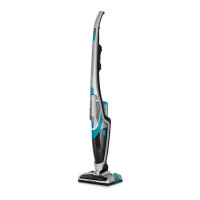
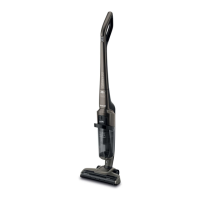
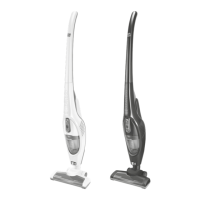
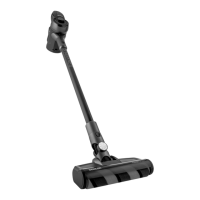
DESCRIPTION OF THE VACUUM CLEANER
DESCRIPTION OF THE MOTOR UNIT
A1 Output hole of the motor
unit
A2 Dust container release
button
A3 Inflow filter cover
A4 Inflow filter
A5 Speed button
A6 On / Off button
A7 Handle
A8 Charging battery light
A9 Power adapter socket
A10 Rechargeable battery
A11 Outer filter
A12 Tube filter
A13 Transparent dust container
A14 Release button of the dust
container bottom for quick
removal of dirt
A15 Battery release button
A16 Lock to release the motor
unit
A17 Metal tube
A18 Floor nozzle
A19 Lock to release the floor
nozzle
A20 Protective cover
A21 Electric rotary brush
A22 Castors
A23 Lock
A24 Side cover to remove the
rotary brush
DESCRIPTION OF THE ACCESSORIES
B1 Cat&Dog motorised mini
brush
B2 Lock to release the mini
brush
B3 Protective cover
B4 Rotary brush lock
B5 UV-Clight
B6 Castors
B7 Rotary brush
B8 Combined crevice nozzle
B9 Crevice nozzle brush
B10 Button to slide out / back
the brush
B11 Combined attachment for
upholstery and furniture
B12 Attachment brush
B13 Button to slide out / back
the brush
B14 Soft brush
B15 Articulated connector
B16 Flexible hose
B17 Holder
B18 Power adapter
B19 Wiping attachment
B20 Water tank
B21 Tank lid
B22 Water control button
Not shown
Wall plug
Screws
Removable Velcro zip sleeve (6 pcs)
ASSEMBLY AND DISASSAMBLY OF THE VACUUM CLEANER
1. ASSEMBLY AND DISASSAMBLY OF THE STICK VACUUM
CLEANER
Place the floor nozzle A18 on aflat, dry and stable surface. Attach
the tube A17 to the floor nozzle so that the connectors at the back
of the floor nozzle A18 are aligned with the holes inside the tube
A17 – see picture C1. Push the tube A17 until it clicks.
Insert the output hole A1 of the motor unit into the tube A17 so
that the connectors at the back of the tube A17 are aligned with
the holes inside the outlet hole A1 – see picture C2.
When you need to disassemble the stick vacuum cleaner, press
the lock A16 to release the motor unit. Then press the lock A19 to
release the floor nozzle A18.
2. ASSEMBLY AND DISASSEMBLY THE WIPING ATTACHMENT
Assemble the stick vacuum cleaner – see the previous part of the
manual.
Attach the sleeve to the bottom surface of the attachment B19
and put the attachment on the floor.
Place the vacuum cleaner above the wiping attachment B19 so
that the protrusion on the attachment B19 is aligned with the
hole on the bottom surface of the floor nozzle A18. Gently push
the vacuum cleaner until it clicks. That signalizes the correct
connection of the attachment B19 to the floor nozzle A18.
When you need to remove the attachment B19 from the vacuum
cleaner, carefully hold the attachment B19 by one hand and pull
the vacuum cleaner upwards until the floor nozzle A18 is released
from the attachment B19.
3. ASSEMBLY AND DISASSEMBLY OF THE VACUUM CLEANER
WITH ACCESSORIES
To ensure perfect cleaning of your home, you can attach any of
the supplied accessories to the output hole A1 of the motor unit.
Simply remove the accessory by pulling it out of the output hole
A1 of the motor unit. Press the lock B2 first to remove the mini
brush B1.
1. Cat&Dog motorised mini brush
Cat&Dog motorised mini brush is the ideal helper for removing
animal fur, hair, etc., while at the same time being suitable for
vacuuming hard-to-reach places. Its use is not limited to the
home and can be used for vacuuming the car. It quickly and
effectively removes hair, animal fur and other materials from car
seats, upholstery, pillows, and other textile surfaces.
2. Combined crevice nozzle
It is suitable for vacuuming hard to reach places (e.g., window
frames, corners, libraries, spaces between mattresses,
upholstery, etc.). Press and hold the B10 button and move
forward to slide the brush out. Press B10 button and move
backward to slide the brush back.
3. Combined attachment for upholstery and furniture
The attachment is suitable for vacuuming surfaces, such as
furniture or upholstery. Press and hold the B13 button and
move forward to slide the brush out. Thanks to the soft bristles,
the attachment is ideal for removing dirt from fine surfaces,
such as net curtains, curtains, etc. Press B13 button and move
backward to slide the brush back.
4. Soft brush
It is ideal for vacuuming dirt and dust from fragile objects,
libraries, walls, blinds, etc.
5. Articulated connector and flexible hose
Attach the articulated connector B15 or flexible hose B16 to
the output hole A1 when you need to extend the reach of the
used accessory, e.g., you need to vacuum dust on the wardrobe.
Note:
The picture D shows the possibilities how to combine the
accessories.
CHARGING THE BATTERY
The battery A10 can be charged either installed in the motor unit or
removed.
Insert the connector of the power adapter B18 into the socket A9 and
insert the adapter plug into the power socket.
The light A8 turns red. The charging time usually takes 4 - 5 hours. The
battery A10 is charged once the light A8 turns green. Then disconnect
the connector of the power adapter A18 from the socket A9 and
remove the plug from the power socket.
Note:
Once the battery A10 is almost discharged, the operation
of the vacuum cleaner will automatically stop to prevent
the battery A10 from being completely discharged.
In order to ensure the long life of the battery A10, it is
advised to fully charge the battery A10 before the first use
and to discharge before the second charging (operation of
the vacuum cleaner will automatically stop).
Tip:
This vacuum cleaner contains a built-in Li-ion battery.
To ensure the longest possible lifetime of the battery, we
recommend:
– do not unnecessarily leave the battery fully charged or
completely flat for too long,
– do not keep the battery permanently fully charged. Its
lifetime will be extended by keeping it at approximately
half charge.
– do not fully discharge the battery.
 Loading...