- 11 - Copyright © 2021, Fast ČR, a.s.
03/2021
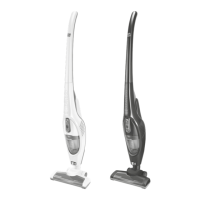
INSERTING AND REMOVING THE BATTERY
1. Inserting the battery: Carefully turn the motor unit upside
down and insert the fully charged battery A10 so that the
battery A10 fits into the connective grooves – see picture E.
Push the battery A10 until it clicks. The battery A10 can only be
inserted with one side.
Warning:
Never insert the battery A10 in the opposite way or
with great force. There is arisk of damage.
2. Removing the battery: When you need to remove the battery
A10, press the A15 button to release the battery A10. Carefully
remove it from the motor unit.
Warning:
If you do not use the vacuum cleaner for along time,
remove the battery A18 from it and store it in acold
and dry place. Charge the battery regularly. Keep
it away from the reach of metal objects to prevent
excessive discharge.
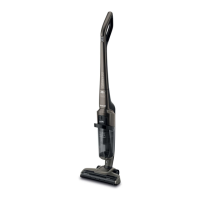
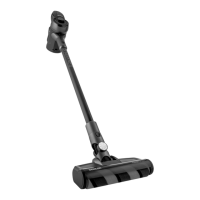
USING THE STICK VACUUM CLEANER
1. Assemble the vacuum cleaner according to the instructions in
the section “ASSEMBLY AND DISASSAMBLY OF THE STICK
VACUUM CLEANER”.
2. Insert the fully charged A10 into the motor unit.
3. Press the On / Off button A6 and the vacuum cleaner turns on.
4. You can adjust the speed using the A5 button. Press the A5
button repeatedly to switch the speed as following:
I(low speed – ensures longer vacuuming time)
II (high speed – vacuuming at high power)
III (turbo speed – vacuuming at maximum power)
5. When vacuuming is completed, press the On / Off button A6
and the vacuum cleaner turns off.
Note:
Electric rotary brush A21 will automatically stop once it is
blocked by, e.g., aforeign object or large amount of hair
or animal hair. It is asafety feature that prevent the brush
from damage. In such case, turn the vacuum cleaner off by
pressing the On / Off button A6 and remove the blocked
object or hair from the brush A21.
USING THE VACUUM CLEANER WITH WIPING ATTACHMENT
Place the wiping attachment B19 with the attached sleeve on the floor.
Remove the lid B21 and pour water or cleaning solution into the water
tank B20. Put the lid B21 back.
Note:
Always use a neutral cleaning agent with low foaming
effect.
Attach the vacuum cleaner to the attachment B19.
In order to vacuum and wipe at the same time, pull the B22 button
up. Water slowly begins to flow from the tank into the sleeve. Turn the
vacuum cleaner on, and while vacuuming you will also wipe the floor.
Note:
Regularly check the water/solution level in the water tank
B20 and fill it up as necessary.
When no longer using the wiping attachment B19, turn the vacuum
cleaner off and push the B22 button down. This will prevent air from
entering the water tank and the water will stop flowing out. Pull the
vacuum cleaner out in the upward direction.
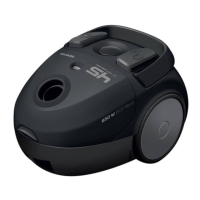
STORAGE UNDER NORMAL USE
The vacuum cleaner SVC 0725BK is supplied with aholder B17 which
can be fixed on the wall. Choose the place where the holder B17 will be
easily accessible and there will be free space around it.
Mounting the holder on the wall
1. Put the holder B17 on the wall and using apencil, mark the
points where it is necessary to drill the holes.
2. Drill two holes which you insert the wall plugs into.
3. Place the holder B17 to the wall and insert the screws into the
holes in the holder. Use ascrewdriver to fix them. Make sure
the holder B17 does not move and the screws are properly
tightened.
Warning:
Never install the holder B17 in environments with
high huminidity or dustiness.
Storage of the motor unit and accessories
The holder B17 is designed to store the motor unit and accessories in it.
Insert the motor unit into the holder B17 and you can attach the
selected accessories you use the most often to two pins – see the
picture F.
CLEANING AND MAINTENANCE
Before cleaning, always make sure the vacuum cleaner is switched off.
Remove the battery A10 from the motor unit.
CLEANING THE MOTOR UNIT AND ACCESSORIES
Use asoft cloth, lightly dampened in a lukewarm water, to clean the
outer parts of the vacuum cleaner. Do not use abrasive cleaning agents,
solvents, or dissolving agents, otherwise the unit surface may be
damaged.
CLEANING THE STICK VACUUM CLEANER
Empty the dust container
It is advised to empty the dust container A13 after each use. However,
if the dirt level reaches the MAX mark, it is necessary to empty the dust
container A13 immediately.
1. Remove the accessory from the motor unit.
2. Place the motor unit above the waste bin with the dust
container bottom facing down.
3. Press the A14 button and the dust container bottom is released
and opens – see picture G1.
4. This will empty the container content directly into the waste
bin.
5. Use your hand to close the container bottom. It clicks once
correctly fitted.
Cleaning the dust container
Clean the dust container A13 regularly to prevent unpleasant odours.
1. Remove the accessory from the motor unit and empty the dust
container A13 according to the instructions above.
2. Press the A2 button to release the dust container and at the
same time, turn the container A13 until the arrow on the motor
unit points at the
symbol. Carefully remove it from the
motor unit – see picture G2.
3. Wipe the inner walls of the dust container A13 using a light
dampened soft sponge. Dry with aclean cloth.
4. Turn the outer filter A11 until the arrow on the filter A11 points
at the symbol to release the outer filter A11. Carefully
remove it from the motor unit downwards – see picture G3.
Remove the tube filter A12 from the motor unit downwards –
see picture G4.
5. Remove the dirt from both filters. If necessary, you can wash
them under the running clean water. And then dry them with
clean cloth.
Warning:
Never insert wet or damp filters A22 and A12 into the
motor unit! Always wait until it is completely dry.
6. Attach the tube filter A12 to the motor unit.
7. Attach the outer filter A11 to the motor unit so that the arrow
on the filter A11 is aligned with the
symbol. Then turn the
filter A11 until the arrow on the filter A11 points at the
symbol and it clicks.
8. Attach the container A13 to the motor unit so that the arrow
on the motor unit is aligned with the
symbol. Turn until
the arrow on the motor unit points at the
symbol. Correct
securing of the container A13 is signalised by aclick.
 Loading...