- 38 -
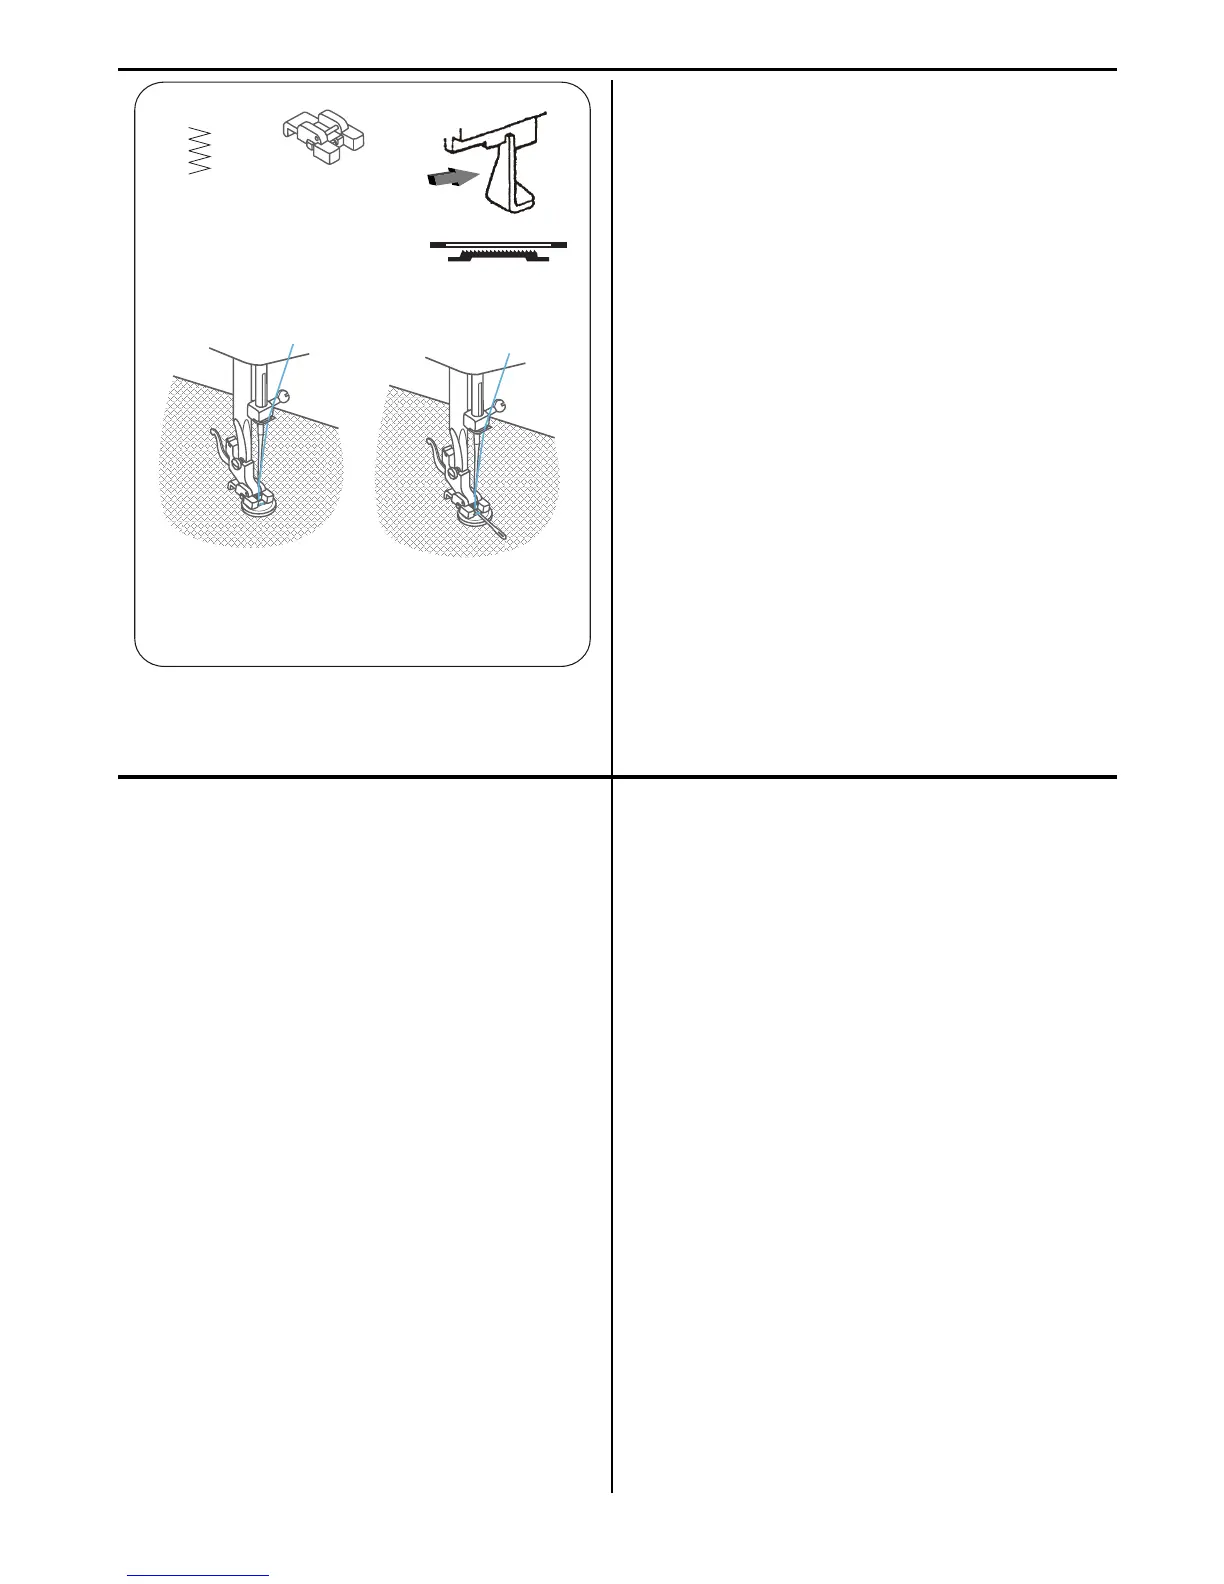
Zigzag stitch
Puntada zigzag
Point zigzag
Sewing a regular button
Costura de un botón común
Couture d’un bouton régulier
Sewing a button with a shank
Costura holgada de botones
Couture d’un bouton avec talon
Button Sewing Foot*
(optional)
Pata para coser botones*
(Opcional)
Pied de bouton*
(facultatif)
B~C
Using the Button Sewing foot
- Lower feed dog. See page 22 for instructions.
- Attach the Button Sewing foot.
- Set the pattern selector to “B”.
- Place the button under the presser foot and align the
left side hole with the sewing needle.
- Slowly stitch 3 to 4 stitches and raise the needle.
- Then slowly move the pattern selector towards the
“C” position until the needle is over the hole on the
right side of the button.
- Lower the needle by turning the handwheel to make
sure that the needle is over the second hole.
- Sew 2 to 3 stitches manually (by turning the
handwheel) to make sure that the needle clears both
holes.
- When the needle is properly aligned with both holes
in the button, sew 8 to 10 stitches and then raise the
needle when finished.
- Set the pattern selector back to position “B” and sew
3 to 4 more stitches to secure the thread.
- For buttons with 4 holes, sew the front 2 holes first
and then bring the garment forward and sew through
the back 2 holes as described above.
Sew a button with a shank:
- If a shank is required, place a darning needle or pin
on top of the button and sew.
- To strengthen the shank, cut the threads leaving an
8-inch (20 cm) tail.
- Bring the needle thread down through the hole in the
button and wind it around the shank.
- Draw the thread to the wrong side and tie a knot.
Important: Remember to reset the drop feed dog when
you have finished sewing the buttons.
Utilisation du pied de bouton
- Abaissez la griffe d’alimentation. Reportez-vous à la
page 22 pour les directives.
- Attachez le pied de bouton.
- Réglez le sélecteur de motif à « B ».
- Placez le bouton sous le pied presseur et alignez le trou
gauche sur l’aiguille à couture.
- Faites 3 à 4 points et élevez l’aiguille.
- Ensuite, déplacez le sélecteur à motif vers la position
« C », jusqu’à ce que l’aiguille soit par-dessus le trou du
côté droit du bouton.
- Abaissez l’aiguille en tournant le volant, pour vous
assurer que l’aiguille se trouve sur le deuxième trou.
- Cousez manuellement 2 ou 3 points (en tournant le
volant) pour vous assurer que l’aiguille s’éloigne des
deux trous.
- Lorsque l’aiguille est correctement alignée sur les deux
trous du bouton, cousez 8 à 10 points. Élevez l’aiguille
lorsque vous avez terminé.
- Réglez le sélecteur de motif à la position « B » et
cousez 3 ou 4 points de plus pour fixer le fil.
- Pour les boutons à 4 trous, cousez les deux trous avant
en premier. Tirez ensuite l’ouvrage vers l’avant et
cousez les deux trous arrière, tel que décrit ci-haut.
Couture d’un bouton avec talon :
- Si un talon est nécessaire, placez une aiguille ou une
tige à raccommodage au-dessus du bouton et cousez.
- Pour renforcir le talon, coupez les fils en laissant une
queue de 8 pouces (20 cm).
- Faites descendre le fil de l’aiguille à travers le trou du
bouton, et enroulez-le autour du talon.
- Tirez le fil du mauvais côté et faites un nœud.
Important : Rappelez-vous de réinitialiser la griffe
d’alimentation lorsque vous avez fini de coudre les boutons.
Usando la pata para coser botones
-
Baje la pata prensora. Vea la página 22 por instrucciones.
- Coloque la pata para coser botones.
- Coloque el selector de patrones en “B”.
- Coloque el botón debajo de la pata prensora y alinee el
agujero izquierdo con la aguja de coser.
- Haga 3 o 4 puntadas lentamente y levante la aguja.
- Mueva lentamente el selector de patrones hacia “C” hasta
que la aguja quede sobre el agujero de la derecha del
botón.
- Baje la aguja girando la manivela para verificar que la
aguja esté sobre el segundo agujero.
- Haga 2 o 3 puntadas manualmente (girando la manivela)
para verificar que la aguja entre en los dos agujeros.
- Una vez que la aguja esté correctamente alineada con
ambos agujeros del botón, haga 8 o 9 puntadas y levante
la aguja cuando termine.
- Vuelva a colocar el selector de patrones en “B” y haga
3 o 4 puntadas más para fijar el hilo.
- Para botones con 4 agujeros, cosa primero los 2 agujeros
del frente luego haga avanzar la tela y cosa los 2 agujeros
de atrás como se indicó anteriormente.
Costura holgada de botones:
- Si necesita que el botón quede un poco separado de la
prenda, coloque una aguja de zurcir o un alfiler encima
del botón antes de coserlo.
- Para reforzar la separación, corte los hilos dejando unas 8
pulgadas (20 cm).
- Pase el hilo hacia abajo por uno de los agujeros del botón
y enróllelo alrededor de la costura.
- Pase el hilo para el otro lado y hág
ale un nudo.
Importante: Recuerde volver a ajustar la pata prensora
cuando termine de coser botones.
Lower feed dog
Baje la pata prensora
Abaissez la griffe d’alimentation
Push
Presione
Poussez
Using bonus accessories - Uso de accesorios suplementarios - Utilisation des accessoires en prime