UPPER LATCH SWITCH AND MONITOR SWITCH REMOVAL
1,
Disconnect the oven from the power supply and remove
the outer case.
2. Discharge the high voltage capacitor.
3. Remove the complete control panel assembly, referring
to the Control Panel Assembly and Component
Re-
moval.
4. Disconnect the wire leads from the switches.
5. Remove the single (1) screw and washer holding the
upper latch hook to the oven cavity front flange.
6. Remove the upper latch hook from the flange by moving
it downward.
7. To remove the switch from the upper latch hook, push
outward the two (2) retaining tabs holding the switch in
place.
LOWER LATCH SWITCH REMOVAL
1. Disconnect the oven from the power supply and remove
5. Remove the single (1) screw and washer holding the
the outer case.
lower latch hook to the oven cavity front flange.
2. Discharge the high voltage capacitor. 6. Remove the lower latch hook from the flange by moving
3. Remove the complete control panel assembly, referring
it downward.
to the Control Panel Assembly and Component
Re-
7. Push outward the two (2) retaining tabs holding the
moval.
switch in place.
4. Disconnect the wire leads from the switch.
8. The switch is now free.
HINGE
PLATE
MOI
JNTI
STEAM DUCT
OVEN LAMP
FILTER
ROLLER
SHAF
TRAY
LOWER LATC
TURNTABLE
ROLLER COVER
TURNTABLE MOTOR
CHASSIS
SUPPORT
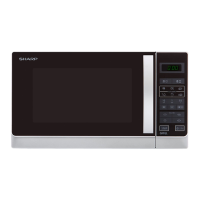
Figure 8. Oven Cavity Components
19