SHARP.
Instruction
Manual
&
Warranty
Thank you for your purchase of this quality clock. The utmost care has gone into the design and
manufacture of your
clock. Please read t
he
se
instructions
ca
refully and store them in a safe
pla
ce
for
future reference.
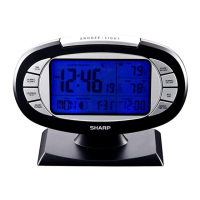
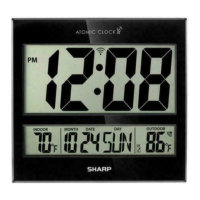
(TIME/12/24}
Button--,,
-:ii;::.0-1
L.....-
-..r-(ALARM1
/0
N/OFF] Button
[ALARM1
/A
LARM2] Bunon [ALARM210N/OFF] Butt
on
[CALENDA
RrCl"F]
Button [MAX/MIN} Button
[ADJUST
/C
HANNE
L}
Button---~
:~;;;;::::::~=~:;::;~~~
~
[SEARCHITIME
ZONE]
Button
:::::,""=::.:;=:~;;;;,=;'::::=""",:::;=----
BATIERY
COMPARTMENT
AT
BACK
FEATURES
Super Accurate Time - Radio ccntrol
led
Optional
12
or
24
hou
r Time fo
rm
at
Automatically Updates for
Da
y Light
Sa
vings Time (DST)
Constant Month, D
ay
& Date Display
Constant Moon Phase Display
Constant Indoor Temperature Display
eonstar1t
Outdoortemp
·erature1.:>isptay- 4
3S
MHz
transmission
fr
om
a wireless r
emote
sense
(i
ncluded).
Min/Max Temp
era
ture History
Constant
Alarm Time Display
Dua
l Alarm
wi
th
Repeat 9 Minute Snooze
Backlight
on
Demand
fo
r Nighttime Viewing
Lo
w Battery Indica
to
r for Outdoor Sensor(s)
Requires 2
"AAA" Batteries for (Sensor) and 3 "AAA" Batteries for (Main Unit)
LCD
DISPLAY
SYMBOLS
1.
nme
2.
PM
Ind
icator
3.
Alarm1
/Alarm2
ON
indicator
4. Time
Zone Indicator
5. Daylight Savings Indicator (DST)
6. Radio signal strength Indicator
7.
Da
yoft
heweek
8. Moon Phase
9. Month
10.Date
11.
lndoortemperature display
12
.0utdoor temperature display
7
13
.Low battery indicator (outdoor sensor)
14
.
Alarm1
/Alarm2 time display
15
.
12124
Hour Indicator
15
5 4
6
ALM1!h
•
ll)Al.M2
I
PM'~,.~'"
iT
l(·)Qsg
'"
MOOH'HJ.SI!
·r1
'f
Cl
I l.J :
3"~5
0
8
10
®"Tl.UP
-.
='·
·~
F
'f
·
~
'"
-.
-·
~
•
:ti=
""
i'
.3n
..
,.
u
14
INSTALLING OR REPLACING THE BATTERIES
11
12
13
Important:
Be
sure
to
install
the
batteries
in
the
remote
outdoo
r
tempe
r
ature
sensor
first
before
installing
the batteries in the
clock
. Alka line batteries are
recommended
for
both
the
sensor
and
I.be
clock
.
To i
nstall
the
batteries
in
the
remote
outdoor
temperature
sensor
:
Begin
by
unsc
re
wing the battery
co
mpartment ccver on
the
back of the sensor (as shown
in
the
below diagram)
Insert two AAA batteries (not inc
lud
ed) into the battery compartment and make sure the polarity is
correct by
following the(+
or-)
symbols engraved inside.
Make
sure
that
the
outdoor sensor is setto Channel 1 (inside
the
battery_
ccmpartment there is a
switch with three different
channel options). You MUST set the switch to
Channel
1.
Replace
the
battery ccmpartment ccver.
When the batteries
in
the
sensor beccme low, a
low
battery indicator symbcl will appear below
the
channel indicator
on
the
clock display
(see
the
diagram abcve).
To
install
the
batteries
in
the
clock:
Begin by opening
the
battery ccmpart
me
nt ccver on
the
back of
the
clock (as shown in
the
be
low
diagram)
Insert three
AAA
batteries (not included) into
the
battery ccmpartment and make sure the polarity
is correct by following the(+
or-)
symbols engraved inside.
Replace battery compartment ccver door.
Replace the batteries whenever the display becomes dim or difficult
to
read.
Battery
Warning
:
Set Switch to
Channel
1
Do not use rechargeable batteries.
Non-rechargeable batteries
are
not to
be
recharged.
Different types
of
ba
tteries or new and used batteries are not to be mix.
Only batteries of the same or equivalent type
as
recommended are
to
be
used.
Batteries are to
be
inserted with
the
ccrrect polarity.
Exhausted batteries are to be removed from the product.
The supply terminals are
not
to be short-circuited.
Do
not dispose of batteries
in
fire; batteries may explode or leak.
Ad
ult assembly r
equ
ired
to
replace a
nd
remove batteries.
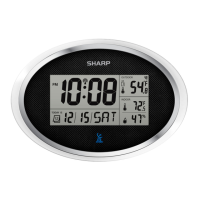
SELECTING
THE TIME ZONE
The
default time zone is
Pa
cific Zone. If your location is not
in
the Pacific Time Zone, please
choose the correct time zone by pressing
the
[SEARCHITIMEZONE]button: P =Pacific,
M =Mountain,
C =Central, E
=Ea
stern.
RADIO
CONTROL
ED
TIME FEATURE
Once the batteries are installed, the clock will begin
to
seek out
the
radio signal
to
update the time.
Th
is
typica
ll
y takes
aproxi
mn
rty
20
minutes
in
good conditions. If after 20 minutes the sign
al
has not
been received, we
re
co
mmend that you set the time manually.(See the section entitled 'Setting the
Time
Manually'
.)
After
th
e first signal is received,
the
clock
wi
ll
automatically seek out the atomic clock
signal
from
Fort
Collins,
Co
lorado
each
evening
at
2:00AM & B:
OOAM
,
and
each
day
at
2:00
PM
&
B:OOPM
and
continues
to
do
so
each
day.
SETTING THE
TI
ME
MANUALLY
NO
TE:
It
is
reccmmend
ed
that
for
the
first
use
of
the
clock,
you
set
the
clock manually and
then
allow
---
the
Radio
Control
signal
to
update
the
nme
Setting
each
day.
To
set the time press and hold down the [TIME-12124HR] button
for2
seconds, and release
button when
the
hour digi
ts
will begin to blink.
While
the hour is blinking press the [ADJUST/CHANNEL] button until you
rea
ch the desired
hour.
Be
sure
to
set
the
time
to
the
ccrrect
AM
or
PM
hour shown by
the
indicator
to
the
left of
the
time
Press the [TIME-12/24HR] button again and
th
e minutes
wi
ll
begin
to
blink. While the minutes
are
blinking press the [ADJUST/CHANNEL] button unt
il
you rea
ch
the desired minute.
Once you have
se
t the desired time press
the
[TIME-12124HR] button again. The time
is
now
set and
will return to normal time keepi
ng
mode.
Note:
In
normal lime keeping mode, pressing
the
[TIME-12/24HR] button will toggle between the
12
and
24
hour formats. When
yo
u are
in
the
24
hour format a
24
hour i
ndi
cator symbcl will appear
abcve
the
time.
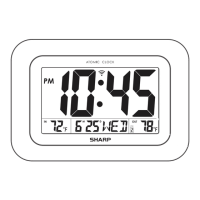
SETIING
THE
CALENDAR
·1nr1r
~
®-
-·(!·
1-
F
-
(Lf
U)
~
'I'
...
~
~
-·3
~
'
1:
1. Year
2.
Day
3. Moon phase
4. Month
TfJE
Ct
3"25
"
~
~
,"3"
,.
u
5. Date
6. Daylight Savings Time
Ind
icator
I I
I I
To
set the
ca
lendar, press and ho
ld
cbM1
th
e{CALENDAR-C/F] button for 2 seconds and
release button when
th
e year will begin
to
blink (see
the
diagram above)
Wh
il
e the year is blinking press the [ADJ UST/CHANNEL] button until the clock displays the
correct year. Note: This
clock
ha
s a perpetual calendar that extends to
the
year 2049.
If
you
mistakenly go past the ccrrect year just
co
ntin
ue
to
press
the
ADJUST/CHANNEL button and
the
year will cycle back
to
2000.
Press the [CALENDAR-C/F] button again,
and
the month will begin
to
bl
ink. While
the
month
is
blinking press the [ADJUST/CHANNEL] button until you reach
the
correct month.
Press the[CALENDAR-C/
F]
button again, and the date will begin
to
blink. While the date is
blinking press the [ADJUST/CHANNEL] button until you reach the correct date.
Note
:
The
da
y of
the
week
and
the
moon
phase
wi
ll
adjust themselves a
ut
omati
ca
ll
y depending
on
what
ye
ar, month & date
yo
u
en
ter.
Once
you
ha
ve
set
the
cale
ndar press
the
[CALENDAR-C/F]button again. The calendar
is
now
set
and
the clock
wi
ll return
to
normal lime keeping mode.
ABOUT
THE DAYLIGHT SAVINGS TIME (DST)
This clock
has
been
pre-programmed to automatically switch when daylight savings time is
in
effect. Your
clock will show "DST"
on
the display during this time (see the diagram above).
Please note: With
the
pre
-pr
og
rammed DST f
eatu
re, if you live
in
an
area where Dayl
ig
ht Savings Time
is not observed, the lime
display on your clock
wi
ll read+/- one hour during the DST lime period.
SETTING THE ALARM
In
normal time keepi
ng
mode, press
the
(ALARM1/ALARM2] butt
on
to
toggle between
both
Alarm 1 lime and Alarm 2 time
In
lo
w
er~ght
portion of
the
display.
Press
the
(ALARM1/ALARM2] button until
the
alarm
yo
u would like
to
set
(1
or 2) is shown
on
the
display.
To
set the alarm time, press and hold
the
[ALARM1/ALARM2] button for 2 seco
nd
s.
Th
e alarm
hour will begin
to
blink.
While
the alarm hour is blinking press the [ADJUST/CHANNEL] button until you reach the
desired
alarm hour.
Be
sure to set the alarm lime
to
the correct
AM
or
PM
setting shown by
the indicator
to
the left of
the
alarm time (see
the
diagram above) ·
Press
the
[ALARM1/ALARM2]bu
tton
again
and
the al
arm
minutes will begin to blink. While
the
alarm minut
es
are blinking press the [ADJUST/CHANNEL] button until you reach the desired
alarm minute.
Once you have set the desired alarm time press
th
e [ALARM1/ALARM2]button again. The
alarm time is now set and
the
clock
wi
ll return
to
normal time keeping mode.
Note: To set
the
2
'"
alarm press the [ALARM1/ALARM2] button until
the
2
"'
alarm time is shown
on
the display. Follow the steps above
to
set the 2
'"
alarm time.
1. Alarmnme
2. Alarm 1
ON
Indicator
3. Alarm 2
ON
Indicator
4. AlarmAM
5.
Alarm
PM
6.
Al
arm
(1
/2) Time Indicter
USING THE
ALARM
AND
SNOOZE FUNCTION
To
activate alarm
1,
press the[ALARM 1 ON/OFF] button. The following symbol will appear
above the time (ALM 1
(
11.,11
)
To
activate alarm 2; press
the
[ALARM 2
ON
/OFF]button. The following symbol will appear
above the lime
(1
11
•111
ALM2)
To deactivate
ei
ther alarm, simply press the [ALARM 1
or
ALARM 2 ON/OFF] buttons and
the
symbcl above the time will disappear.
Note: The snooze function will be on automatically after activating the alarm.
To
activate
the
snooze function when the alarm sounds, ju
st
press
the
[SNOOZE/LIGHT] button.
The
alarm
will
stop sounding
and
then
sound
again
in
9 minutes. This
can
be
repeated
up
to
4 times
after which the
alarm will not sound again until
the
following day.
When the
Ala
rm
sounds, the
LED
backlight will stay on for 5 seconds.
UNDERSTANDING
THE DIFFER
ENT
MOON PHASES
Your
clock will
show
you the phase in which the moon is in that day. Below are the different moon phases
that can be displayed:
[]
[]]
[J [i] i
iJ
[]
[]
NEW
r.tOON
WAXING
CRESCENT
FIRST
QUARTER
WAXING
GIBBOUS
AA.I.
MOON
WANING
GIBSOUS
I.AST
QUARTER
WAN!NG
CRESCENT