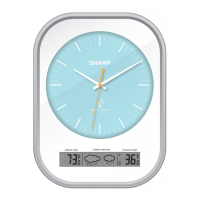
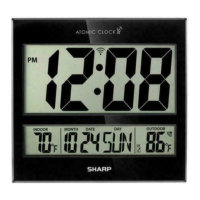
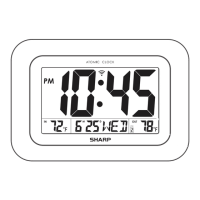
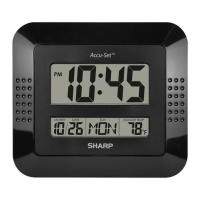
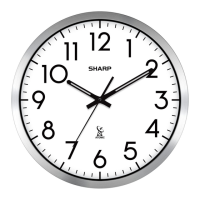
Atomic QA Wall Clock
Instructions & Warranty
Thank you for your purchase of this quality clock. The utmost care has gone into the design and manufacture of your
clock. Please read these instructions and store them in a safe place for future reference.
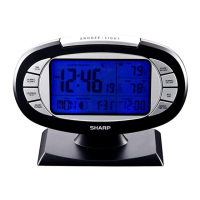
The receiver unit has a clear, easy-to-read display that shows indoor temperature, outdoor temperature and 12
hour weather forecast.
The remote sensor transmits the outdoor temperature. To receive the outdoor temperature,
place the sensor anywh
ere within 100 feet ; the 433.92MHz technology means no wire installation is required.
The Atomic Clock will always be accurate to within one second as it receives daily WWVB updates. Daylight Saving
Time also automatically updates so there is no need to re-set the clock manually!
The clock has a built in receiver that automatically synchronizes itself with the WWVB radio signal broadcast by the
US Governme
ntís National Institute of Standards & Technology (NIST) in Fort Collins, Colorado.
IMPORTANT: If the Atomic Clock does not receive the WWVB signal immediately, wait overnight and it will be
set in the morning.
FEATURES:
Atomic QA Clock
1
The WWVB radio
signal daily broadcast ensures that the atomic clock will always display the most ac
curate date and time.
. QA Clock:
2. LCD WEATHER FORECAST DISPLAY
3. BATTERY COMPARTMENT AND DOOR:
- Before inserting the battery, select the Time Zone and
and stop at zero position (12:00), and then the minute and hour hands will start running and
Then, the clock begins to receive the Atomic time signal automatically and it will take 3 - 10
receive the signal, the hands will find their correct time and work normally.
1. The unit will a
utomatically search for the time signal at 2:16am, 4:16am, 2:16pm, 4:16pm.
2. Closed area such as airport, basement, tower block or factory is not recommended.
3. While the atomic signal is flashing, the control panel is inactive.
- Displays indoor/outdoor temperature and 12 hour weather forecast;
- Use 2 x AA size batteries
NOTE:
REC
WWVB
M.SET
Chan nel
Reset
C / F
REC
WWVB
M.S ET
1
2
4
5
6
3
7
9
10
11
12
13
14
8
- In normal mode, press the button to switch the between channel 1, 2 and 3 to receive the 433.92MHz signal;
press and hold the button for 3 seconds to pair with the outdoor remote sensor.
In case of malfunction, press RESET button to reset all values to default values.
- In normal mode, press and hold the M.SET button, second hand will stop and enter into manual setting. Keep
pressing the M.Set button, the minute hand will run quickly. Release the button to exit the manual setting and
the clock will start running within a few seconds.
- In normal mode, press and hold the REC button, the hands will stop running and enter into Force Receiving
mode. It will start receiving the Atomic time signal within 10 minutes. Once received the signal successfully,
the clock hand
s will found the correct time and run normally. Otherwise, it will return to the time before Force
Receiving. If the Atomic signal is not received wait over night and it will be set in the morning.
- Before insert the battery, select the DST mode. The clock has programmed to automatically switch when the
daylight saving time is in effect.
- Before insert the battery, select the correct time zone. The default time zone is P (Pacific Time). If your location
is not in
the Pacific, slide the time zone switch to M (Mountain Time) / C (Central Time) / E (Eastern Time) zone.
- Function same as No. 9
- Function same as No. 8
- Use 1 x AA size battery
5. Channel BUTTON:
6. Reset BUTTON:
7. WALL MOUNT
8. M. SET (Manual Set) BUTTON:
9. REC (Force Receiving) BUTTON:
10. DST ON/OFF SWITCH:
11. TIME ZONE SWITCH:
12. REC BUTTON:
13. M. SET BUTTON:
14.
BATTERY COMPARTMENT AND DOOR:
-
NOTE:
LCD WEATHER FORECAST DISPLAY
1.The accuracy of a general pressure-based weather forecast is about 70% - 75%.
2.The weather forecast is meant for next 12 hours. It my not necessarily reflect the current situation.
3.The “Sunny
“
icon, when applied to nighttime, implies clear weather.
4. BUTTON:
- In normal mode, press the butt n to switch temperature unit °C/°F.
°C/°F
Sunny, Sunny Intervals, Cloudy, Rain, Rain + Thunder, Snow
DST mode (Daylight Savings Time) . Once battery is inserted, the
second hand will run
stop at zero position.
minutes. If successfully
Sunny
Sunny Intervals
Cloudy
Rain
Rain + Thunder
Snow